
It’s no coincidence that many packages utilizing synthetic intelligence methods are open supply and thus fully free. This is as a result of the early approaches originated in academia, the place free licences for software program are widespread observe with the intention to promote collaboration and additional growth.
Here, nevertheless, it’s not about frameworks and libraries for types of AI, however about tangible and helpful purposes of synthetic intelligence on your personal pc. The time period AI encompasses varied strategies reminiscent of neural networks, machine studying, deep studying, or pure language processing. In the next compilation, all these approaches are represented.
Further studying: How to make AI art
The fashions matter
The varied approaches to sample recognition, machine-processed determination timber, and automation of duties are constructed on coaching information and fashions which are already prepared. The availability of this information is likely one of the explanation why helpful AI methods can be found in freely out there software program as we speak in any respect.
Models typically take years to develop, and there are sometimes terabytes of uncooked information to judge. But with the rising computing energy of widespread PC {hardware}, the event of AI fashions and the evaluation of coaching information has accelerated in recent times, making it doable for smaller analysis groups.
The following compilation is concerning the sensible advantages, i.e. the implementation of strategies primarily in free software program for Windows, which present effectively how far the know-how has now progressed with out excessive set up prices.
This can also be because of open supply developments — as a result of with Pytorch, a deep studying framework from Facebook and Microsoft has been out there since 2016, which has made a reputation for itself primarily in analysis and in free software program initiatives with its APIs for Python and C++. Tesla’s Autopilot, amongst others, can also be primarily based on it.
The second huge widespread and free framework is Tensorflow, which comes from Google and delivers a decent binding to the Google Cloud, but additionally many libraries for private use.
It is these two frameworks whose synthetic intelligence largely flows into the packages introduced right here by way of the connection of algorithms and information fashions, or was essential of their growth.
Final 2x – Enlarge picture sizes
Well enlarged: Final 2x runs with any CPU and GPU. This pixelated graphic (left) has been enlarged to 4 instances its unique dimension (proper) by the algorithm Waifu 2x.
IDG
Scaling bitmap graphics by merely enlarging their pixels all the time results in a extreme lack of high quality. With Final 2x, enlarging bitmaps doesn’t need to be lossy. The program Final 2x succeeds in upscaling graphics and smoothing them all the way down to the final element with the assistance of neural networks and the fashions provided.
With the algorithms Real Cugan, Real Esrgan, Waifu 2x and SRMD, Final 2x supplies 4 methods to scale photographs for the perfect outcomes. The program may also considerably enhance pixelated photographs in JPG format with noise and robust artefacts.
Installation: Final 2x can also be in the beginning of our helpful instruments assortment as a result of it is extremely simple to put in beneath Windows after which instantly invitations you to experiment efficiently. There are additionally no particular {hardware} necessities, as a result of the neural networks and algorithms utilized in Final 2x run on Nvidia, AMD, and Intel chips. An built-in GPU can also be sufficient.
As with all AI and neural community instruments, nevertheless, the identical applies right here: Quite a lot of RAM helps. For Windows, the developer supplies the handy installer Final2x-windows-x64- setup.exe (260 MB) on his Github page, which completes the setup with only a few clicks.
Hereʼs the way it works: After beginning, Final 2x presents an enter area that accepts these picture information in JPG or PNG format that it’s to upscale by dragging and dropping. A click on on the cogwheel image on the backside left opens a web page with settings. Under Device, the CPU/GPU for the calculation could be chosen, if a number of can be found.
The Model determines the picture high quality. The algorithm Real-ESRGAN could be very effectively fitted to images, whereas Waifu 2x is specialised for drawings. The scaling issue is set by the Custom Scale area. It can also be all the time advisable to activate the choice TTA with the intention to receive well-denoised outcomes.
In the primary window, Start begins the calculation, which may take a number of minutes for advanced photographs.
Meshroom – 3D scanner for smartphones
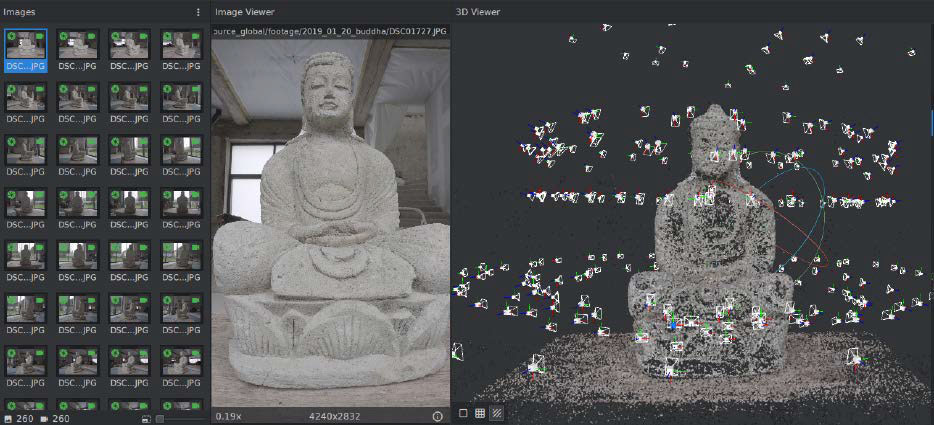
Welcome to the three-dimensional world: Meshroom creates a 3D grid from images of actual objects for additional processing in CAD packages and 3D fashions reminiscent of Blender.
IDG
A 3D scanner scans actual objects with lasers and creates a file from the info for additional use in CAD and animation packages. What sounds very advanced is definitely doable on a small scale with standard smartphones or digital cameras and the free software program Meshroom. It relies on the photogrammetric libraries of the developer Alicevision, is on the market beneath an open supply license, and for Windows (64 bit). From the evaluation of picture collection, it calculates the form of a photographed object and creates a grid file.
Installation: Because of the Cuda interface required for calculations, Meshroom requires an Nvidia graphics card with help for no less than Cuda 2.0. The table here reveals which playing cards this is applicable to. The Cuda drivers from Nvidia for Microsoft Windows have a obtain dimension of 3GB.
Once the Nvidia {hardware} is about up, you may set up Meshroom (1.3GB). With AMD graphics playing cards and Intel chips, Meshroom solely works within the much less exact sketch mode. Those with endurance for calculations can check an alternate model of Meshroom with out Cuda.
This is how itʼs completed: When photographing the article to be scanned, it will be important that it’s as indifferent as doable in an empty room. Dozens of photographs are wanted from all sides at totally different angles with a excessive depth of area and with out blurring. It is essential to not use a picture dimension of greater than 10 megapixels. The information are then dragged into the left-hand Images space in Meshroom to start out the calculation, which takes a number of hours even on Nvidia playing cards.
For additional optimization of the mesh, 3D software program such because the free program Blender is then advisable.
Kdenlive – Object monitoring by way of AI
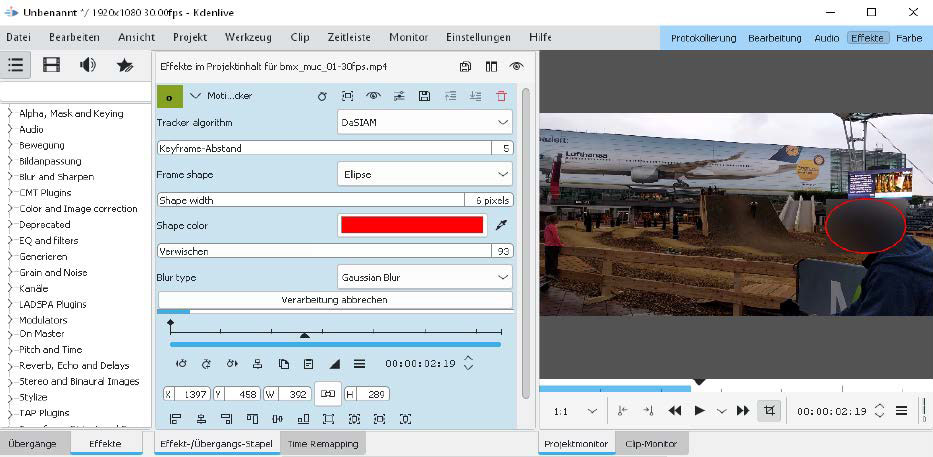
Tracking an object: The movement tracker “DaSIAM” within the newer variations of the video editor works with KITechniques and might, for instance, make faces unrecognizable by blurring.
IDG
This free video editor has been in a position to give you AI aids for 2 years now. Motion monitoring, i.e. automated object monitoring in video clips, can present acknowledged motifs with a masks after which apply focused results to them. This is helpful, for instance, to pixelate sure objects in a video clip.
Installation: Kdenlive is on the market as open supply for Windows in 64 bit as a setup file (100MB) and is thus shortly put in. In addition, the mannequin information for the movement monitoring algorithm at the moment are added. These are three information “dasiamrpn_ kernel_cls1.onnx“, “dasiamrpn_kernel_r1.onnx“, and “dasiamrpn_model.onnx” from the Kdenlive builders. All three information have to be positioned within the set up listing of Kdenlive. To do that, enter the tackle %AppData%/kdenlive within the tackle bar of Windows Explorer and create a brand new subfolder known as opencvmodels. The three downloaded mannequin information are then positioned there.
This is how itʼs completed: In Kdenlive, the movement tracker is on the market as an impact. To use it, place an imported clip from the listing on the high left within the timeline under, swap to the Effects tab within the center menu bar and choose Alpha, Mask and Keying — Motion Tracker there. Dragging the impact onto the specified clip opens the settings for the impact and shows a purple sq. within the preview window. In the settings, the kind DaSIAM ought to be chosen as Tracker algorithm. In the timeline, go to the primary body, place the purple choice body across the object after which click on on Analysis to calculate the keyframes across the object. Pixelation, for instance for faces, may also be chosen instantly.
Spleeter – Splicing music into tracks
Skilfully deconstructed: Spleeter is a command-line software that makes use of AI and in depth fashions to interrupt down music information in MP3 format into particular person tracks with remoted devices.
IDG
This is how ready-mixed items of music change into particular person tracks once more: The AI software Spleeter already obtained a number of consideration two years in the past after its first presentation. It can divide music in MP3 format into two, 4, or 5 particular person tracks utilizing pre-trained fashions.
Spleeter acknowledges classes reminiscent of vocals, bass, drums and rhythm part. The command-line software makes use of the AI library Tensorflow to investigate the info stream in music items and the encoder Ffmpeg to separate the remoted tracks into particular person MP3 information.
The AI software and the coaching of the fashions come from the French streaming service Deezer, which was allowed to make use of the big, licensed catalogue of pop music as evaluation materials for sample recognition. This coaching information can also be out there free of charge personal use, however have to be put in individually.
Installation: Thanks to its recognition, there’s a Windows model of Spleeter that saves the tedious set up of the person Python program parts. This compact port for Windows is on the market by way of the package deal supervisor Chocolately, which first waits to be arrange. To do that, first go by way of the Start menu to the Windows Power Shell, which opens with a proper click on and the choice Run as administrator. In this command line, the command:
Set-ExecutionPolicy AllSignedallows the execution rights with the entry “j”. Then the command:
Set-ExecutionPolicy Bypass -Scope Process -Force; [System.Net.ServicePointManager]::SecurityProtocol = [System.Net.ServicePointManager]::SecurityProtocol -bor 3072; iex ((New-Object System.Net.WebClient).DownloadString('https://chocolatey.org/set up.ps1'))installs the Windows package deal supervisor Chocolately.
Then the package deal supervisor can set up Spleeter within the Powershell with this enter:
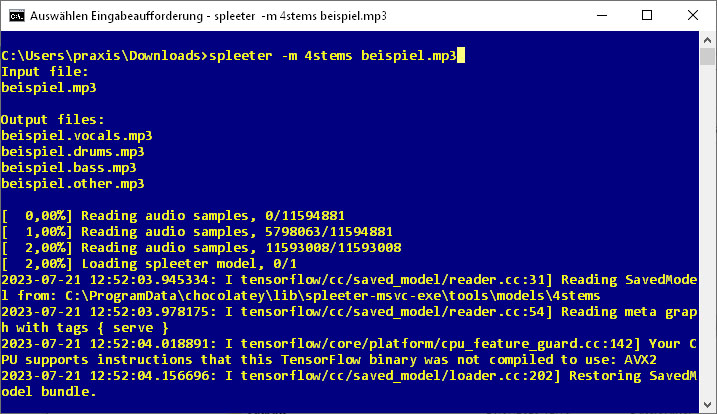
choco set up spleeter-msvc-exeNow the set up of the coaching fashions is critical. For this goal, the batch file “download_models.bat” is used within the newly created listing “C:ProgramDatachocolateylibspleeter-msvc-exetoolsmodels”, which can also be known as within the Powershell and downloads about 1.2GB of information — no small matter. Finally, Spleeter requires the set up of the Visual C++ Redistributable from Microsoft.
This is how itʼs completed: Once all of the steps have been accomplished, you may proceed within the Powershell or within the command immediate. The name:
spleeter.exe datei.mp3splits an current MP3 file within the present listing into vocals and devices, which it locations within the folder as particular person MP3 information. This is the only utility instance, which additionally takes just a few seconds of computing time on a present PC with common efficiency. In typical pop music, nevertheless, Spleeter acknowledges extra tracks for isolation, reminiscent of drums and bass.
spleeter.exe -m 4stems datei.mp3In this instance, Spleeter makes use of its sample recognition to seek for 4 particular person tracks in a chunk of music, particularly vocals, bass, drums, and rhythm/accompaniment. The calculation takes a bit longer till these tracks are written to the working listing as particular person MP3 information.
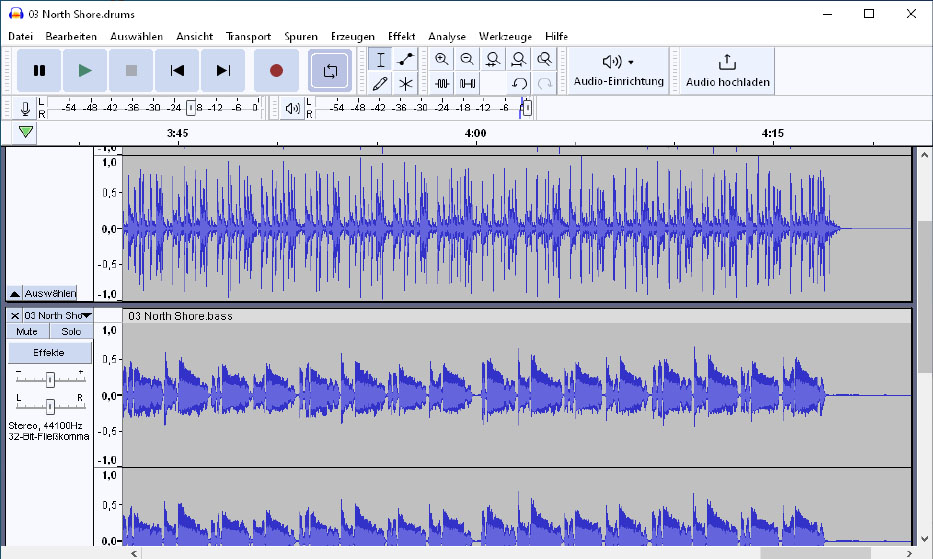
A take a look at the tracks created within the audio editor Audacity: Spleeter works very exactly in separating devices and vocals, however cuts off excessive frequencies within the course of.
IDG
If within the piece of music at hand the accompaniment has a strikingly distinctive function, Spleeter may also use this command to separate it into 5 tracks, which works greatest with vocals, bass, drums, piano, and rhythm part:
spleeter.exe -m 5stems datei.mp3Skilfully deconstructed: Spleeter is a command-line software that makes use of AI and in depth modelling to separate music information in MP3 format into particular person tracks with remoted devices.
Microsoft Edge – Enhance photographs
With its personal information facilities behind it, Microsoft is engaged on equipping on a regular basis packages with as many AI methods as doable. What is helpful in the long term stays to be seen. Undoubtedly, the brand new capabilities of the Edge net browser to routinely upscale photographs and even movies ship very good outcomes on high-resolution screens.
Installation: Although Microsoft Edge is already pre-installed on Windows, the browser’s AI methods for picture enhancement are solely out there within the developer model of Edge. The setup file of this public preview model of the Microsoft browser is on the market.
This is how itʼs completed: the browser doesn’t do the picture enhancement regionally by itself pc, however sends the pictures to Microsoft servers, the place they’re extrapolated and despatched again to the browser. This implies that Microsoft is aware of and can consider which photographs customers retrieve on the internet. This AI choice is subsequently not activated by default. Instead, the perform continues to be ready to be activated on the choices web page beneath the tackle edge://settings/privacy/enhanceImages by way of the displayed swap.
There, this perform may also be activated particularly for particular person web sites. Only within the alpha variations of Microsoft Edge known as Canary is the AI perform out there, additionally to enhance blurred movies as much as 720p decision with the assistance of its personal GPU. This AI methodology in Edge requires newer graphics chips from AMD or Nvidia along with appropriate proprietary drivers and doesn’t ship the info to Microsoft servers.
Vosk – Speech recognition by way of AI
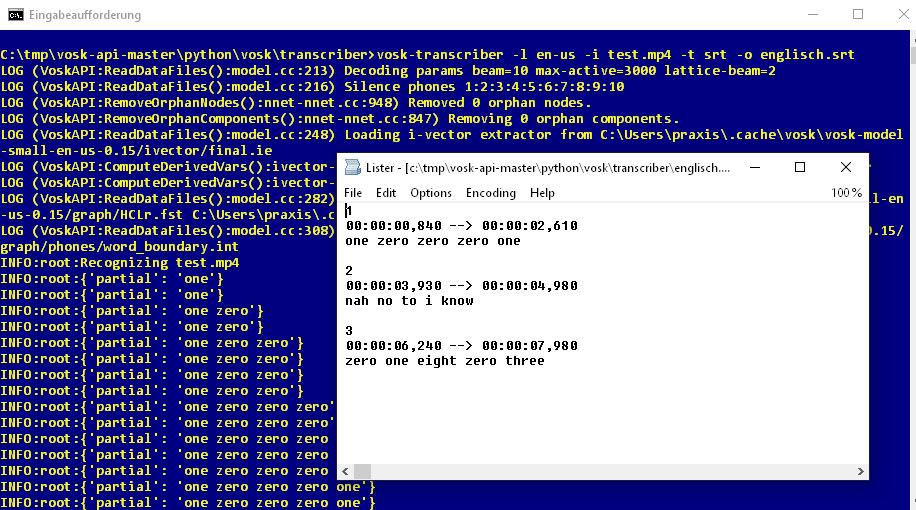
From spoken language to subtitles: In this instance, we let Vosk acknowledge the audio monitor of an English-language YouTube video in MP4 format. The result’s this SRT file.
IDG
From the spoken, recorded phrase to a clear transcription will not be a great distance off as we speak. The AI framework Vosk, which relies on the speech recognition engine Kaldi, is an open supply challenge of Johns Hopkins University.
Installation: Vosk requires Python 3.11 on Windows. During set up, the checkbox Add Python to PATH have to be activated. In the command immediate, the 2 instructions:
pip set up ffmpeg
pip set up vosk
set up the stipulations for Vosk. Next, the encoder/decoder Ffmpeg is required within the type of the file “ffmpeg-git-essentials.7z“. The archive content material is positioned within the newly created listing “C:Program Filesffmpeg” in order that the file “ffmpeg.exe” is situated there within the subfolder “bin”. Now the trail “C:Program Filesffmpeg|bin” have to be added to the Windows surroundings variable “Path”. This could be completed by way of Windows icon > Settings > System > Advanced system settings > Environment variables > Path > Edit > New.
This is how itʼs completed: Then go to the Github web site http://github.com/alphacep/vosk-api to obtain some pattern scripts beneath Code – Download ZIP, that are unpacked into any listing. There, within the subfolder “pythonvosktranscriber”, one can find the instance script “transcriber.py”. With the decision:
vosk-transcriber -l en-us -i check.mp4 -t srt -o englisch.srtit creates the subtitle file “english.srt” from the video file “test.mp4” by speech recognition with timestamps. The script routinely downloads an acceptable language mannequin. The completed file can then be additional processed in different translation packages to subtitles in one other language.
Digikam – Face recognition for photographs
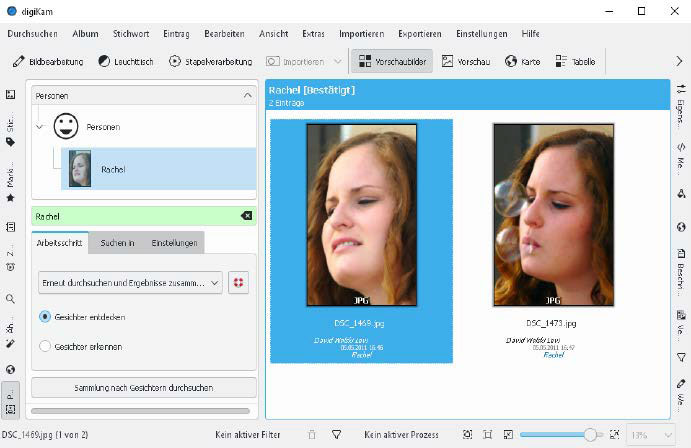
Digikam acknowledges faces: From the pictures of the scanned photograph assortment, the photograph administration creates an area individual database after which permits tagging and trying to find individuals.
IDG
Digikam, a program for database-supported group of enormous photograph collections that has been in fixed growth for greater than 15 years, was initially developed for Linux and is usually ported to Windows. This is as a result of Digikam’s capabilities are appreciable: In addition to sorting and categorizing images by albums, tags, and key phrases, there are superior sorting choices. Face recognition and the automated grading of the picture high quality of photographs are two newer options of the photograph administration which are primarily based on AI.
Installation: Digikam is well put in in Windows with 64 bit by way of a setup program (114MB). The set up program asks for some particulars with wise default settings for the setup. After the primary name of Digikam, this system then independently suggests downloading the required AI mannequin information for the included face recognition, which quantities to round one other 420 megabytes.
This is how itʼs completed: Digikam has been experimenting with face recognition in photographs primarily based on neural networks since model 2.0. But solely since model 7.2 has this AI know-how been in a position to show itself in observe in Digikam. After opening a photograph, the picture show reveals the image of an individual with a plus image. This is used to manually mark a face with a variety rectangle and provides it a reputation.
This is repeated for a number of extra footage with the individual, whereby the title is then chosen from the displayed listing. The entire photograph assortment can then be searched for a similar individual by way of the menu merchandise Search > People.
Hugin – Panoramas from photograph collection
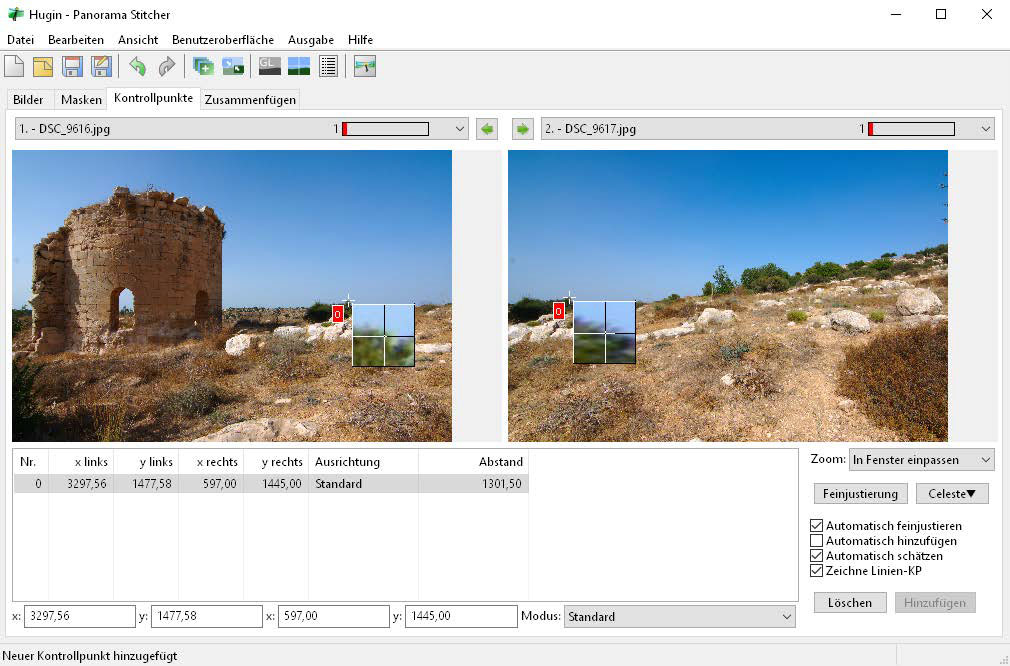
Combines photograph collection routinely by sample recognition: Hugin calculates a surroundings or a panorama picture from collection of neighboring footage. The management factors proven right here assist on this course of.
IDG
And one other software for photographs that saves many hours of tedious picture processing and permits for fully new sceneries in panorama pictures. The program Hugin creates panorama photographs from overlapping collection of single photographs. Panoramas are notably interesting in panorama pictures to seize dramatic moods. This has additionally been doable with smartphone apps for a number of years. Hugin, nevertheless, permits exact management over the consequence and may also mix particular person photographs in vertical rows.
Installation: Hugin is a Windows program and easily must be unpacked from its ZIP archive into any folder. The executable file could be discovered as hugin.exe within the subfolder “bin”.
This is how itʼs completed: Hugin is a software for superior customers and also you shouldn’t be at a loss for prolonged experiments till all of the features of this system have been explored. It is advisable to start out with small panoramas consisting of two particular person photographs added to the Images tab. For good outcomes, you need to all the time manually add the focal size from the metadata of the person photographs. Added management factors between overlapping photographs by way of the tab of the identical title enhance the consequence significantly.
Subsync – Synchronize subtitles
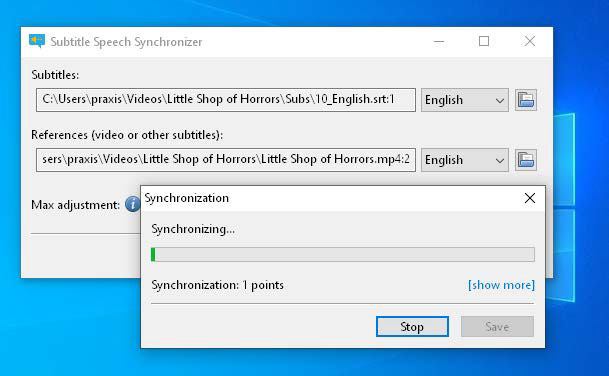
Calculate time codes in subtitle information to match the video: Subsync makes use of speech recognition by way of the built-in Python module Pocketsphinx and analyzes the required video file.
IDG
Cinophiles favor movies and collection within the unique model with out dubbed dialogue. A subtitle monitor is however useful — and essential anyway for unknown languages.
Websites like opensubtitles.org present subtitles for collection and movies in codecs that media gamers like VLC can deal with. The problem right here is usually discovering an acceptable subtitle file that runs in sync with the video file at hand. If the subtitles don’t match the spoken phrase within the movie, the enjoyment of the movie can even fall by the wayside.
The free software Subsync can repair this: With speech recognition and synthetic intelligence, it synchronizes the subtitle file with a video file.
Installation: Here, too, no lengthy excursions into the command line are essential. On the challenge web site at https://github.com/sc0ty/subsync/releases, there may be an installer and a conveyable model for all Windows variations with 64 bit for obtain (free, 42MB).
Calling up this EXE file unpacks this system right into a subfolder through which this system file can then be discovered.
This is how itʼs completed: In this system interface, the trail to the subtitle file in SRT format is entered within the higher area Subtitles, and the language of this file have to be entered subsequent to it. Below this, the sphere References expects the video file, and the choice subsequent to it, the language.
After clicking Start, Subsync will then obtain the suitable dictionary information for the chosen languages, which quantities to a number of dozen megabytes.
After that, synchronization begins primarily based on matches discovered, and Subsync rewrites the timestamps of the SRT file to do that
This article was translated from German to English and initially appeared on pcwelt.de.