
Adobe Photoshop’s enormous number of Artistic Filters can’t probably be coated in a single story, however we will present you a few of our favorites that can assist you get began. The actual enjoyable begins while you study to combine them into new and much more astounding results, comparable to Fresco and Paint Daubs collectively, or Poster Edges with Watercolors.
In this story we’ll introduce, clarify, and present examples of those superb options. Click the hyperlinks within the checklist under to get to particular creative filters:
What are Photoshop’s Artistic filters?
In a nutshell, Photoshop Artistic filters are computerized, creative methods (or particular results) that allow you to create pictures that simulate creative types comparable to coloured pencils, watercolors, chalk pastels, charcoal, pen and inks, crayons, and dozens of different creative media. In the present model of PS, there are over 225 particular results filters.
Six classes of filters can be found within the Filter Gallery: Artistic, Brush Strokes, Distort, Sketch, Stylize, and Texture, with dozens of filters inside every class. There are additionally 16 further filter classes beneath the Filter menu, with but extra filters inside these classes.
How do Photoshop’s Artistic filters work?
Each filter creates a number of creative results with a number of, customized settings per impact. They’re all completely different. The filters are situated beneath the Filter tab on the principle PS menu. There have to be an open picture for this menu choice to perform.
For the Artistic filters, choose Filter > Filter Gallery > Artistic Filters. Scroll by the 15 filter choices and select one that matches your mission, or flick through the remainder of this text to study all about these options.
Notice the codecs: The Settings (identify and vary) are outlined as soon as at first of the primary paragraph. The following examples checklist the consumer’s chosen vary (inside parentheses). Images are recognized as (TL = prime left), (TR = prime proper), (BL = backside left), and BR (backside proper).
All concerning the Artistic filter Colored Pencils
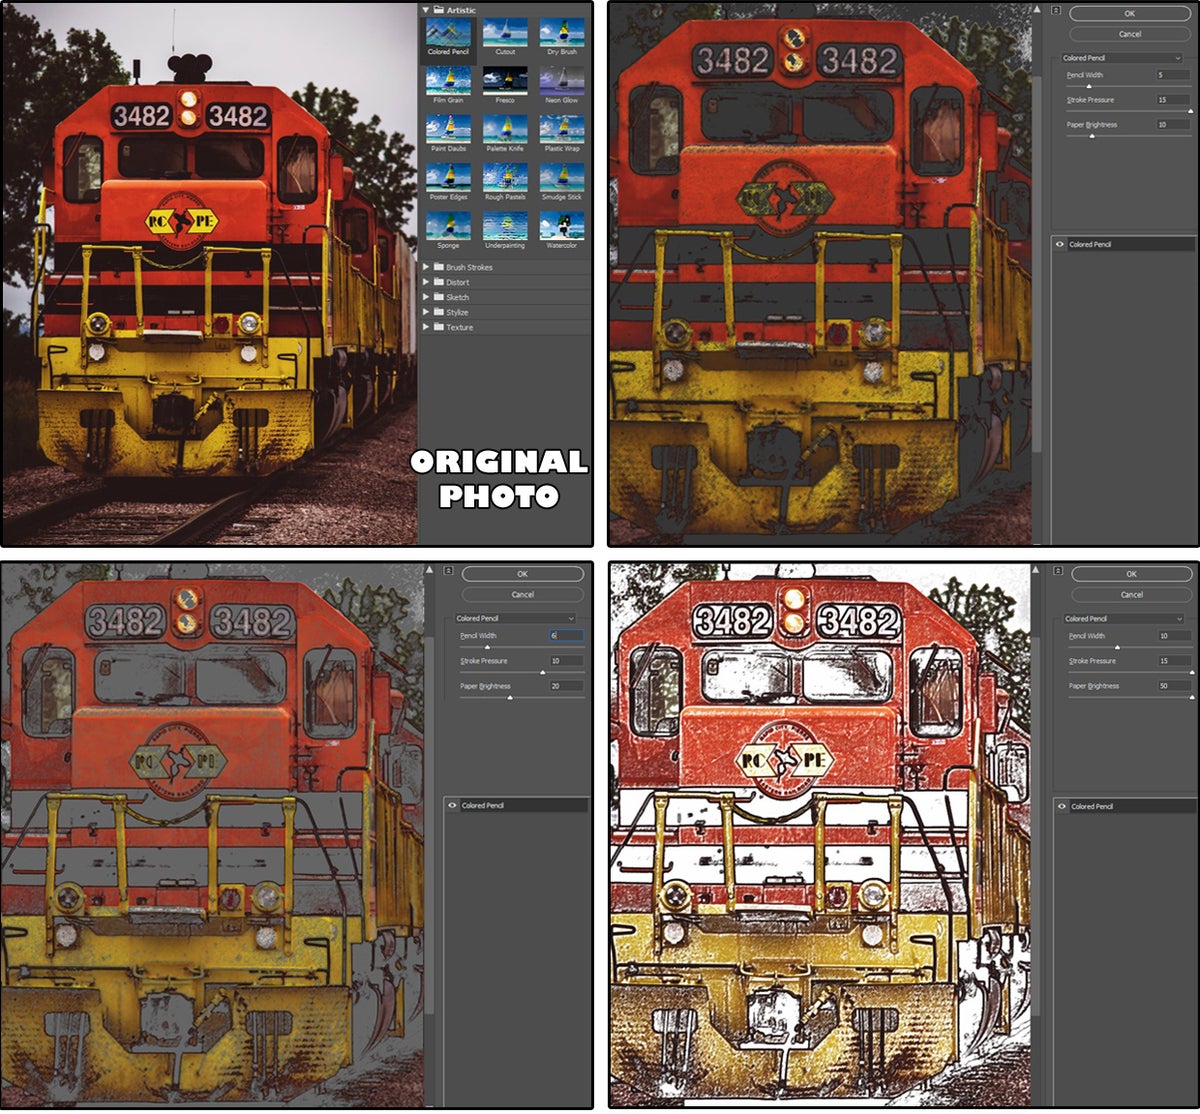
The colored-pencil filter works greatest on pictures with a number of, shiny colours. Choose a picture, then choose Filter > Filter Gallery > Artistic Filters > Colored Pencils. The customizable settings embrace Pencil Width (1 through 24), Stroke Pressure (0 through 15), and Paper Brightness (0 through 50). Notice the examples in determine 01 Colored Pencils.
The first picture (TL) exhibits the unique picture. The second picture (TR) has darker colours with a skinny, lighter stroke (5, 15, 10). The third picture (BL) mutes the colours and will increase the stroke barely (6, 10, 20). And the fourth picture (BR) maximizes the stroke and the brightness/distinction (10, 15, 50). These are all efficient for creative functions; nonetheless, if mixed with different filters, outcomes are superb.
 JD Sartain / IDG
01 Colored Pencils filter
If you want a top level view of your picture, most artists use Filter > Stylize > Find Edges. If that answer is unsatisfactory; enhance the distinction in your picture (comparable to Image > Adjustments > Brightness/Contrast > Contrast 75), then apply the Colored Pencils filter (15, 15, 50), which supplies a extra outlined stroke all through the picture.
Next, take away the colours utilizing Image > Adjustments > Desaturate. If the outlines are nonetheless minimally outlined, then add the impact Filter > Stylize > Find Edges and the outlines ought to then pop.
All concerning the Artistic filter referred to as Cutout
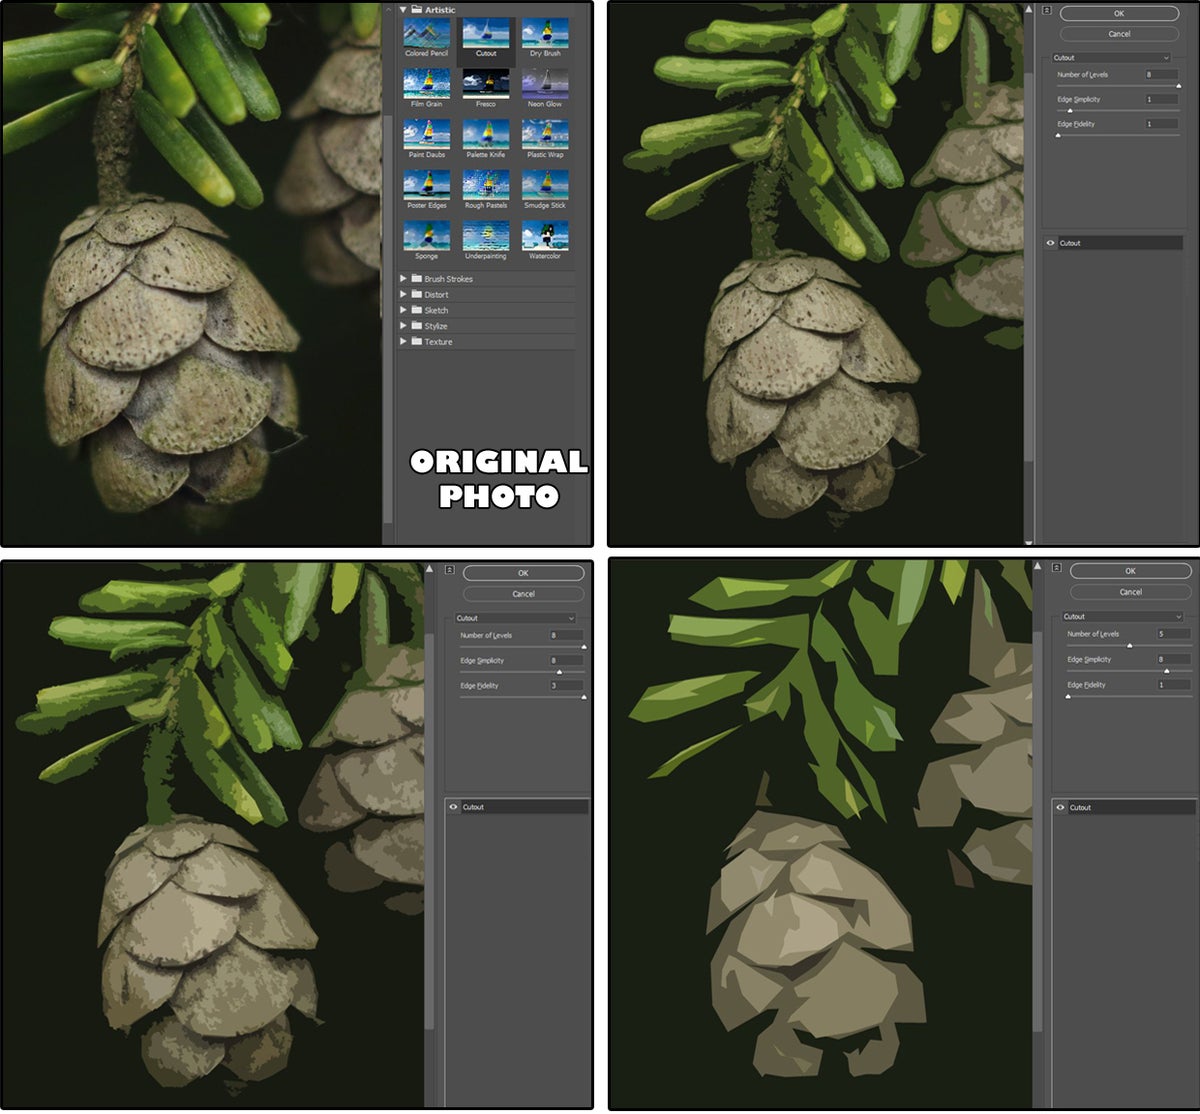
The Cutout filter works greatest on pictures with uncluttered backgrounds, shiny colours, and easy pictures. Choose an acceptable picture, then choose Filter > Filter Gallery > Artistic Filters > Cutout. The customizable settings embrace variety of ranges (2 through 8), clearly, what number of cutout ranges you need based mostly on colours and luminosity; edge simplicity (0 through 10) adjusts the angles of the corners; and edge constancy (1 through 3) impacts how clean the sides turn out to be. Notice the examples in determine 02 Cutout filter.
The first picture (TL) exhibits the unique picture. The second picture (TR) has a number of cutouts with minimal edges (8, 1, 1). The third picture (BL) has most cutouts with a number of to most edges (8, 8, 3). And the fourth (BR) has midrange cutouts with mid to minimal edges (5, 8, 1). If your mission consists of creating posters, patterns for linocuts (print making), or silk display screen designs, this filter is an efficient selection.
 JD Sartain / IDG
Figure 02 Cutout filter
All concerning the Artistic filter referred to as Dry Brush
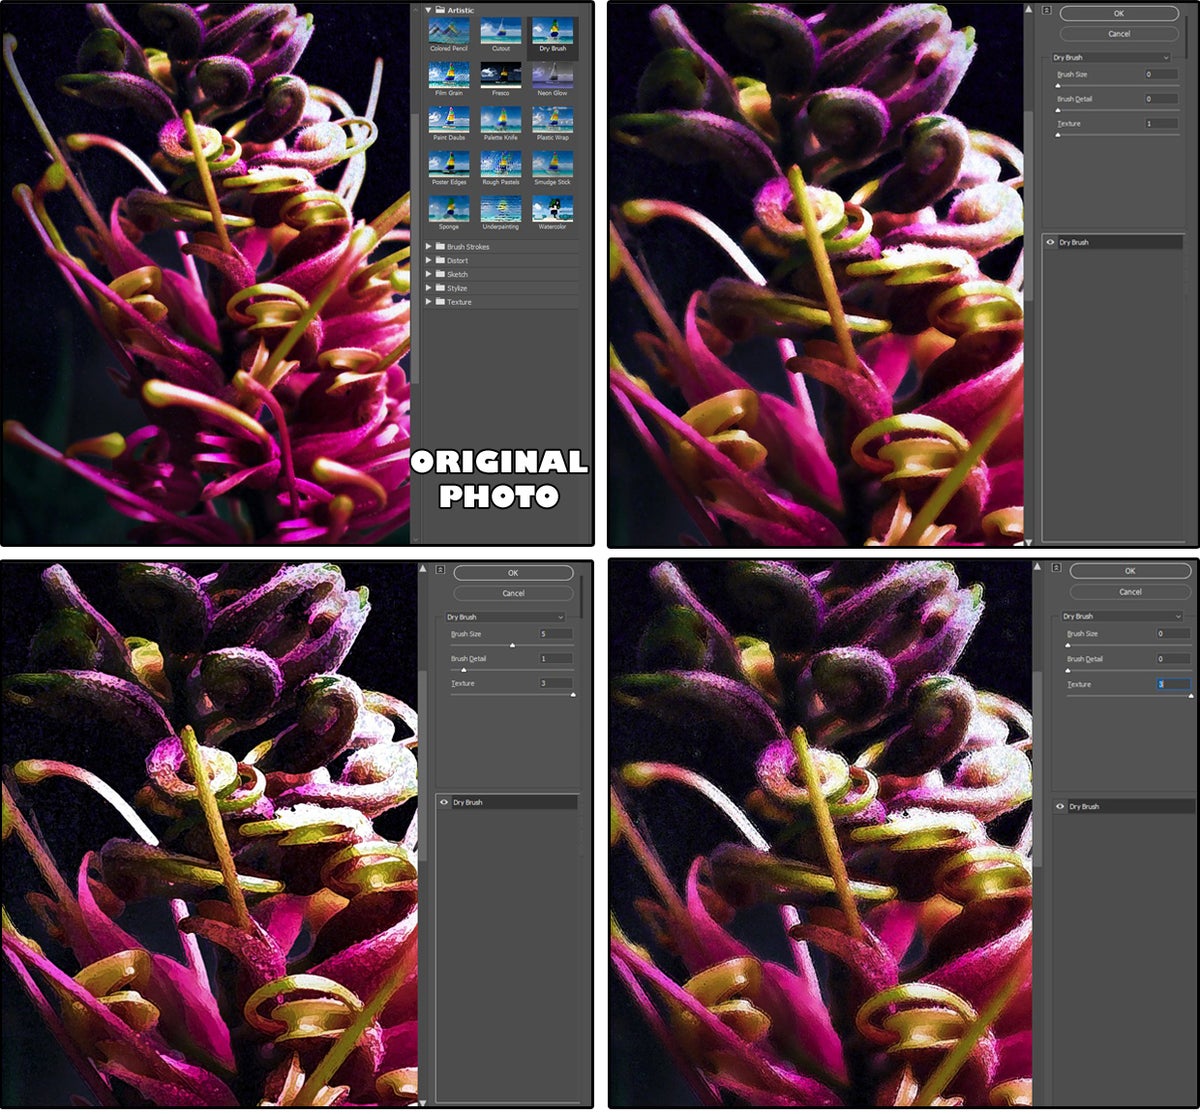
Use the Dry Brush filter to create the phantasm of a portray. Any picture, drawing, or perhaps a scanned portray will work. Choose a picture, then choose Filter > Filter Gallery > Artistic Filters > Dry Brush. The customizable settings embrace brush measurement (0 through 10); brush element (0 through 10); and texture (1 through 3). Notice the examples in determine 03 Dry Brush filter.
The first picture is the unique picture. The second picture (TR) minimally alters the feel solely (0, 0, 1). Next, (BL) has midrange to minimal brush settings and most texture (5, 1, 3). And the final (BR) maximizes the feel solely (0, 0, 3). If you’ve ever painted with a dry brush, this filter is an honest match.
 JD Sartain / IDG
Figure 03 Dry Brush filter
All concerning the Artistic filter referred to as Film Grain
Excess movie grain creates that great “vintage photo” look, particularly when the picture is in black-and-white or sepia-toned. This filter additionally emulates that “grainy” function that you simply get while you use high-speed movie with ISO settings between 400 and 800, or while you over-develop or under-expose movie, or use infrared movie.
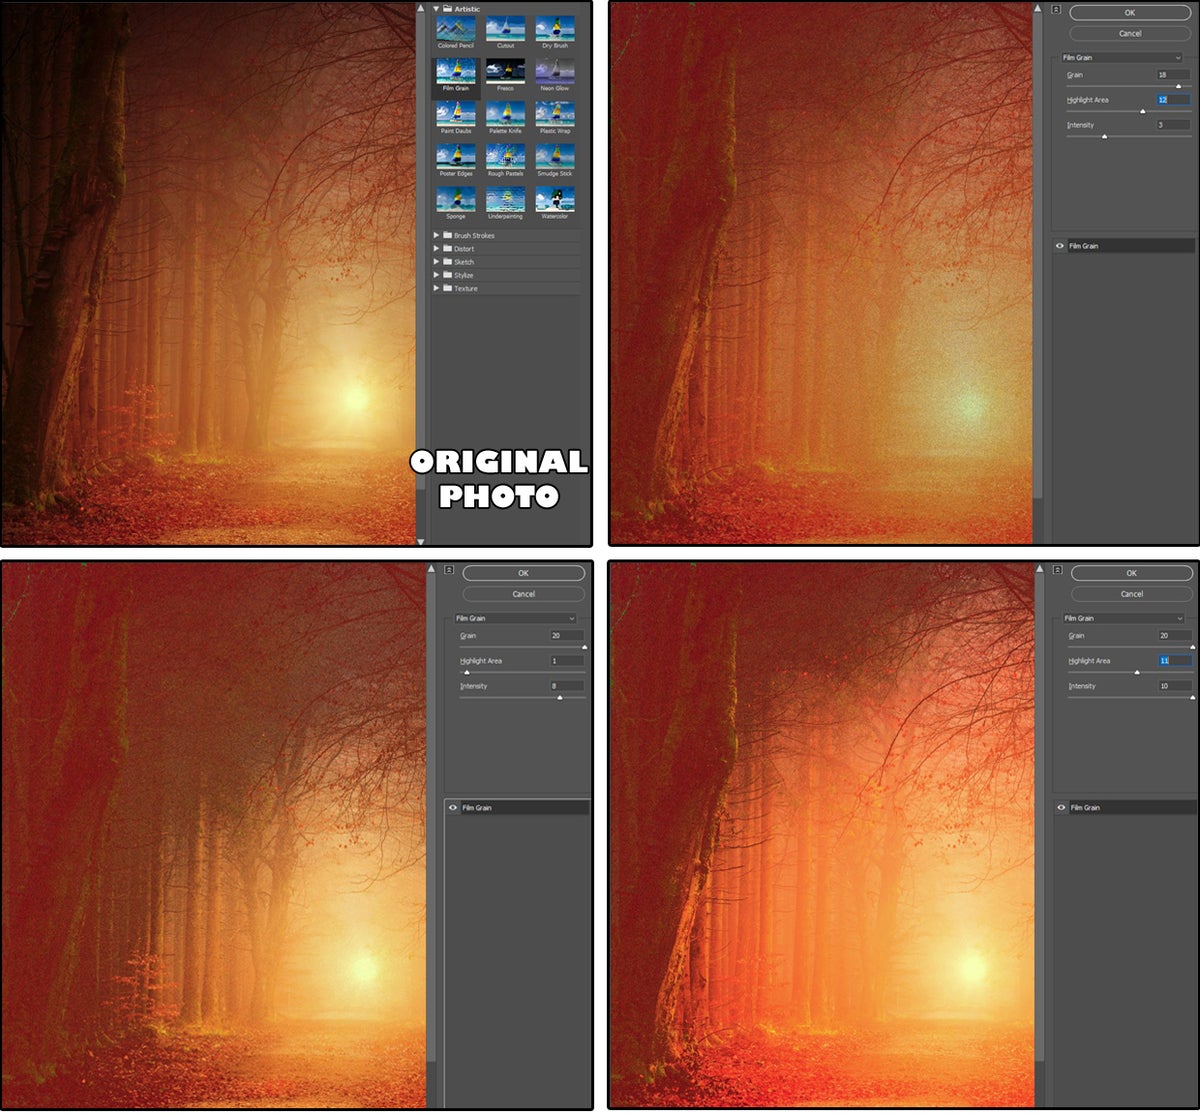
For this phantasm, any picture or illustration will suffice. Choose a picture, then choose Filter > Filter Gallery > Artistic Filters > Film Grain. The customizable settings embrace Grain (0 through 20); Highlight Area (0 through 20); and Intensity (0 through 10). Notice the examples in determine 04 Film Grain filter.
First, the unique picture. Next, (TR) has minimal grain (18, 12, 3). Next, (BL) has a little bit extra (20, 1, 8). And final (BR) has much more (20, 11, 10). The grain outcomes with this filter are delicate and look very completely different based mostly on the picture you select.
If you like extra grainy pictures with increased settings, strive utilizing the impact Filter > Noise > Add Noise > Uniform (or Gaussian) from 0.10 through 400, in monochromatic or Kodachrome. Or, you may also strive Filter > Filter Gallery > Texture > Grain (this one has 10 grain varieties to select from).
 JD Sartain / IDG
Figure 04 Film Grain filter
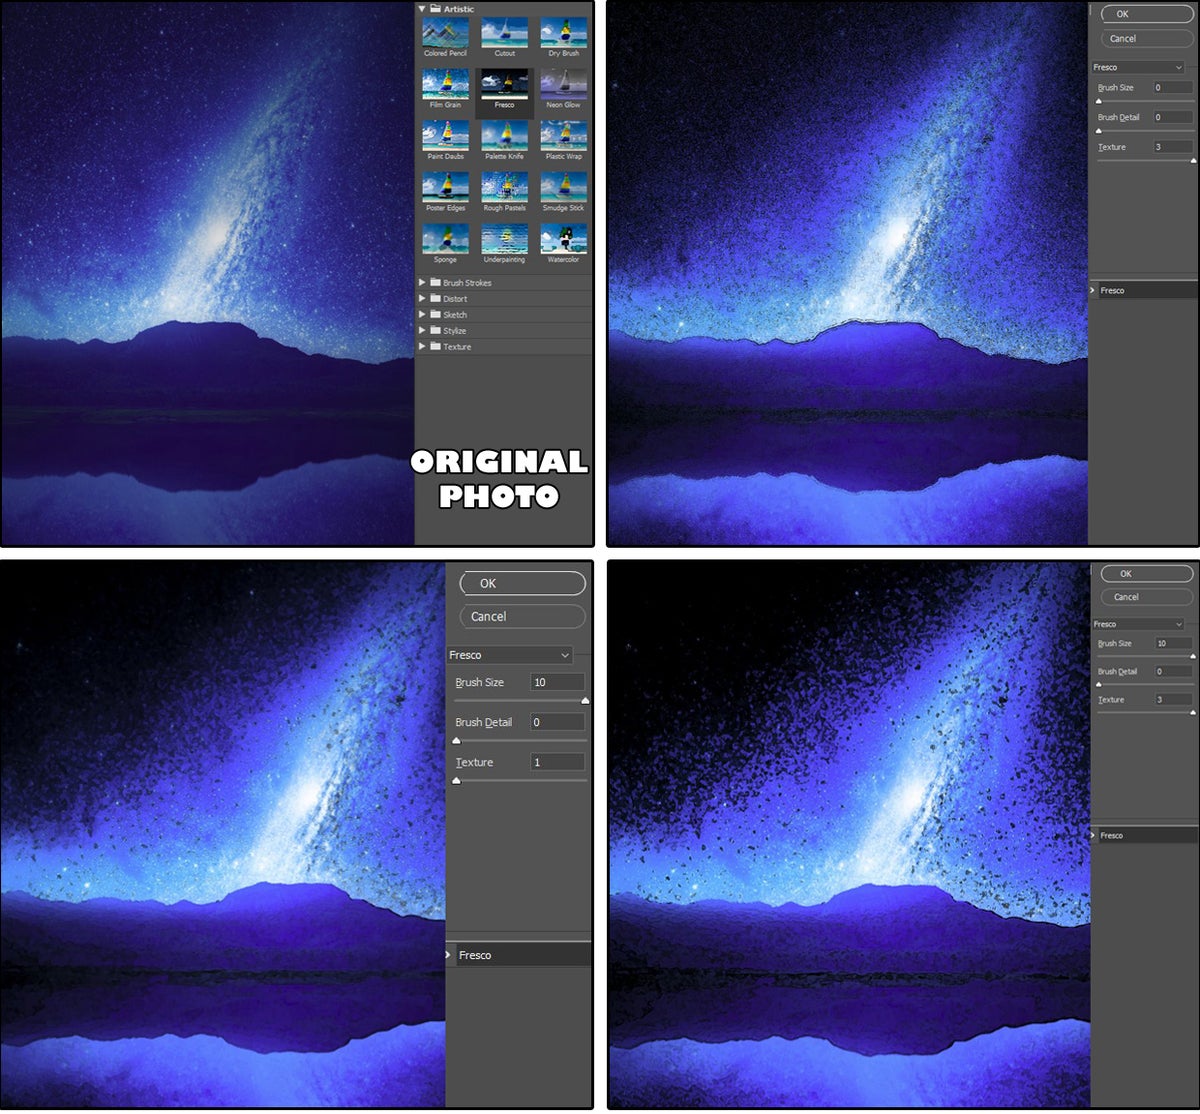
All concerning the Artistic filter referred to as Fresco
Photoshop’s Fresco filter (which simulates the nice and cozy, saturated impact of a wet-plaster portray methodology greatest recognized from examples within the ruins of Pompeii and the murals of the Italian Renaissance) works particularly effectively with pictures utilizing shiny colours and excessive distinction. Choose a picture, then choose Filter > Filter Gallery > Artistic Filters > Fresco. The customizable settings embrace brush measurement (0 through 10); brush element (0 through 10); and texture (1 through 3). Notice the examples in determine 05 Fresco filter.
After the unique picture (TL), the (TR) picture has minimal brush settings with most texture (0, 0, 3). Next, (BL) has most brush, minimal texture, and no element (10, 0, 1). And final, (BR) has most brush and texture with zero element (10, 0, 3). Notice how the picture progresses from a easy nightscape to a nocturnal explosion that resembles a blue and white volcano.
 JD Sartain / IDG
Figure 05 Fresco filter
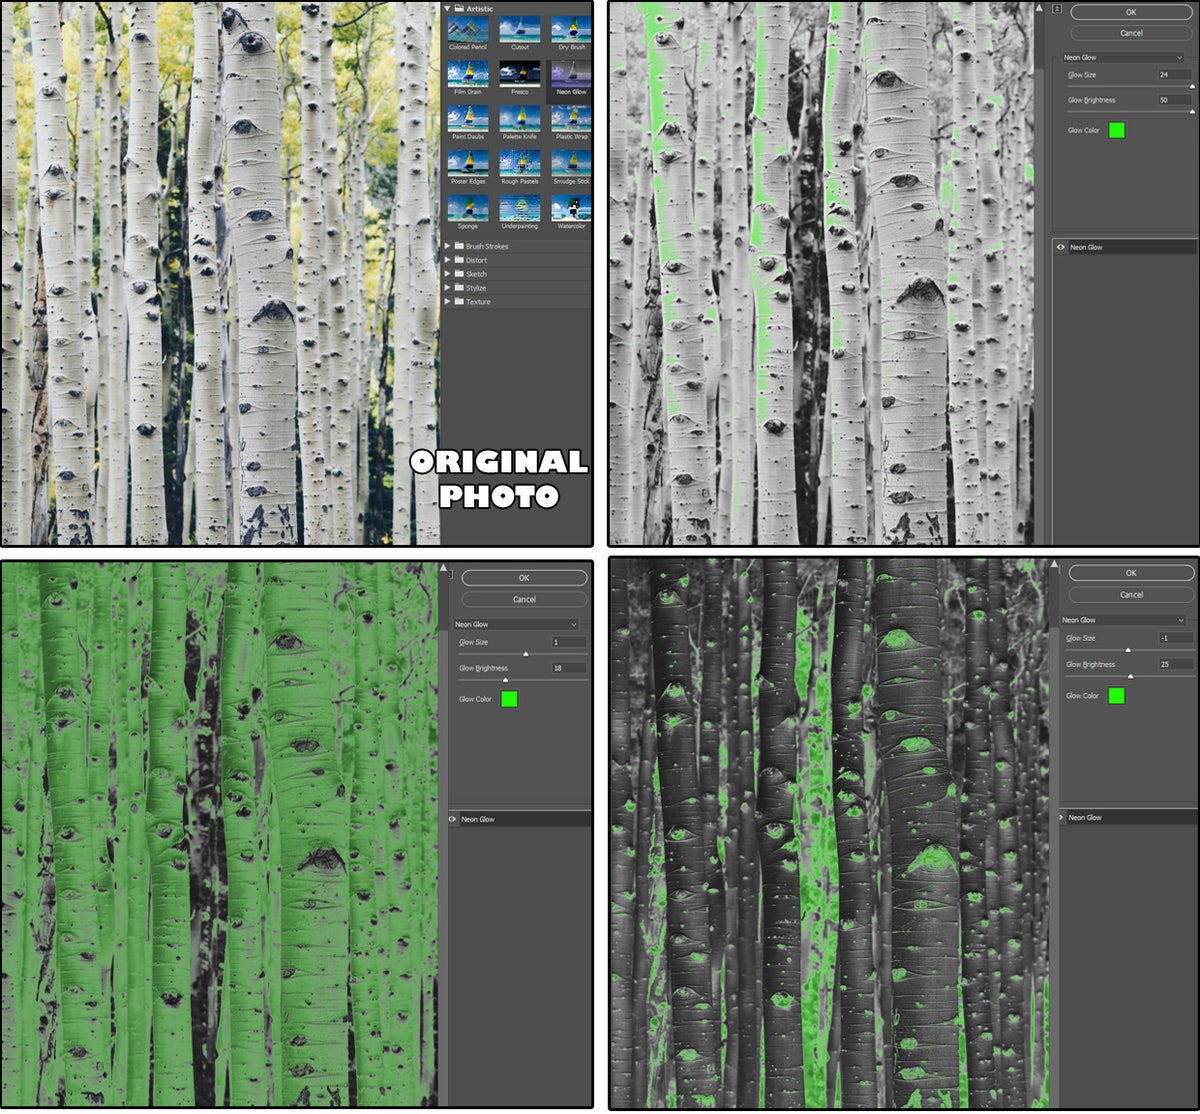
All concerning the Artistic filter referred to as Neon Glow
This filter does exactly what it’s referred to as: It creates a glowing space inside, exterior, round, or on the sides of your picture.
Choose an uncluttered picture with a single or group of comparable objects for greatest outcomes. The last picture is diminished to minimal colours: the glow coloration, the background coloration, and (typically) a mixture of the 2.
Select Filter > Filter Gallery > Artistic Filters > Neon Glow. The customizable settings embrace Glow Size (-24 through +24) and Glow Brightness (0 through 50). Then it’s good to select a coloration from the Glow Color palette. Notice the examples in determine 06 Neon Glow filter.
After the unique picture (prime left), the (prime proper) picture settings are (+24, 50, fluorescent inexperienced). Next, the underside left picture settings are (+1, 18, fluorescent inexperienced). And final, the underside proper picture settings are (-1, 25, fluorescent inexperienced). Notice how the pictures progress from a easy neon glow on white to 100-percent neon to a reverse video impact with neon on black.
 JD Sartain / IDG
Figure 06 Neon Glow filter
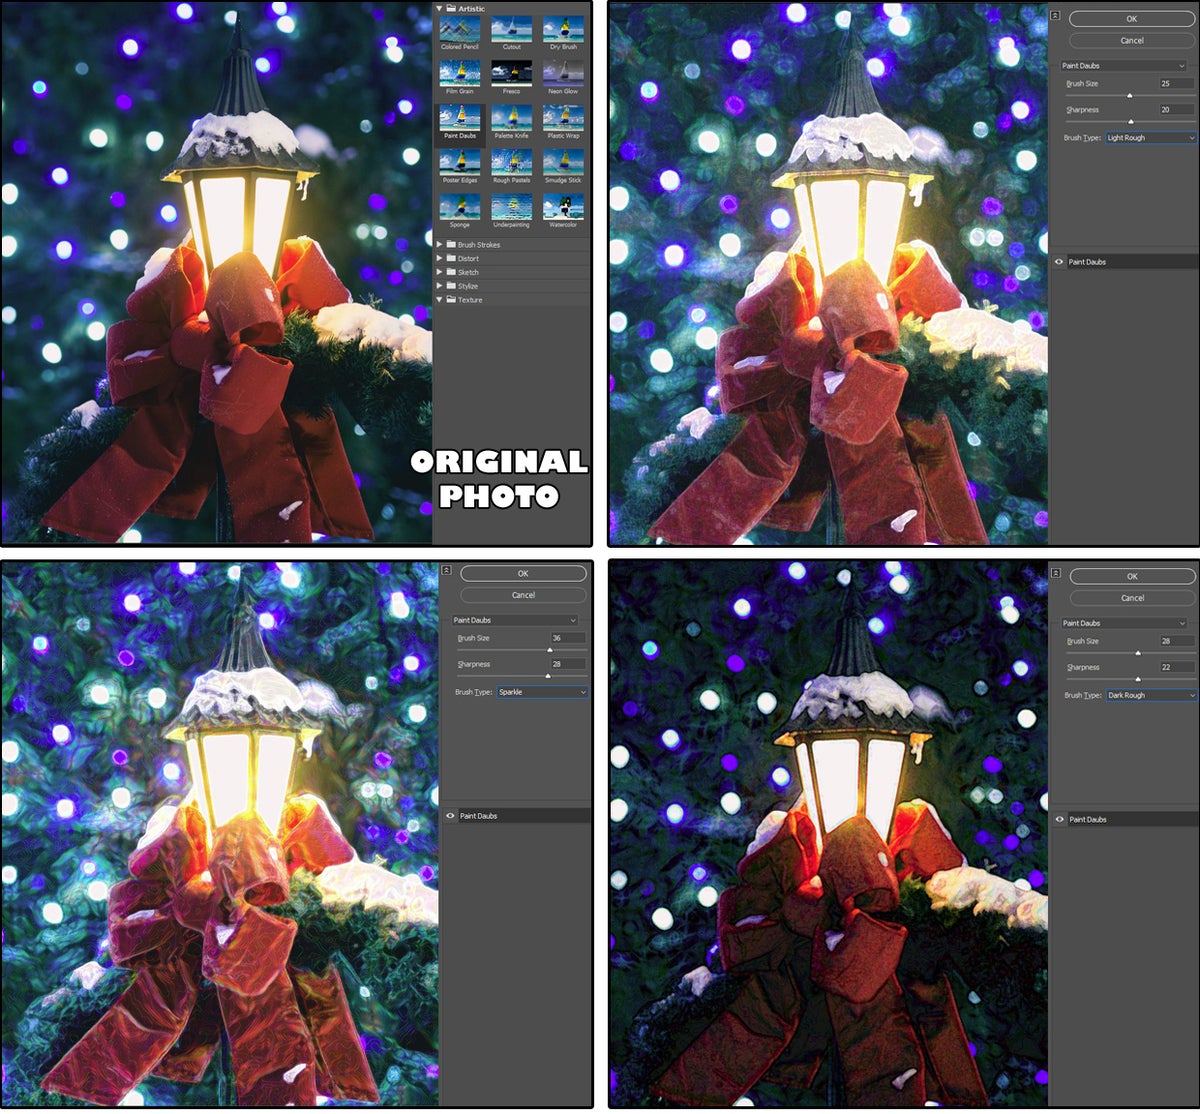
All concerning the Artistic filter referred to as Paint Daubs
Like the opposite “painting” filters, the Paint Daubs filter is modeled after the well-known Italian “Impasto” approach utilized by artists comparable to Rembrandt, Van Gogh, Jackson Pollock and others. Basically, the artist applies thick layers of paint onto a canvas to create textures and definition.
Select Filter > Filter Gallery > Artistic Filters > Paint Daubs. The customizable settings embrace Brush Size (1 through 50); Sharpness (0 through 40); after which you need to select a Brush Type from the checklist field (Simple, Light Rough, Dark Rough, Wide Sharp, Wide Blurry, or Sparkle). Notice the examples in determine 07 Paint Daubs filter.
After the unique picture (prime left), the highest proper picture settings are (25, 20, Light Rough). Next, the underside left picture settings are (36, 28, Sparkle). And final, the underside proper picture settings are (28, 22, Dark Rough).
 JD Sartain / IDG
Figure 07 Paint Daubs filter
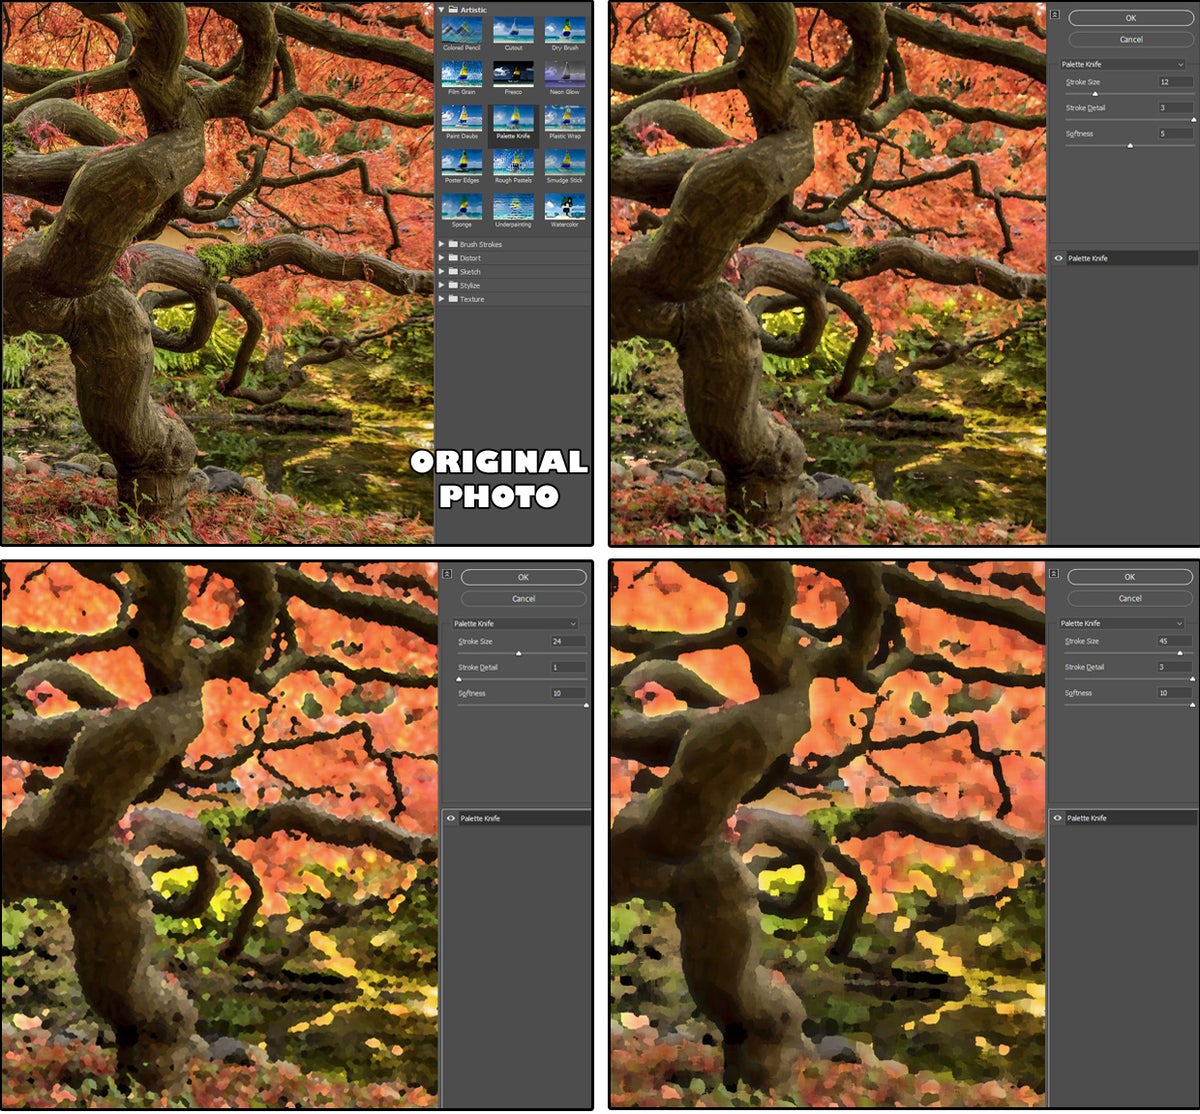
All concerning the Artistic filter referred to as Palette Knife
The Palette Knife filter seems similar to its real-life cousin, however with out the precise knife. Also recognized as one other Impasto approach that includes making use of paint to canvas with a portray knife, this 19th-century ability was a Van Gogh favourite.
Select Filter > Filter Gallery > Artistic Filters > Palette Knife. The customizable settings embrace Stroke Size (1 through 50); Stroke Detail (1 through 3); and Softness (0 through 10). Notice the examples in determine 08 Palette Knife filter.
After the unique picture (prime left), the highest proper picture settings are (12, 3, 5). Next, the picture settings at backside left are (24, 1, 10). And final, the underside proper picture settings are (45, 3, 10).
 JD Sartain / IDG
Figure 08 Palette Knife
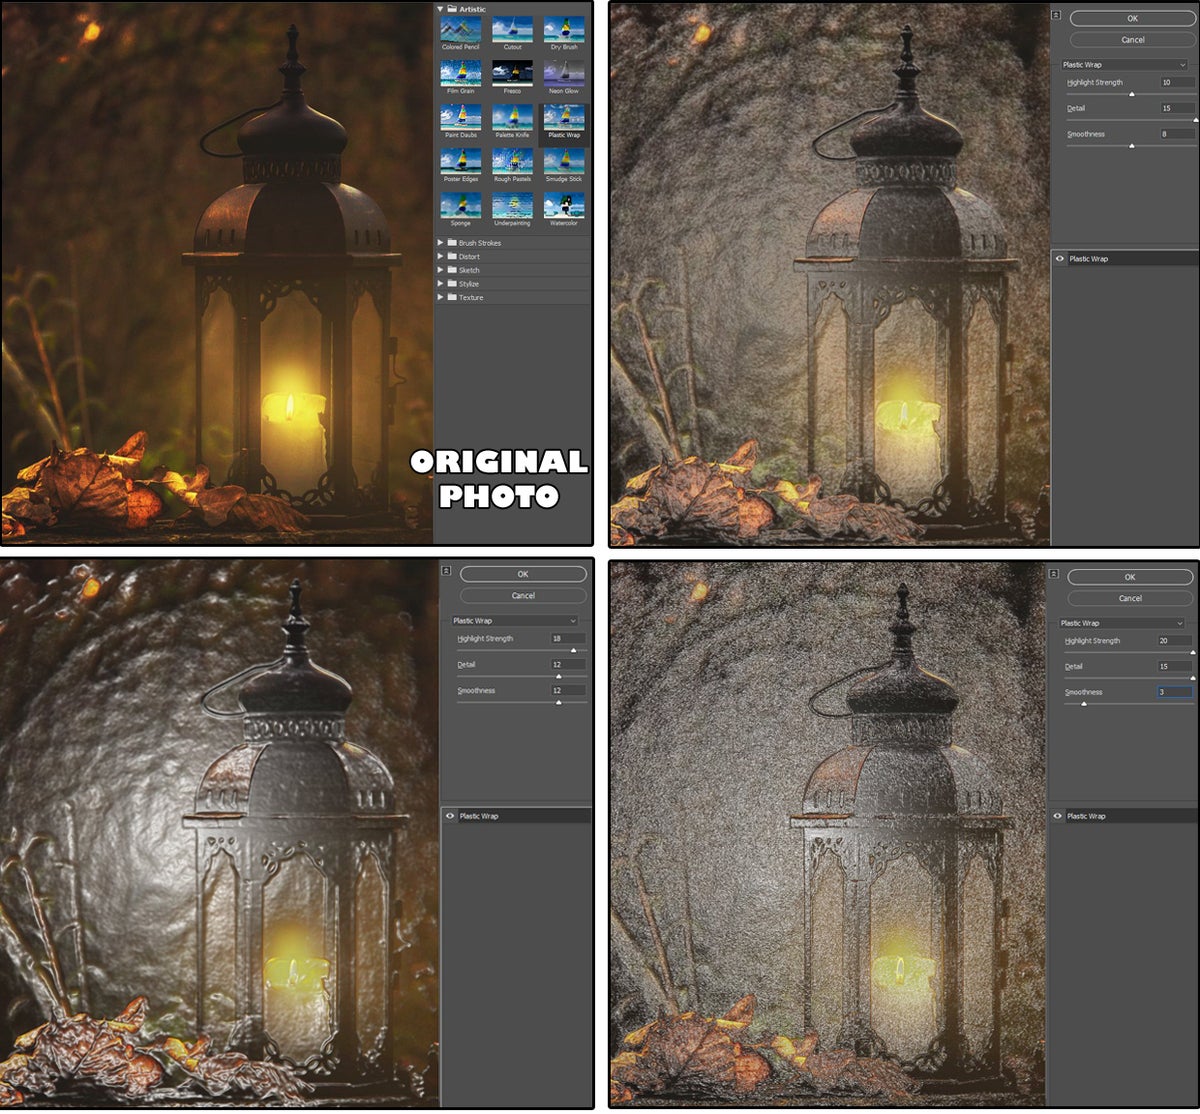
All concerning the Artistic filter referred to as Plastic Wrap
Unique by itself, the Plastic Wrap filter seems similar to an object wrapped in cellophane! It’s an fascinating approach patterned after no different and, but, produces great results.
Select Filter > Filter Gallery > Artistic Filters > Plastic Wrap. The customizable settings embrace Highlight Strength (0 through 20); Detail (1 through 15); and Smoothness (1 through 15). Notice the examples in determine 09 Plastic Wrap filter.
After the unique picture (prime left), the highest proper picture settings are (12, 3, 5). Next, the underside left picture settings are (24, 1, 10). And final, the underside proper picture settings are (45, 3, 10).
 JD Sartain / IDG
Figure 09 Plastic Wrap filter
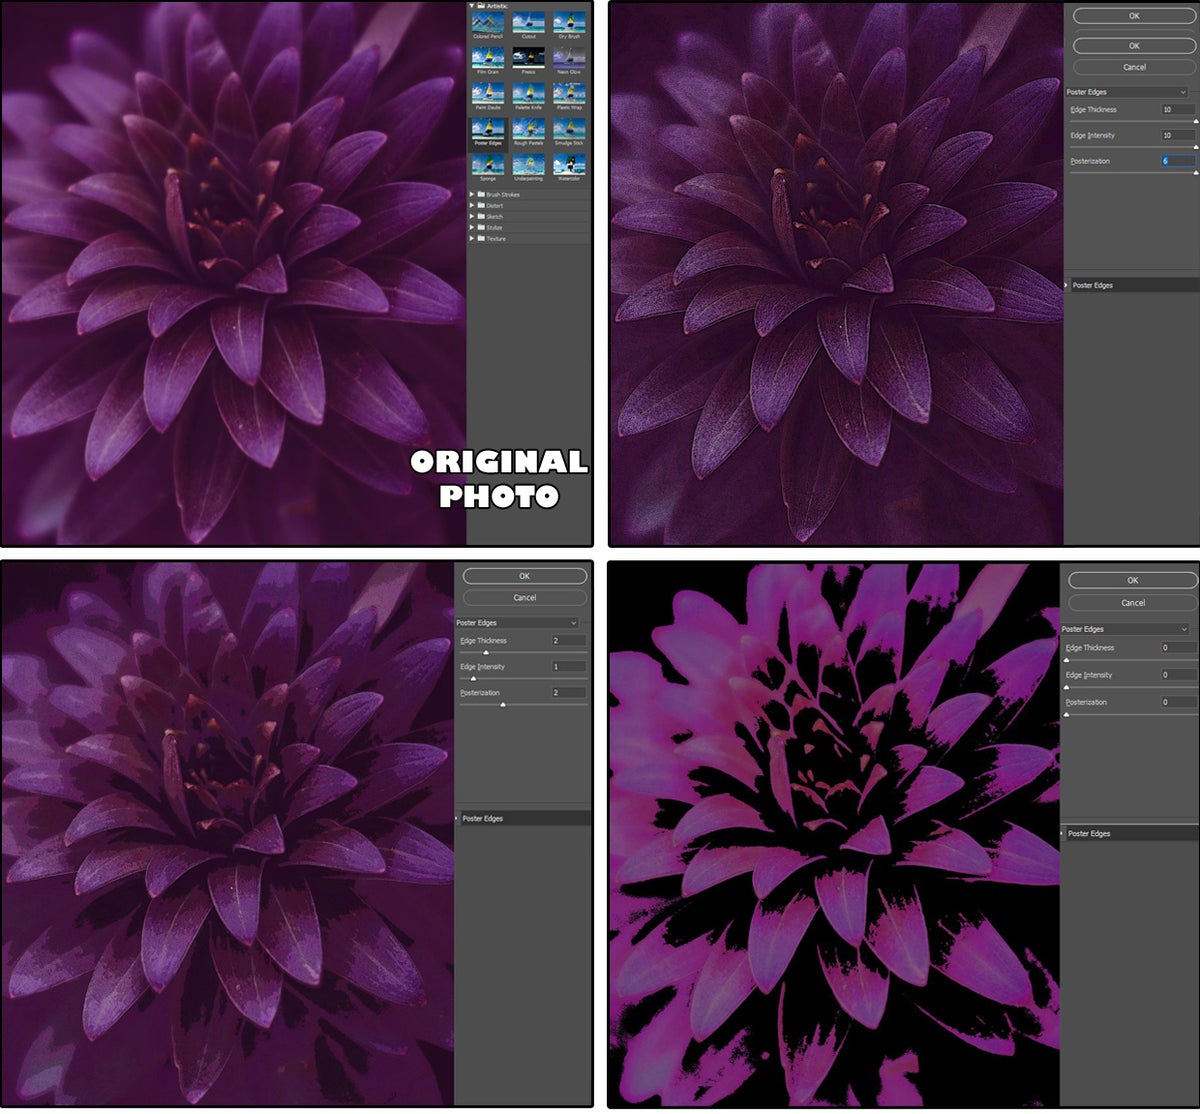
All concerning the Artistic filter referred to as Poster Edges
The Poster Edges filter is just like the Cutout filter; however solely within the decrease settings. When the upper settings are utilized, this impact seems extra like one of many Brush Strokes filters.
Select Filter > Filter Gallery > Artistic Filters > Poster Edges. The customizable settings embrace Edge Thickness (0 through 10); Edge Intensity (0 through 10); and Posterization (0 through 6). Notice the examples in determine 10 Poster Edges filter.
The first one (prime left) is the unique picture, the highest proper picture settings are (10, 10, 6). Next, the picture settings at backside left are (2, 1, 2). And final, the underside proper picture settings are (0, 0, 0). Like the Cutout filter, this filter works particularly effectively for posters, linocuts (print making), silkscreen designs, stamps, and stencils.
 JD Sartain / IDG
Figure 10 Poster Edges filter