
Apple’s choice to ditch Intel processors and transfer the whole Mac vary to utilizing its home-grown Apple Silicon processors appears to have paid off. Its M1 and M2 processors–and now M3 chips–present spectacular efficiency and battery life.
But older Macs that had Intel processors inside did have one benefit over the brand new Apple Silicon chips–they made it straightforward for Mac customers to run Windows as effectively. The Windows working system was written particularly to run on Intel processors, and the truth that Macs adopted Intel processors again in 2005-2006 meant that they had been additionally in a position to run Windows, in addition to macOS itself.
That was an actual boon for a lot of Mac customers, as there are lots of professional-level apps in fields equivalent to graphics and design which are solely accessible for Windows PCs. And, after all, there are a whole lot of PC video games that by no means get launched on the Mac, so being able to run Windows apps and video games on the Mac gave Mac customers one of the best of each worlds.
Further studying: The best laptops and Chromebooks
Different methods you will get Windows on Mac
Before we clarify easy methods to set up Windows on a Mac (which you willl discover beneath), we’ll run by the alternative ways you possibly can (and will) run Windows on a Mac.
Boot Camp
Intel Macs had two choices for operating Windows, utilizing both Apple’s personal Boot Camp software program or virtualization instruments equivalent to the favored Parallels Desktop or VMware Fusion.
Boot Camp allowed Intel Macs to partition their inside onerous drive, splitting it into two sections. One partition saved the macOS and all of your regular Mac apps, whereas the Boot Camp software program allowed you to put in Windows on the second partition. When you turned your Mac on you possibly can then use a useful keyboard shortcut and inform your Mac whether or not you needed besides the pc into macOS, or into Windows as a substitute (a course of often known as dual-booting). The solely drawback of utilizing Boot Camp was that you simply had to decide on–both you booted into the macOS or Windows. The two working programs remained solely separate, so that you couldn’t run Mac apps and Windows apps on the similar time. If you needed to run the Mac model of Photoshop when you’re at work, however perhaps swap to Windows for a fast spot of Diablo 4 motion at lunchtime, you then’d need to hold rebooting your Mac to modify forwards and backwards between the macOS and Windows.
The different possibility is named virtualization–typically additionally known as emulation–and that is the method taken by apps equivalent to Parallels Desktop and VMware Fusion. Boot Camp is not accessible for Macs which have Apple Silicon, however Parallels Desktop and VMware Fusion have each been up to date to run natively on Macs with Apple Silicon.
It’s additionally value mentioning that there are two different choices accessible (though they don’t truly contain putting in Windows itself straight onto your Mac). Microsoft has its personal streaming service, known as Windows 365, which runs Windows on a particular cloud server, after which lets you stream Windows to your Mac through the Internet. This generally is a helpful possibility when you have a quick sufficient broadband connection, nevertheless it does require a month-to-month subscription price, so it might find yourself being fairly costly in case you use it usually.
The different possibility is a program known as CrossOver, accessible from Codeweavers, which cleverly lets you run Windows apps and video games in your Mac with out even needing a duplicate of Windows in any respect. CrossOver prices $64 with 12 months of technical help, however it’s fairly a posh piece of software program and it might not go well with everybody. However, there’s a free trial accessible so that you could see the way it works earlier than deciding if you wish to purchase the complete model.
For extra choices learn Macworld’s round-up of the Best virtual machine software for Mac.
Virtual Machines
For most of us, virtualization stays probably the most simple and handy possibility for operating Windows and Windows apps on our Mac. Parallels Desktop and VMware Fusion have lengthy been the 2 leaders on this discipline, and each applications are typical Mac apps that may be put in in your Mac utilizing the macOS, similar to another Mac app. These virtualization applications will let you create a Virtual Machine (or VM) that emulates the bodily {hardware} of a PC.
When you create a digital machine in your Mac you assign a specific amount of your Mac’s reminiscence and storage to the digital machine, and this lets you set up Windows onto the digital machine. You can then set up different Windows apps onto the digital machine as effectively, and run these Windows apps inside the macOS itself, proper alongside all of your regular Mac apps. This is in distinction to Boot Camp on outdated Intel Macs, which pressured you to modify between the macOS and Windows.
Being in a position to run Windows apps alongside all of your regular Mac apps is absolutely helpful and handy. The drawback of virtualization is that your Mac is successfully operating two working programs on the similar time–macOS and Windows–so that you want a reasonably highly effective Mac with loads of reminiscence and storage to run a Windows digital machine successfully. Even with probably the most highly effective Macs at the moment accessible, it’s onerous to get ok efficiency utilizing virtualization to play the most recent Windows video games that want high-speed 3D graphics.
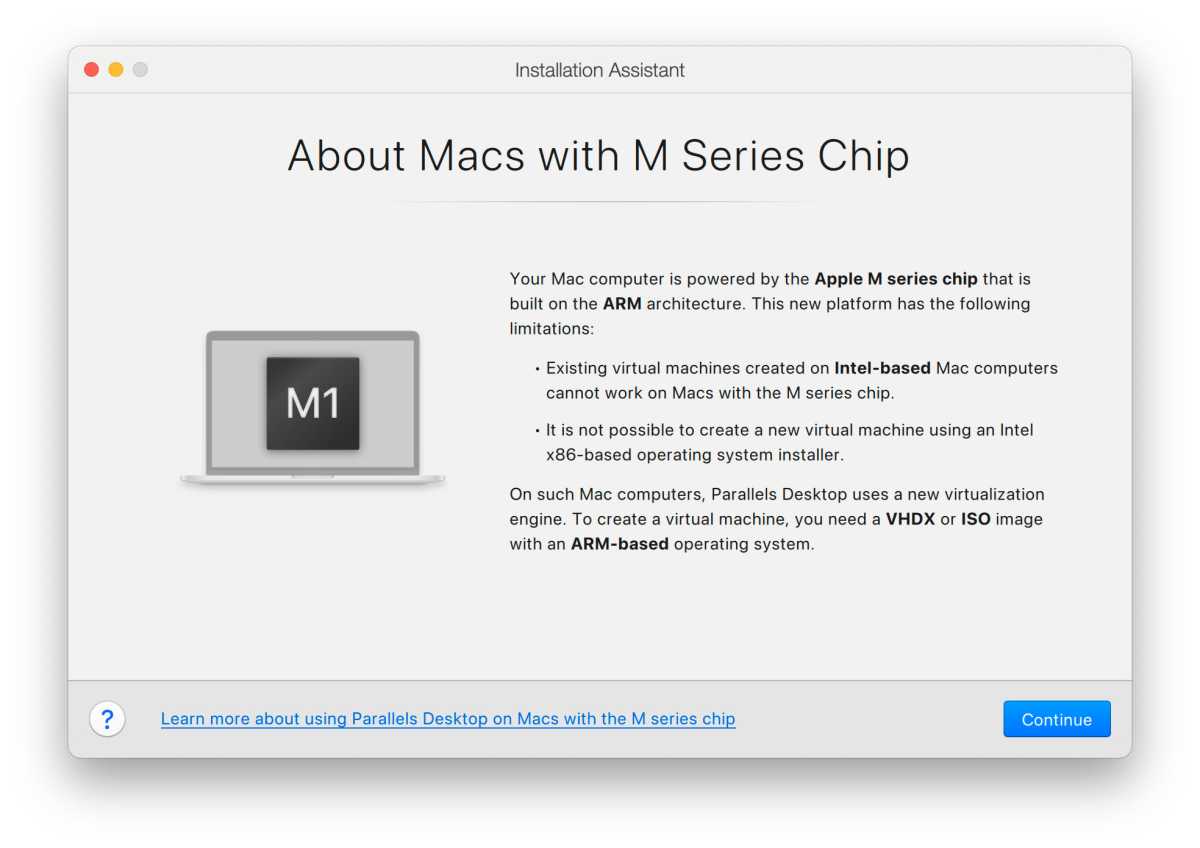
And, sadly, there’s one different complicating issue in terms of utilizing virtualization apps like Parallels Desktop and VMware Fusion on the most recent Macs with Apple Silicon. Apple’s M-series of processors is totally totally different from Intel’s processors, and makes use of a unique set of programming instructions–often known as an instruction set–for writing software program, apps and video games. The typical model of Windows was written particularly for Intel processors, which made it comparatively straightforward to run Windows on Macs that additionally had Intel processors. However, Apple’s new chips are often known as Arm processors (as they’re based mostly on designs licensed from a U.Ok. firm known as Arm Ltd) and these Arm processors use an instruction set often known as RISC (Reduced Instruction Set Computer), which is totally totally different from the instruction set used on Intel processors, often known as x86. This signifies that the usual Intel model of Windows merely received’t run on Arm processors, so you possibly can’t use it to create a Windows digital machine that may run on a Mac with Apple Silicon.
Windows on Apple Silicon
This is the place issues get much more sophisticated. There is an alternate model of Windows, often known as Windows 11 On Arm, which is designed to be run on Arm processors, and is suitable with Apple’s Arm-based processors. This can be utilized with Parallels Desktop and VMware Fusion on Apple Silicon Macs with a purpose to create digital machines that run the present Windows 11 On Arm (truly getting your fingers on a duplicate of Windows 11 On Arm could be a bit difficult, however we’ll come to that in a second).
But, after all, there’s one remaining spanner within the works. Most Windows apps are written for PCs which have Intel processors, and use Intel’s x86 instruction set. So, simply as many Mac apps needed to be re-written to run on Apple Silicon, Windows apps that had been written for Intel processors additionally have to be re-written for Windows On Arm. This meant that early variations of Windows on Arm suffered from a critical lack of respectable software program, so Microsoft launched its personal emulation system that permits Windows On Arm to run apps that had been written for the Intel model of Windows (just like Apple’s Rosetta know-how, which permits Macs with Apple Silicon to run older Mac apps that had been written for Intel processors).
So once you use Parallels Desktop or VMware Fusion to create a digital machine on a Mac with Apple Silicon, you could discover that you simply’re utilizing an emulation/virtualization program to run Windows On Arm, which then makes use of its personal emulation know-how to run outdated Windows apps that had been written for Intel processors. Piling emulation-upon-emulation like meaning that you could be not get excellent efficiency out of your digital machines.
Microsoft has produced an Arm model of Microsoft Office, and likewise a few of its key developer instruments, equivalent to Visual Studio, so Mac-based software program builders or enterprise customers who have to run the Windows model of Microsoft Office should discover virtualization a helpful possibility. Microsoft can also be encouraging different software program builders to supply extra Arm variations of their apps, nevertheless it’s gradual going in the intervening time so operating Windows On Arm and Windows apps on present Macs with Apple Silicon stays very a lot a piece in progress.
How to get Windows in your Mac
The exceptional factor about Parallels Desktop and VMware Fusion is that they handle to cover (virtually) all these complicated particulars out of sight, beneath a slick, fashionable interface. Parallels gives a trial interval so that you could attempt it out earlier than shopping for the complete model (from $99.99/£89.99, from Parallels). You can truly get Fusion free if it’s only for private use – though this does require a moderately tedious registration course of – however enterprise customers do need to pay a license price (from $149 from VMware). However, Parallels does a greater job in terms of putting in Windows On Arm, in order that’s what we’ll give attention to right here.
Foundry
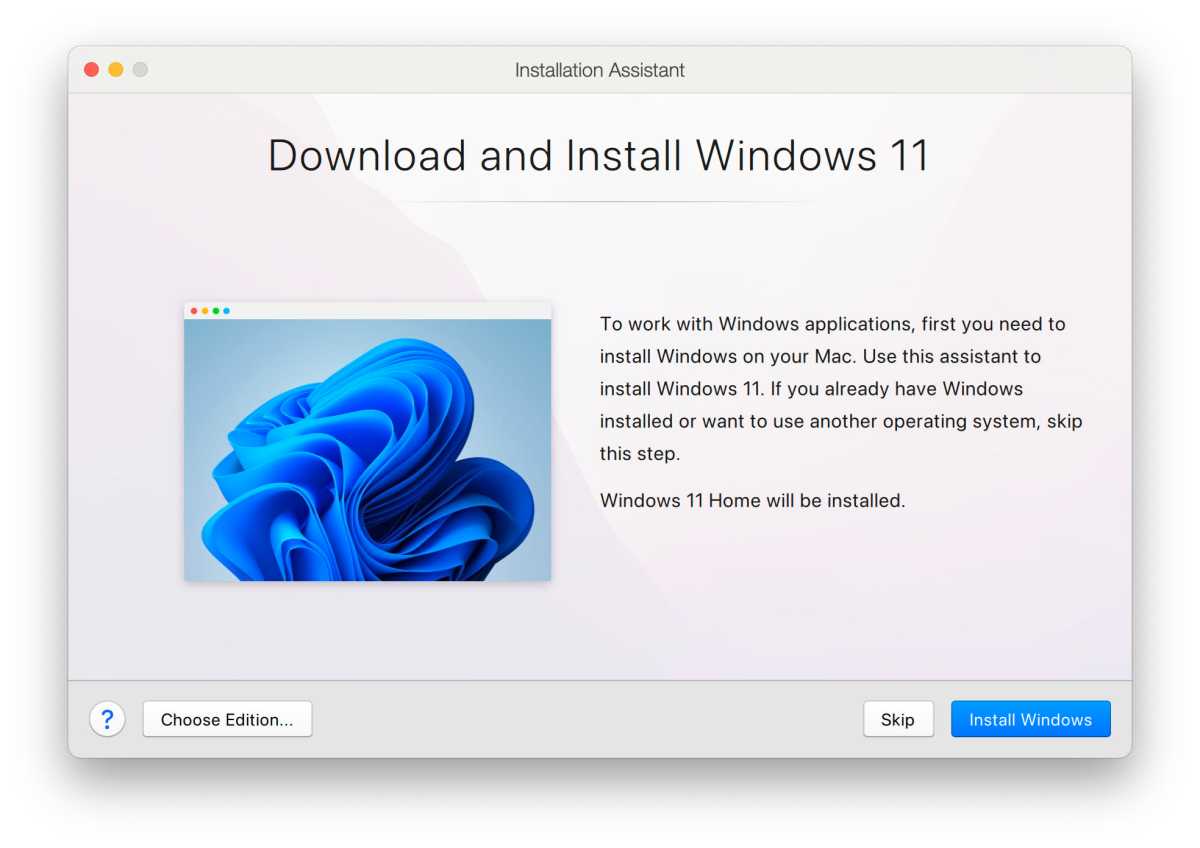
Download Windows on Arm
Foundry
As quickly as you launch Parallels Desktop on a Mac that has Apple Silicon (any M1, M2 or M3-series chips), the app gives some helpful details about operating Windows on Apple Silicon with a purpose to provide help to get began. It then asks if you wish to obtain and set up a duplicate of Windows 11 On Arm (earlier variations of Windows are not accessible, sadly).
Microsoft usually sells Windows On Arm solely to PC producers, builders, or enterprise customers with particular licenses, however Parallels has labored carefully with Microsoft and has been authorised as an “authorized solution for running Windows 11 On Arm on Macs with Apple Silicon”. This permits Parallels Desktop to obtain and set up Windows 11 On Arm routinely from proper inside the program.
Just launch Parallels Desktop, and its Installation Assistant offers you the choice of buying Windows 11 On Arm from the Microsoft Store. If you’ve already acquired a license for Windows 11 you then could possibly use that right here, or you should buy a brand new license from inside Parallels Desktop.
Unfortunately, VMware Fusion doesn’t present this feature, and simply leaves you to determine easy methods to purchase Windows 11 On Arm by your self.
Configure your Virtual Machine
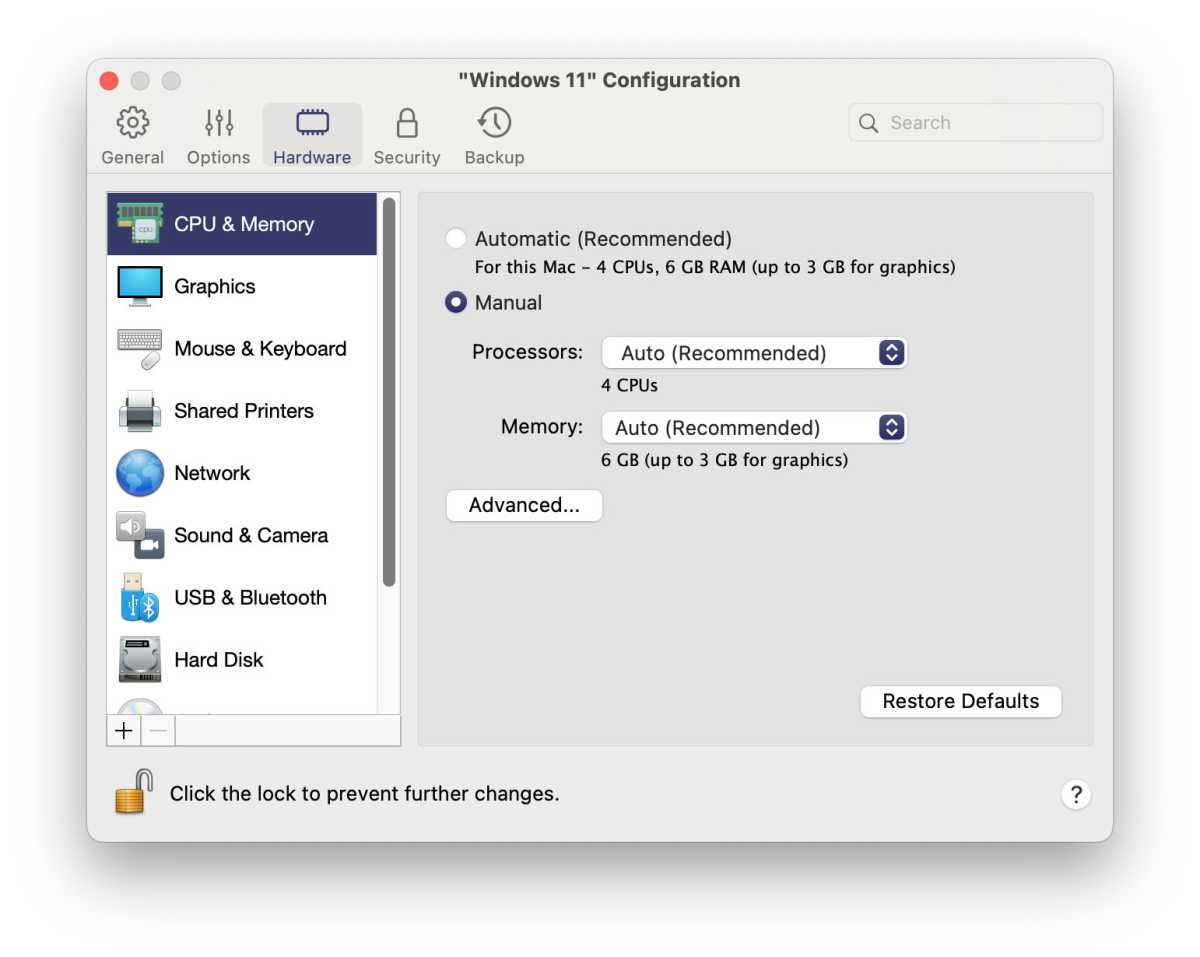
Foundry
Once you’ve downloaded Windows, you possibly can create and configure your new digital machine (VM). You can select what number of of your Mac’s processor cores to dedicate to operating the VM–which is a key issue that may decide how briskly the VM runs. You may specify how a lot reminiscence and cupboard space are allotted to the VM too.
There are a lot of different settings, equivalent to the flexibility to regulate the way in which that Windows apps seem on the Mac desktop, or how Windows and Mac apps can share recordsdata. However, Parallels gives customary settings that usually work effectively, and you’ll then experiment and fine-tune your VM as you get used to working with it.
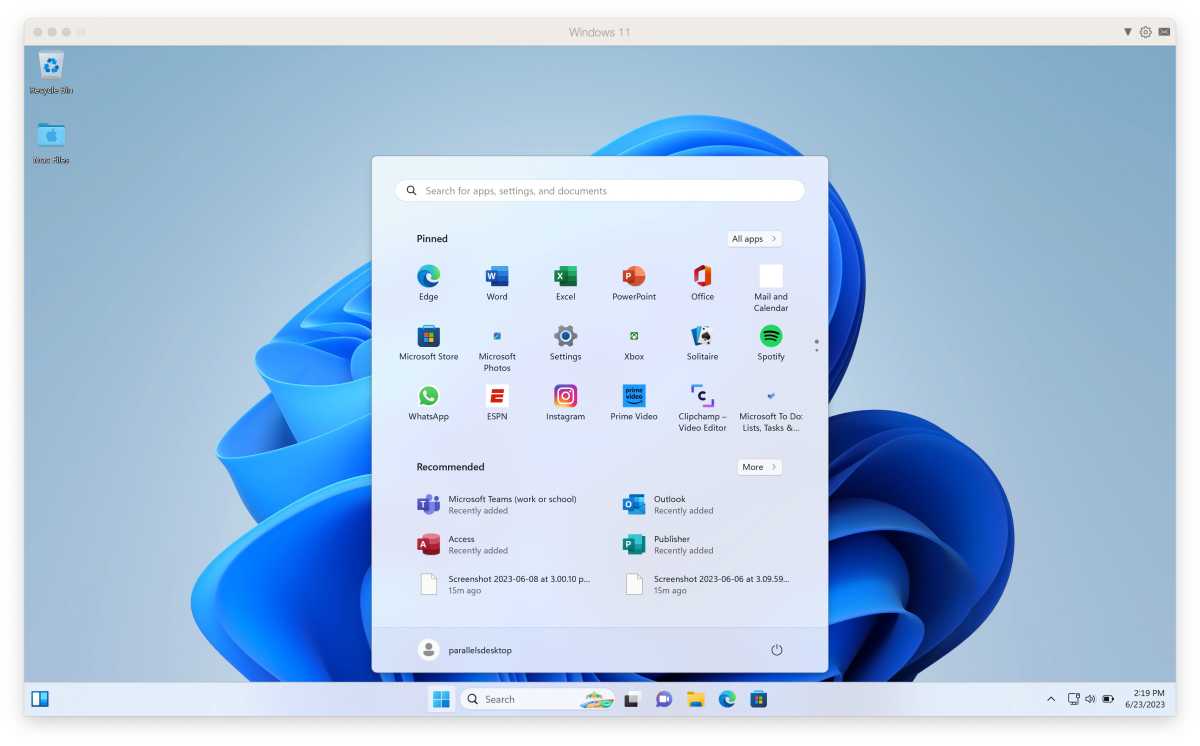
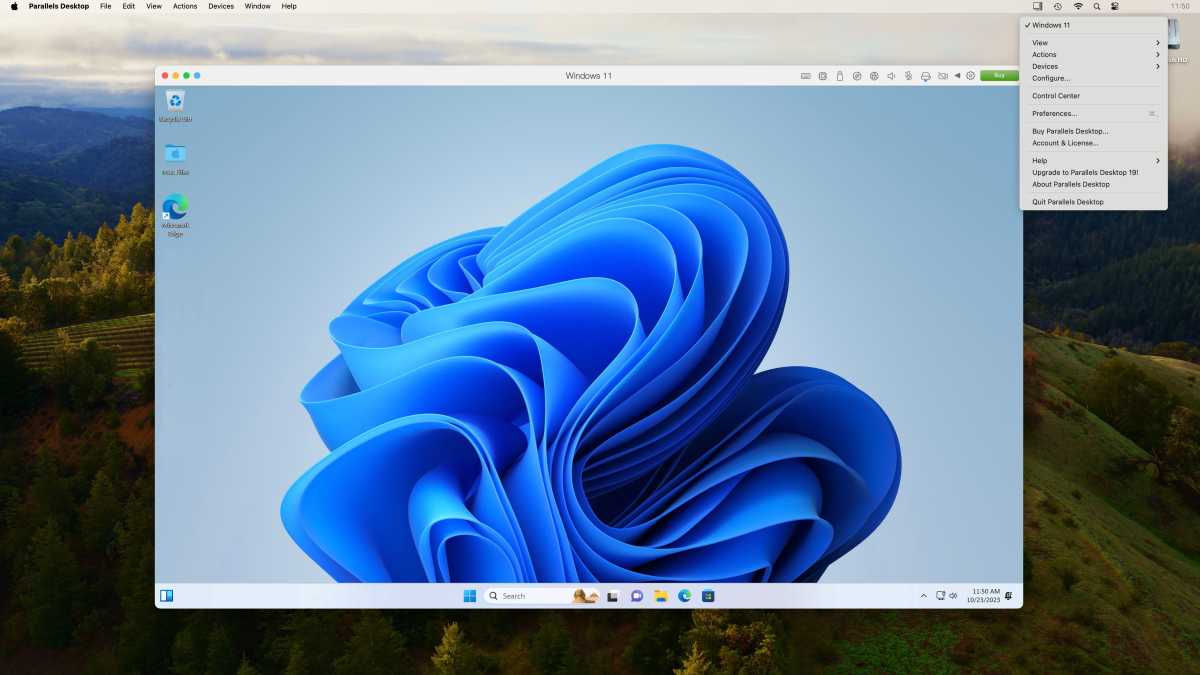
Run Windows in your Mac
Foundry
Here’s our Windows VM operating on an iMac with a modest M1 processor. As you possibly can see right here, the VM begins off operating in its personal window, displaying the usual Windows desktop. However, Parallels Desktop gives a Coherence mode that hides this window and simply reveals your Windows apps floating on the principle Mac desktop, similar to abnormal Mac apps. You can modify the viewing mode and different settings utilizing the Parallels pulldown menu in the principle Menu bar.
This article initially appeared on macworld.com.