
If you assume that overclocking is solely for performance-obsessed geeks armed with bottles of liquid nitrogen, it’s time to rethink! Even a small bump in PC efficiency can delay the necessity to improve your CPU, protecting cash in your pocket.
Today I’ll stroll you thru easy overclocking steps that may enhance processor speeds 10 p.c or extra. If you’re a gamer, video artist, or media streamer, that’s a helpful, no-cost improve. Read on if you need your PC to go quicker!
What is overclocking, anyway?
Overclocking is a method for tweaking varied varieties of PC {hardware}, in order that it runs quicker than the producer’s meant specification. Many processors, RAM modules, and graphics playing cards may be overclocked, normally by adjusting their settings by way of your motherboard’s UEFI BIOS. Operate in secure margins and overclocking shouldn’t harm your PC. But, as we’ll talk about, it’s necessary to handle the extra warmth that accelerated {hardware} can generate.
Some ideas for the journey
There are a couple of guiding rules price contemplating earlier than you overclock a CPU. First, not all processors may be simply overclocked. If you’re Team AMD, you’re in all probability in luck, as all trendy Ryzen processors may be overclocked in B- and X-series AM4 motherboards. Intel, nevertheless, locks most of its mainstream CPUs to stop sensible customers from buying a funds element and jacking up its efficiency. Pricier fanatic processor traces (recognized by a Okay or X suffix, such because the Intel Core i5-10600K), then again, are bought unlocked and might subsequently be overclocked.
Even then, keep in mind that processors are distinctive slabs of silicon and electronics. Some processors can tolerate increased working speeds higher than others—even these of the identical mannequin and specification. It’s referred to as the “silicon lottery” for a purpose!
Stable overclocks entail a fragile stability of velocity and warmth. The extra you push your processor, the warmer it’s going to get. If your PC turns into just a little too toasty, built-in fail-safe measures ought to shut off the ability earlier than these costly elements are broken. To preserve your overclocked PC secure, your job is to maintain it cool.
Budget CPU coolers (the inventory heatsink-and-fan meeting that ships with many processors) are going to wrestle right here. Consider upgrading to a better-performing air cooler (resembling these from Noctua) or examine all-in-one liquid coolers, which work very like a automotive’s radiator. I not too long ago upgraded my gaming rig with the NZXT Kraken X62 which pumps coolant over the CPU by way of a sealed system, then extracts the warmth by way of a big radiator and double-fan meeting, mounted within the prime of the case.
 NZXT
NZXTNZXT Kraken X62
We’re about to get hands-on with a motherboard’s UEFI BIOS software program, which permits fine-tuning of your {hardware} settings. However, some motherboard producers supply handy apps that try to securely overclock your CPU for you. If these handbook steps appear just a little powerful, then take a look at the likes of Asus Dual Intelligent Processors 5, Gigabyte EasyTune, AMD’s Ryzen Master, or Intel’s Extreme Tuning Utility. MSI motherboards actually have a bodily OC Genie button you’ll be able to press to turbocharge your PC.
Overclocking fundamentals
For this information, I’m utilizing an Asus Maximus VIII Hero Alpha motherboard with an Intel Core i7-6700Okay processor. Obviously, these steps could must be tweaked on your explicit {hardware}, however the rules nonetheless apply.
Before you get began, make sure to obtain and set up the newest BIOS software program on your motherboard from the producer’s web site. It’s an necessary step to make sure you have the newest configuration choices and that your efforts aren’t annoyed by recognized points.
Let’s boot up the PC, press F2 (or Delete) at startup to entry the BIOS, and get began.
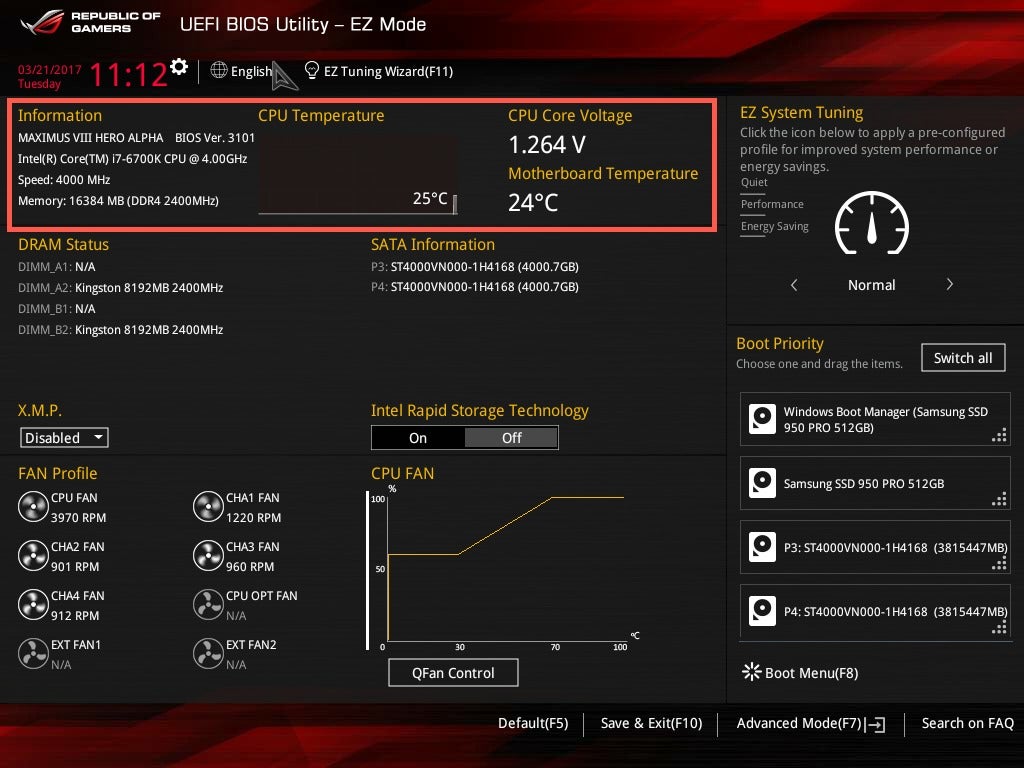
As you’ll be able to see beneath, this processor runs at a base frequency of 4GHz (4,000MHz). It’s additionally geared up with a Max Turbo characteristic that enhances speeds to 4.2GHz when required. When idle, the CPU temperature is a cool 25 levels C, with a core voltage of 1.264V—the quantity of energy that’s being equipped to the CPU.
 Terry Walsh/IDG
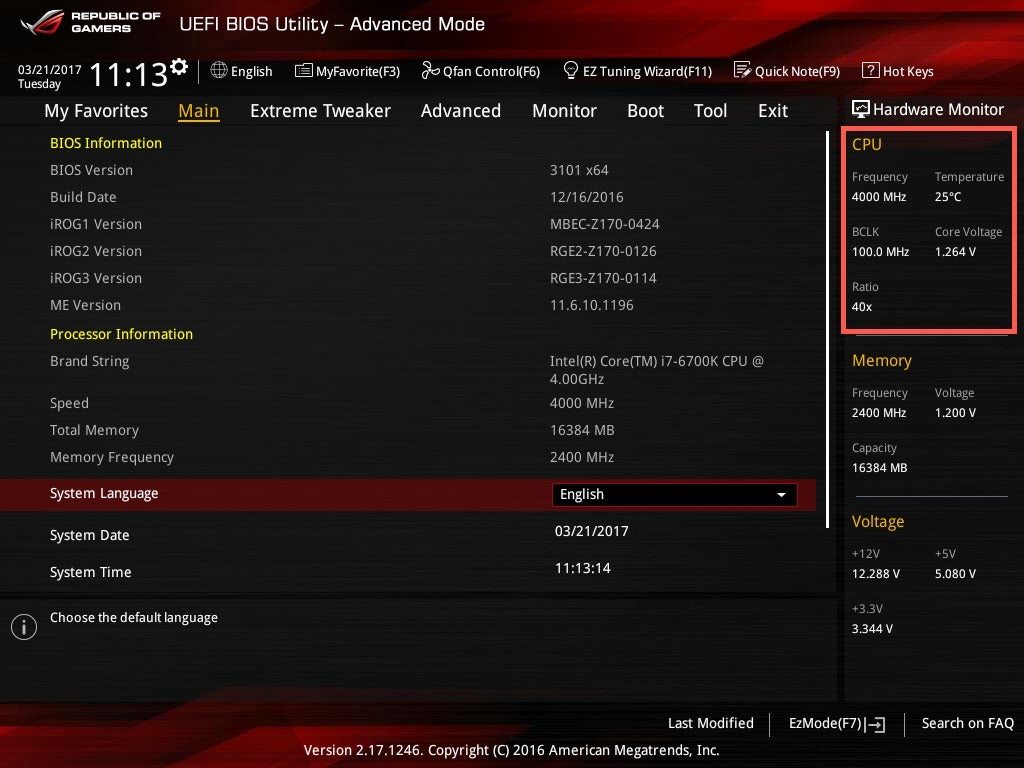
Click F7 to change to Advanced Mode, which is the place we’ll be spending most of our time on this information (see beneath). On the correct of the display screen, there are two extra settings to say: BCLK is the bottom clock frequency, presently set to 100MHz. Underneath that, you’ll see a Ratio setting (usually referred to as the multiplier). Your processor velocity is a straightforward calculation of the bottom clock velocity multiplied by the ratio. In this instance, 100MHz x 40 equals 4,000MHz (4GHz).
 Terry Walsh/IDG
To overclock the CPU, we will alter the bottom clock frequency or the ratio/multiplier to realize a quicker CPU frequency. A ratio of 42x with the identical 100MHz base clock velocity would ship a CPU frequency of 4,200MHz, or 4.2GHz.
Switching to handbook management
Modern motherboards may be geared up with a raft of automated settings designed to make overclocking simple.
 Terry Walsh/IDG
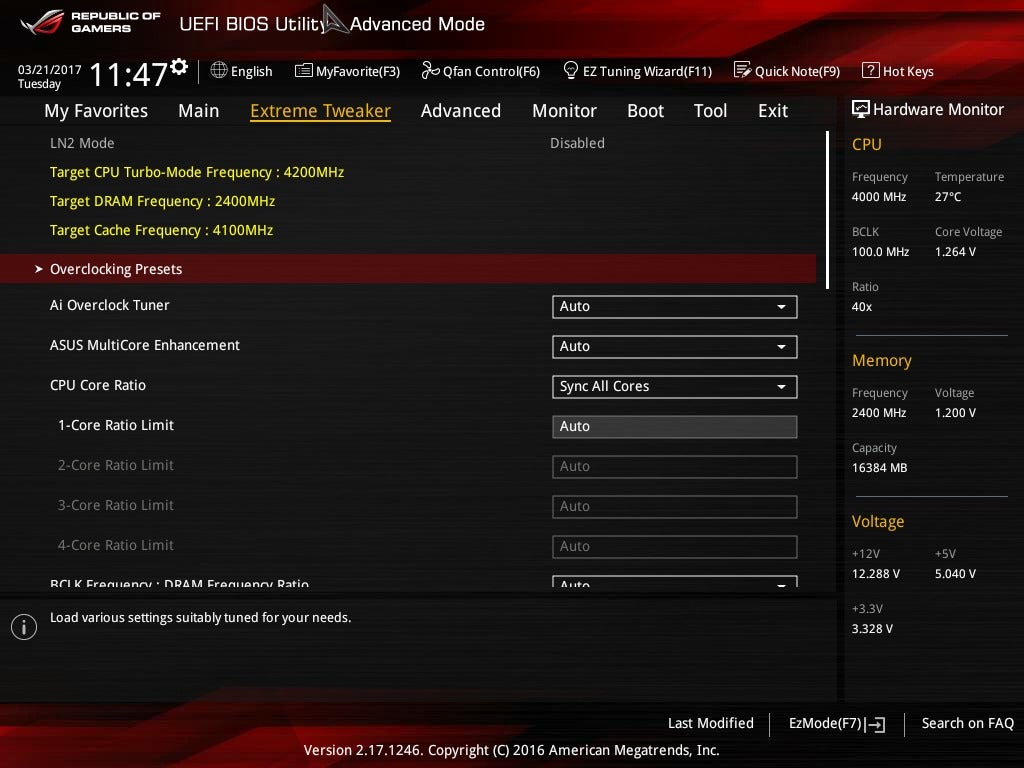
In the Asus Extreme Tweaker menu, we swap the Ai Overclock Tuner from Auto to Manual, which permits entry to the bottom clock frequency setting. You can now kind a worth into the BCLK Frequency discipline. Hold fireplace for now, although.
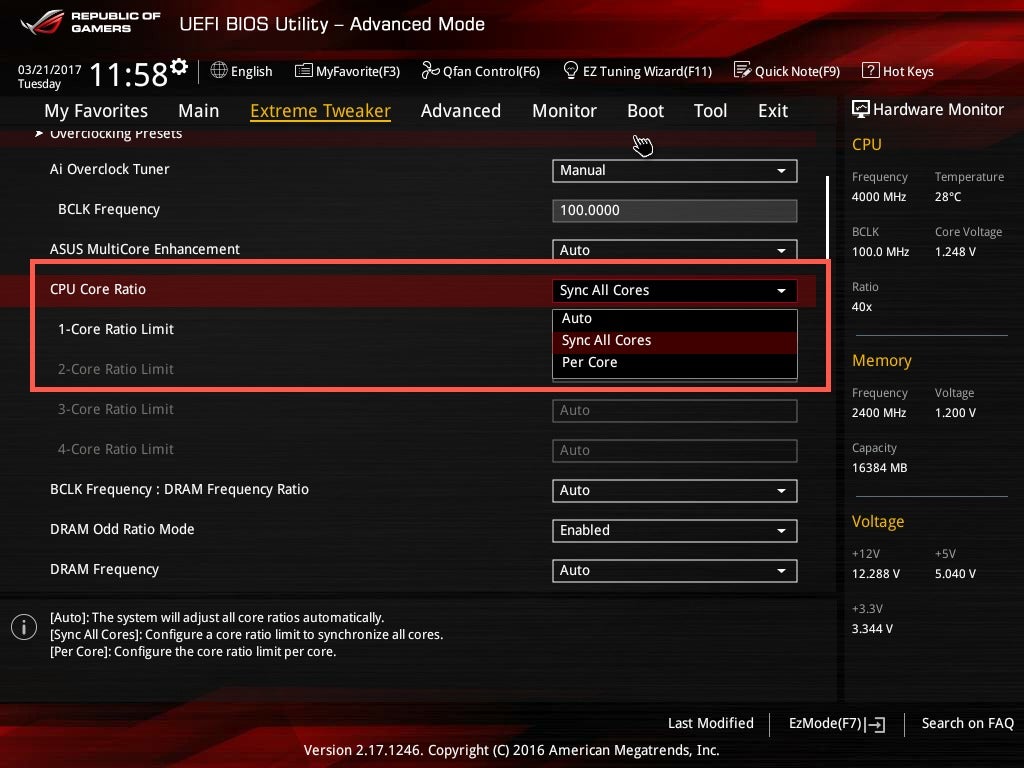
Below, you’ll see CPU Core Ratio, which permits us to regulate the multiplier. Some motherboards can help you goal particular person processor cores or apply one setting throughout all cores. Why? Applying the identical bold overclocking profile to all processor cores could make your PC unstable. But, dial again the settings on particular person cores and you might obtain a greater stability.
 Terry Walsh/IDG
With the CPU Core Ratio set to something aside from Auto, the Core Ratio Limit settings turn out to be editable. Sync All Cores allows the 1-Core Ratio Limit setting. Any worth you kind right here is utilized throughout all 4 cores. Select Per Core and you’ll goal every core individually.
 Terry Walsh/IDG
We’ll synchronize speeds throughout all cores on this information, however be happy to play with particular person core settings if required.
Before we make any modifications to the bottom clock frequency or CPU ratios, there’s a further component to contemplate: voltage. The voltage utilized to your CPU varies regularly. Faster working speeds require extra energy for stability. Your motherboard handles this behind the scenes however, do you have to want, you’ll be able to set handbook voltage ranges to help your overclocking efforts.
 Terry Walsh/IDG
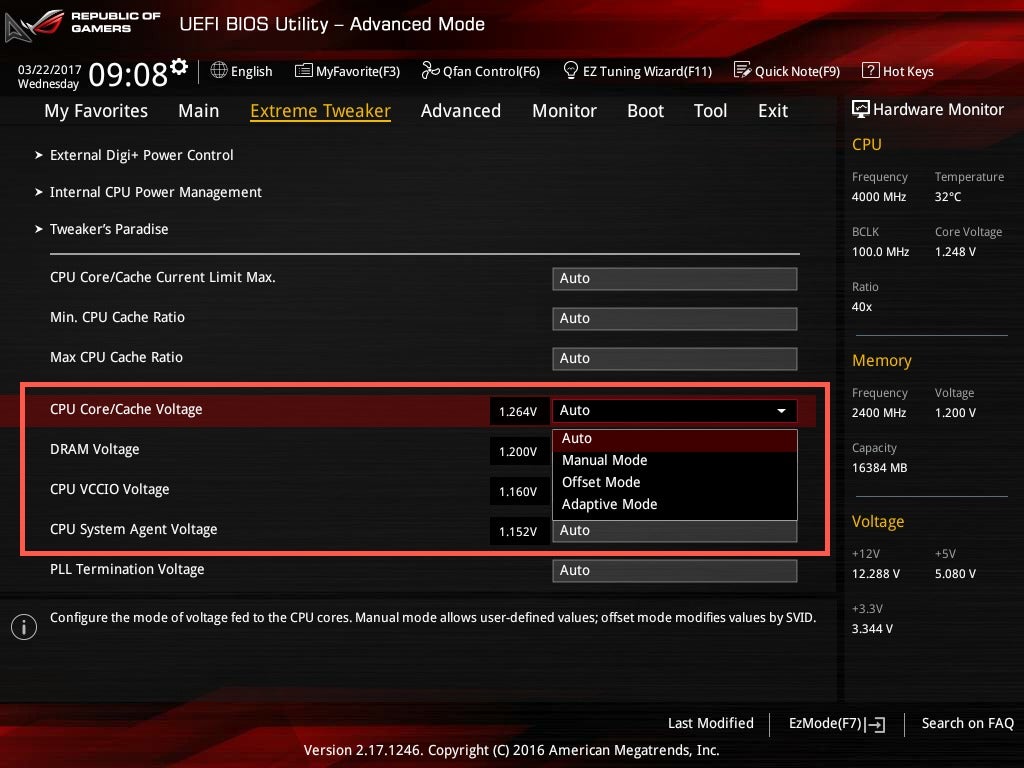
Scroll right down to CPU Core/Cache Voltage and click on the drop-down menu. You can see three various settings. Manual Mode units a single, static voltage stage. Whether your CPU is idle or working at full tilt, the identical voltage can be utilized. Thinking about energy consumption, Manual Mode is kind of inefficient, however provides you probably the most management.
Offset Mode works by including (or subtracting, when you wished to underclock) a set quantity of energy to the usual voltage that the processor would use. The voltage would nonetheless range primarily based on necessities, however the vary could be boosted by no matter step you configured. So, when you created an offset of 0.1 V, for instance, and the processor usually requires 1.25 V to ship a sure velocity, 1.35 V would truly be equipped.
In Adaptive Mode, your CPU would solely obtain a voltage enhance when it enters turbo mode. It’s price noting that, on some motherboards, you can additionally embody an Offset worth for Adaptive Mode, that additionally supplies a voltage enhance to the processor exterior of turbo mode.
 Terry Walsh/IDG
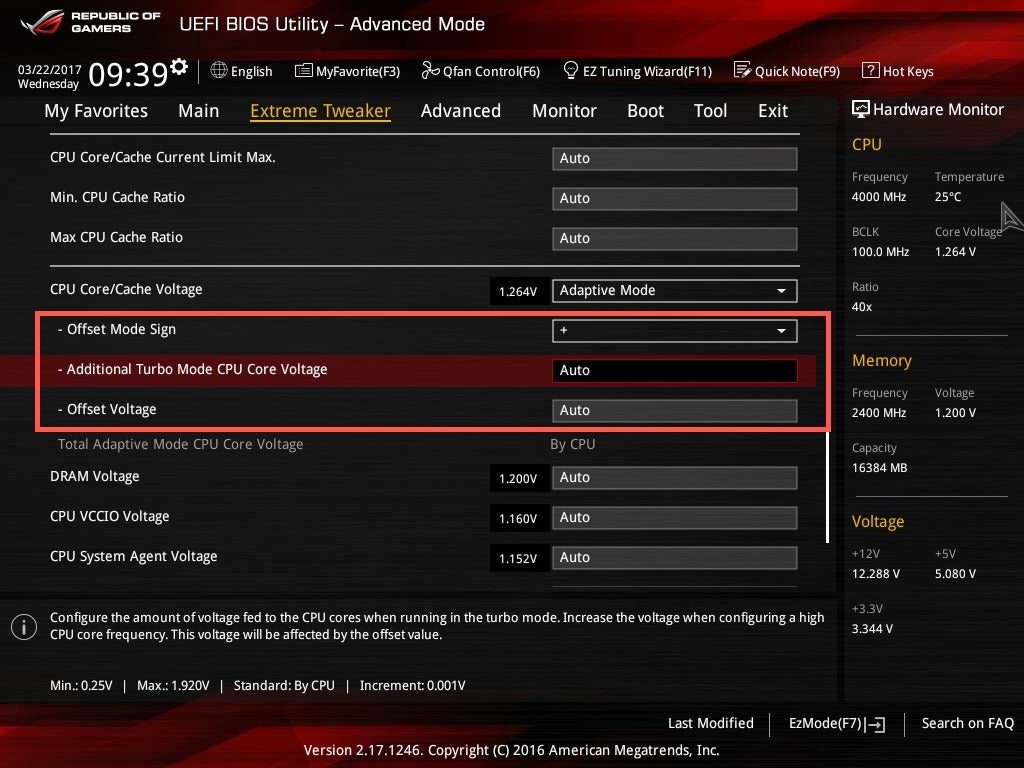
If you’re taking your first steps in overclocking, permit your motherboard to deal with voltage mechanically—not less than till you’ve constructed up some expertise. If you expertise instability, then experiment with Adaptive and Offset modes to help your CPU with a small voltage enhance. Benchmarking PCs in handbook voltage modes can place important stress on the CPU, growing their danger of failure.
Be certain to additionally take note of any contextual assist offered in your UEFI BIOS, or motherboard handbook. In the screenshot above, you’ll be able to see pointers on the backside of the display screen outlining minimal and most voltage settings, in addition to the increment to make use of.
Next web page: Walkthrough and benchmarking