
Undervolting your graphics card can have important enhancements on its thermals whereas sustaining a excessive stage of efficiency. This additionally interprets to much less energy draw, much less total warmth, and probably an extended lifespan. We just lately laid out why it is best to (or shouldn’t!) take into account doing this in our article here. Generally talking, it’s a protected course of that shouldn’t harm your {hardware}.
Today, we’ll present you methods to undervolt your Nvidia or AMD graphics card. Best of all, it’s free and enjoyable to do!
Step 1: What you’ll want
Let’s collect the mandatory instruments for the job. We know the GPU scarcity is tough, however you’ll want an Nvidia or AMD ‘Unobtanium’ GPU for this to work. Older technology graphics playing cards work positive too, however your mileage might range. A GPU that’s already closely overclocked from the manufacturing facility might require extra work to achieve a candy spot versus a reference or founders version that’s nearer to inventory settings.
Many of the identical ideas will apply to each Nvidia and AMD GPUs, however they differ barely in the simplest purposes as we’ll see right here:
- MSI Afterburner, et al: This free utility software will mean you can do all of the tinkering on the GPU and monitor the vitals. This is advisable extra for Nvidia GPUs. You can additional complement with HW Info64, which helps you to monitor GPU Junction Memory temperatures on the RTX 3000’s VRAM. You’ll additionally need to obtain AMD’s Adrenaline Radeon Software when you’re working an AMD GPU, because it has nice straightforward to make use of instruments for this.
- Heaven Benchmark: This is a free benchmark that may provide help to get actual time suggestions out of your GPU settings.
- Your Favorite Game: Don’t neglect to do exams previous to undervolting, so you may see the enhancements. Keep an eye fixed on temperature and clock speeds. Take notice of the inventory specs of your GPU in addition to these by the producer, in order that when you’re hitting the numbers when undervolting.
Step 2: Pre-Flight Tests
Open up MSI Afterburner and get acquainted with the completely different sliders and GPU knowledge readouts. Here you’ll discover temperatures, energy limits, reminiscence clock, and core clock speeds. Yours might have a unique visible pores and skin.
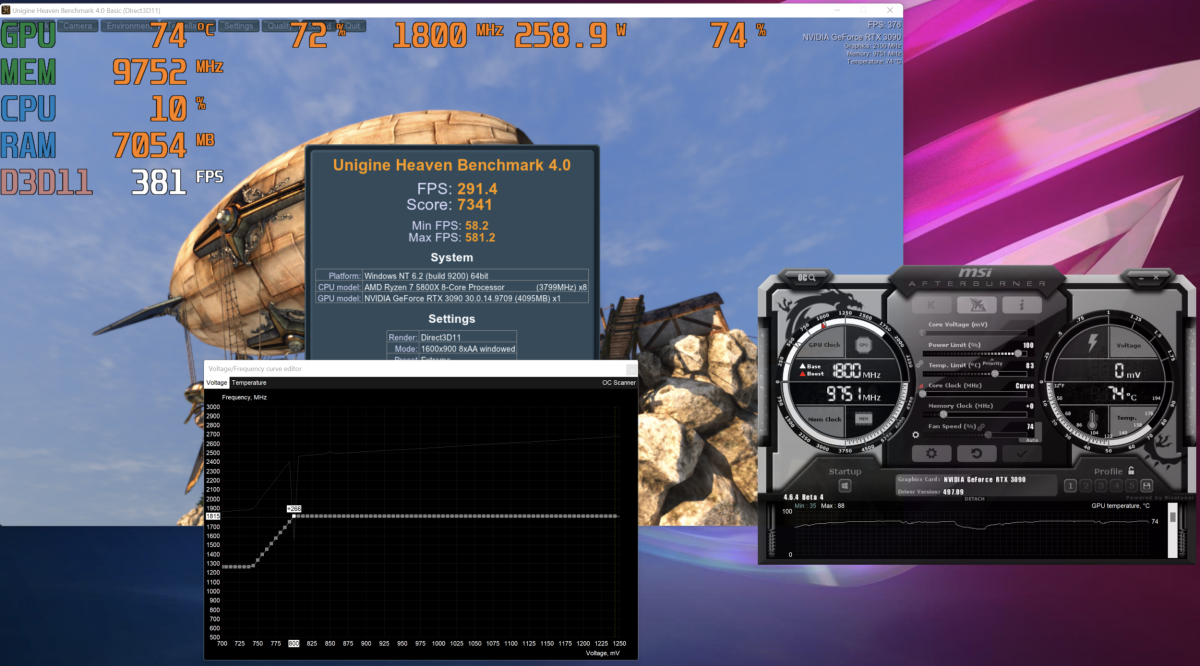
- Run a Heaven Benchmark Pre-Test: We’re working a check on a inventory Nvidia EVGA 3090 FTW3 Ultra utilizing the Heaven Benchmark Extreme preset so we will see enhancements afterwards. Out of the field enhance, core clock will common round 1800Mhz for this GPU with temperatures round 83c after which hitting 86C after 30 minutes in an open chassis. The GPU can even downclock itself to beneath 1800MHz when temperatures are excessive by 15hz increments. Fans are at 83% to 86%, audible, however they’re not alarmingly loud. Memory speeds are secure at about 9751Mhz. Our inventory Heaven rating beneath is 7,350 or 291.8 FPS. We’ll examine this to our undervolted numbers quickly.
Stock check with the Heaven benchmark.
Thiago Trevisan/IDG
Nvidia 3090 EVGA FTW3 Ultra inventory, Heaven Benchmark Extreme:
- Temperature: 83c to 86c after 30 minutes
- Clock speeds: 1800MHz with occasional downclocking
- Fans: 83% to 86%
- Heaven Benchmark Extreme Score: 7,350 with a 291.8 FPS
Step 3: Curve Editor
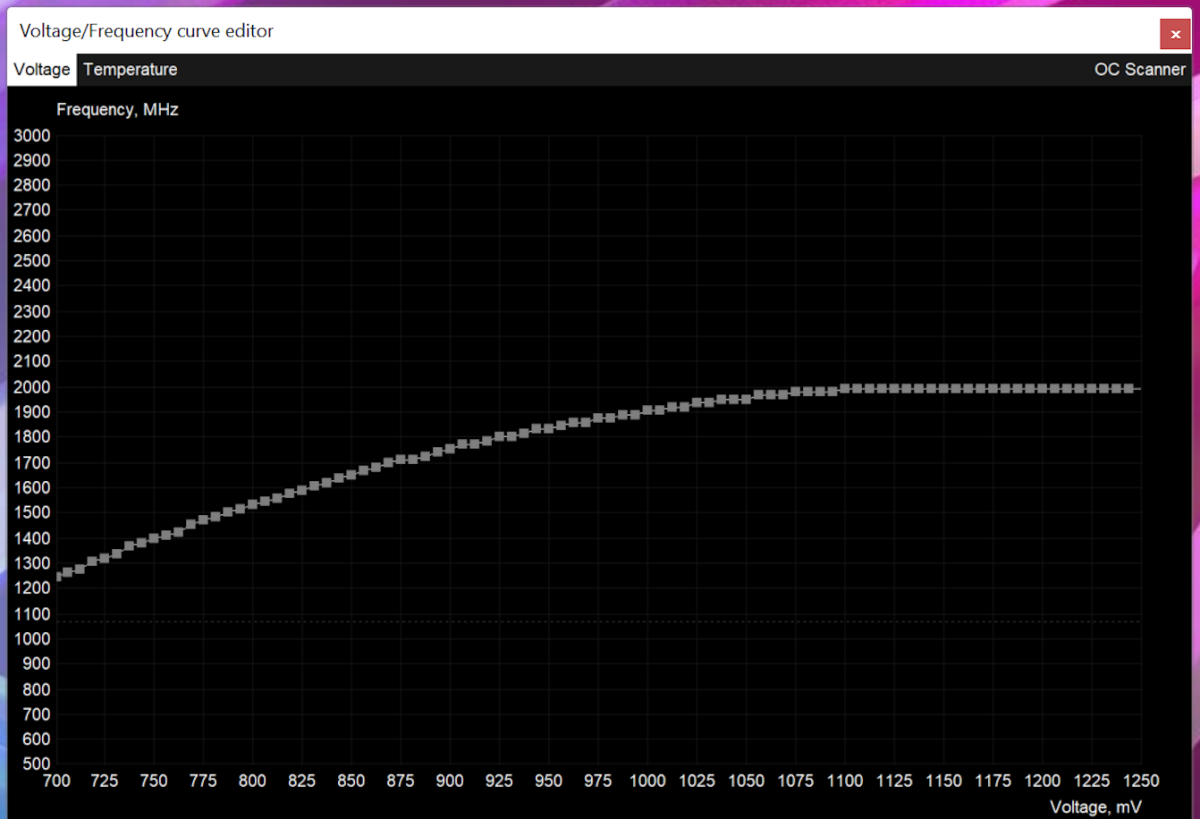
The curve editor: This would be the trickiest a part of the method, but it surely will get simpler afterwards. In MSI Afterburner, you’ll need to hit ‘control+F’ in your keyboard to open the curve editor. We’re trying on the GPU Core clock MHz frequency on the left (Y Axis) column, and the GPU Voltage on the underside (X Axis) row.
Thiago Trevisan/IDG
Frequency and Voltage: For our GPU, we see that 1800MHz is the core enhance clock. If we discover that on the curve editor, it should fall proper round 975 volts with inventory out of the field settings. Your GPU will range, even when it’s the identical mannequin, so be sure you examine stats on your explicit one.
You’ll need to drag it first to 1800MHz, and you can begin on the 975V as a place to begin. (Your numbers will differ relying on GPU) After hitting the examine mark in Afterburner, the road must be straight after your chosen frequency and voltage.
These are the fundamentals of the method, however be mindful the curve editor could be barely tenacious with the way it strains the frequencies up. You might need to perform a little little bit of tinkering to get it the place you’d like.
I normally discover that inserting each level beneath your goal frequency by holding CTRL and dragging down, adopted by elevating simply the goal frequency at your required voltage will line up properly after hitting the examine mark in Afterburner.
Step 4: Test, Adjust, and Test some extra
Now the actual enjoyable begins. Using Heaven Benchmark, you may check varied curve factors for frequency and voltage. Heaven will usually crash when you’ve gone too far. If it retains working, proceed to check in your favourite video games earlier than figuring out if it’s a secure undervolt.
Test 1: After our preliminary inventory 1800MHz and 975v start line, we dropped the voltage all the way down to 875v and barely elevated the frequency to 1815MHz. Here is the intense preset end in Heaven Benchmark:
- Temperature: 81c
- Clock velocity: 1815MHz and routinely clocked larger to 1830MHz
- Fan velocity: 82%
- Heaven Benchmark rating: 7,433 with an FPS of 295.1
The above is a notable enchancment in efficiency numbers, in addition to reasonably higher thermals and noise. Let’s take it a step additional and discover some good effectivity.
Thiago Trevisan/IDG
Test 2: Let’s goal 1815MHz once more and see how the GPU responds at a decrease 800v.
- Temperature: 74c
- Clock Speed: 1800MHz Average
- Fan Speed: 74%
- Heaven Benchmark Score: 7341 With a FPS of 291.4
The outcomes for 800v at 1815MHz had been near inventory and thermally a lot better. Fans dropped from 86% to 74% and temperature dropped from 86c to 74c whereas sustaining the inventory core clock speeds. Our rating decreased barely from 7350 to 7341 and FPS from 291.8 to 291.4, however this may be elevated with some additional tuning.
With some additional tweaks, we raised the voltage to 875v and frequency to 1890MHz. This netted us a rating of 7556 at 300 FPS, but in addition introduced temperatures to 80c and followers to 81%. Still extra environment friendly than inventory with larger efficiency in addition if that is the route that you simply’re after.
You’ll then need to resolve if you need most efficiency features, most effectivity features, or a mix of each. This candy spot will range with every particular person GPU because of the silicon lottery, nevertheless. We had been proud of our first check outcomes at 1815MHz and 875v, however the voltage could be decreased for even higher thermals.
These varied examples can present you the way easy modifications in both voltage or frequency can elevate your efficiency up and down in addition to temperatures.
The key factor right here is to a pointy eye on just a few important factors. Stability is crucial, adopted by your different advantages.
- It should be secure in Heaven Benchmark and your different video games.
- Watch the core clock to verify it’s hitting the mark.
- Watch thermals and energy utilization to verify the advance is real looking.
- Experiment with completely different voltages and core clocks for greatest outcomes.
Undervolting AMD GPUs
If you’re working an AMD GPU, you’ll have entry to the instruments inside the Adrenaline Radeon software program.
Thiago Trevisan/IDG
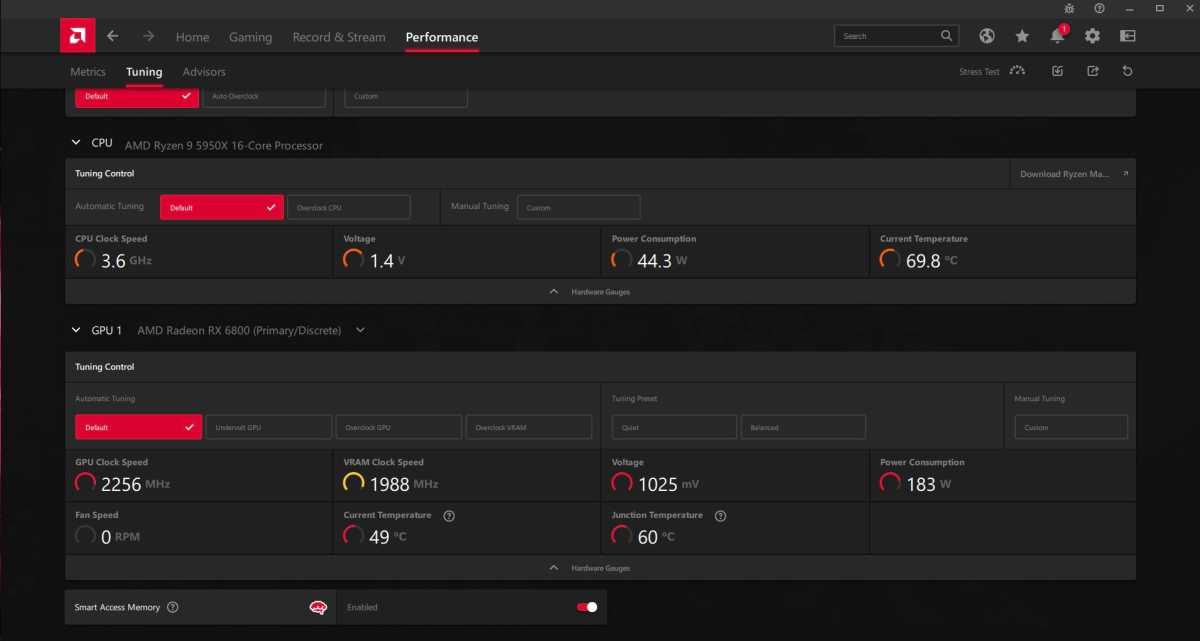
Here we’re testing the AMD Reference RX 6800, which is customized water cooled. The acknowledged enhance frequency by AMD is often 2105MHz, however right here we’re allotted extra headroom to over 2200MHz because of the additional cool efficiency.
The AMD Radeon Software is straight ahead to make use of. First, head over to the efficiency -> Tuning tab.
Here, you’ll have just a few choices. You can manually set the voltage very like we did with the Nvidia GPUs. Experiment with simply altering the voltage itself. With a drop from 1025mv to 893mv, we had a secure enhance in efficiency. Temperatures, energy draw, and noise ranges had been all down from inventory. Benchmark numbers improved as properly and that’s precisely what we prefer to see.
You also can use the auto undervolting function discovered on the identical web page. Here the software program will do the be just right for you, but it surely doesn’t at all times produce good outcomes – for that you simply’ll need to do some customized tuning.
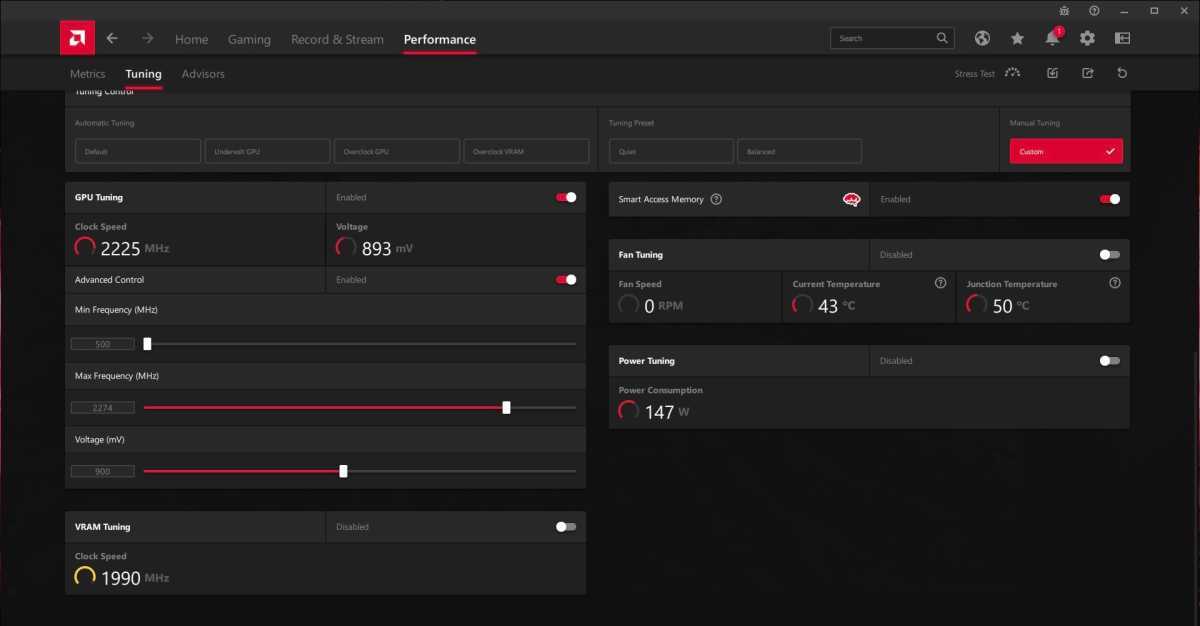
Improved outcomes from undervolting
Thiago Trevisan/IDG
Conclusion
Undervolting is akin to positive artwork with some wholesome science blended in. The actual substances on your optimum candy spot will range based mostly on GPU and it’s as much as you to see what finally works greatest. The proof is within the proverbial pudding, nevertheless: the exams and stats above will help you gauge how profitable your makes an attempt at undervolting have been. Best of luck and get tinkering!