


Upgrading your PC can breathe new life into an older system, bettering efficiency, growing storage capability, and enhancing your general computing expertise. Whether you are seeking to velocity up your purposes, retailer extra information, or get higher graphics efficiency for gaming or design work, this information will stroll you thru the important upgrades you would possibly contemplate.
Note: Before you spend cash on {hardware} upgrades, you would possibly wish to attempt a number of the free strategies of dashing up your laptop outlined in this article.
How to improve your PC
There are 4 fundamental strategies of upgrading your PC:
1. Upgrading RAM
2. Switching from Hard Disk to M.2/NVMe Solid State Drive
3. Switching from Hard Disk to SATA Solid State Drive
4. Upgrading the graphics card
5. Upgrading the processor
We’ll discover every of those within the steps beneath.
Before you begin: do you have to improve or purchase a brand new laptop?
Upgrading means that you can tailor your PC to your particular wants and preferences. You can prioritize which parts to improve based mostly on what efficiency enhancements are most necessary to you, corresponding to enhancing your gaming expertise, dashing up software program purposes, or growing storage capability.
But earlier than you start making {hardware} modifications to your present PC, ask your self whether or not it could be higher to purchase a brand new laptop.
If your laptop is comparatively new (lower than three years previous), it may need the potential for upgrades that may prolong its helpful life at a fraction of the price of a brand new PC. However, if it is considerably older, discovering suitable elements could be tougher, and the funding won’t be value it.
Sometimes, the overall value of upgrades can method and even exceed the worth of a brand new PC that meets your wants. Consider the cumulative value of upgrading a number of parts versus buying a brand new system.
Choosing between upgrading and shopping for a brand new PC finally comes all the way down to evaluating the cost-effectiveness, assessing your efficiency wants, and contemplating the longevity that upgrades vs. a brand new system will present. If upgrades can fulfill your necessities and supply a very good return on funding, they could be a clever selection.
1. Upgrade RAM
(Image: © unsplash.com)
Increasing your system’s RAM (Random Access Memory) can considerably enhance its responsiveness, particularly in the event you run a number of purposes concurrently or use memory-intensive packages.
1. First, decide the kind of RAM suitable along with your motherboard (DDR4, DDR5, and so on.) and the utmost quantity of RAM your system can help.
2. Once you already know the specs, purchase the RAM modules that match your system’s necessities. Check out our checklist of the best RAM for some strategies.
3. Power down your PC and unplug it. Open the case and find the RAM slots in your motherboard. If you are including to current RAM, take away the previous modules if obligatory. Align the brand new modules with the slot, making certain the notch on the RAM matches the slot, and press down firmly till the clips snap into place.
2. Switch from Hard Disk to M.2/NVMe Solid State Drive
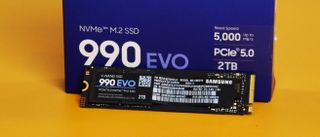

(Image: © Future / John Loeffler)
Replacing an HDD with a SSD gives a considerable efficiency improve. The two hottest choices are M.2/NVMe SSDs and SATA SSDs. We’ll cowl upgrading to a M.2/NVMe SSD on this step and upgrading to a SATA SSD in Step 3.
Other sorts of SSDs embody PCIe (Peripheral Component Interconnect categorical) and U.2 SSDs.
Choosing the proper SSD entails assessing your system’s compatibility, your efficiency wants, and your finances. Always double-check compatibility along with your motherboard and system specs to make sure a easy improve course of.
To swap from a tough disk to a M.2/NVMe SSD, you may have to do the next:
1. Confirm that your motherboard has an M.2 slot that helps NVMe SSDs. Note the size and width supported by your motherboard to make sure compatibility.
2. Utilize cloning software program to switch your working system, purposes, and information from the HDD to the M.2/NVMe SSD. Depending in your setup, it’s possible you’ll want to make use of an exterior adapter to clone to the M.2/NVMe SSD in the event you can not join it on to your motherboard alongside the HDD.
3. Power down and open your PC. Locate the M.2 slot in your motherboard. Remove any current modules if obligatory. Insert the M.2/NVMe SSD into the slot at a couple of 30-degree angle and gently press down. Secure the SSD with the screw offered.
4. Turn in your PC and entry the BIOS to make sure the M.2/NVMe SSD is chosen as the first boot system. After saving your modifications and exiting BIOS, your system ought to boot from the M.2/NVMe SSD, able to ship top-tier efficiency.
3. Switch from Hard Disk to SATA Solid State Drive


(Image: © Future)
SATA SSDs are slower than M.2/NVMe SSDs however will nonetheless outperform a tough disk drive. They are suitable with most computer systems and in addition are usually the cheaper choice when evaluating solid-state drives whereas being large enough for many basic computing wants corresponding to corresponding to net looking, workplace purposes, and watching movies.
To swap from a tough disk to a SATA SSD, observe the steps beneath.
1. Ensure the SSD is suitable along with your motherboard’s SATA interface. Check for measurement (2.5-inch is customary for SSDs) and guarantee your system has an obtainable SATA port.
2. Use cloning software to copy your operating system, purposes, and information onto the SATA SSD. You can do that by connecting the SSD to your PC utilizing a USB to SATA adapter, particularly helpful for laptops or PCs with out additional inner drive bays.
3. Power down your PC, open the case and find your HDD. Disconnect and take away the HDD, then set up the SATA SSD as a substitute utilizing the identical SATA and energy cables. Secure the SSD within the drive bay.
4. Power in your PC and enter the BIOS to make sure the SATA SSD is ready as the first boot system. Save modifications and exit BIOS. Your PC ought to now boot from the SATA SSD, leading to a big efficiency enchancment.
4. Upgrade Graphic Card
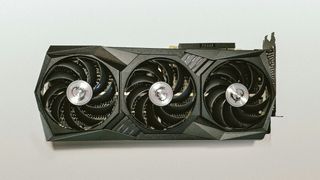
(Image: © unsplash.com)
A brand new graphics card can considerably improve your PC’s gaming efficiency, help for a number of displays, and enhance general visible efficiency in graphic-intensive purposes.
1. Ensure your PC’s energy provide can deal with the brand new graphics card’s energy necessities and that there is sufficient bodily area in your case.
2. Power down and unplug your PC. Open the case, find the graphics card, take away the screws and any energy connectors, and punctiliously pull it out of the slot.
3. Insert the brand new graphics card into the PCIe slot, safe it with screws, and join any obligatory energy connectors. Close the case, energy up your PC, and set up the brand new drivers.
5. Upgrade CPU
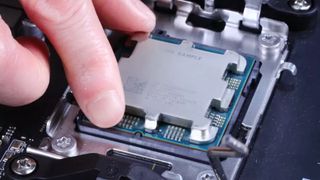
(Image: © MSI)
Upgrading the CPU is a much less frequent answer than the opposite steps we’ve coated right here. This is all the way down to stringent compatibility necessities with motherboards and the complicated and costly nature of the improve.
CPU upgrades are usually thought-about solely when the present processor is the clear bottleneck, or in the event you’re planning a big system overhaul.
If you wish to improve your CPU, observe the steps beneath.
1. Ensure your new CPU is suitable along with your motherboard. Check the CPU socket sort and chipset, and confirm that your motherboard’s BIOS is updated.
2. Power down and unplug your PC. Open the case to entry the motherboard. You would possibly have to take away different parts or cables that block entry to the CPU socket.
3. Carefully take away the CPU cooler (the fan and heatsink) from atop the CPU. You could have to twist gently or unclip a retention arm to launch the cooler. Then, gently elevate the CPU out of its socket by unlocking the socket’s retention arm (no power must be wanted).
4. Place the brand new CPU into the socket, aligning it appropriately with the socket’s notches or marking (CPUs solely match a method). Lock the CPU in place by securing the socket’s retention arm. Apply thermal paste to the highest of the CPU if it isn’t pre-applied on the cooler. Then, reattach the CPU cooler, making certain it is securely fixed.
5. Reassemble any parts or cables you needed to transfer or take away through the CPU improve. Close up your PC case, plug all the pieces again in, and energy up your PC. You could have to enter the BIOS to confirm the brand new CPU is acknowledged and configure any new settings.
We have coated the first strategies of upgrading your PC. However there are a few different choices that you could be want to contemplate.
If you are including parts that require extra energy, like a high-end graphics card, it’s possible you’ll have to improve your energy provide to fulfill the brand new calls for.
More highly effective parts can generate further warmth. Consider upgrading your cooling system with higher followers or a liquid cooling answer to maintain temperatures down.
Overall, upgrading your PC is an economical strategy to prolong its lifespan and improve your computing expertise. Whether you are upgrading for higher efficiency, elevated storage, or improved graphics, it is important to analysis and guarantee compatibility earlier than buying new parts. Always again up your information earlier than making any modifications, and in the event you’re not snug performing the upgrades your self, search help from knowledgeable.