
The Blur Gallery in Adobe Photoshop is completely different from the Blur Filters we have lined beforehand (each are present in Photoshop’s Filter menu). When you choose Blur Gallery, Photoshop shows one other dropdown menu with 5 Blur choices: Field, Iris, Tilt-Shift, Path, and Spin Blur. These filters are way more interactive than common Blur Filters, with dwell previews and on-image controls, together with choices to create Bokeh results.
Blur Gallery Tools
To use Blur Gallery options, open a file, then use the Lasso software or the Magic Wand to pick the realm you wish to clean or soften. It works greatest should you lower out the chosen space, paste it again in as a brand new layer, then be certain that this layer is lively within the Layers panel. The blur will have an effect on the whole chosen space until you utilize the Pins to pick particular sections.
Using the blur options within the Blur Gallery
Choose Filter > Blur Gallery > Path Blur (or any of the opposite 4 Blur choices) to open the Blur Gallery panel, which shows all 5 of the Gallery Blurs talked about above, plus three Effects tabs that present choices for Bokeh, Motion, and Noise. Each Gallery Blur and every of the three Effects provide completely different adjustment instruments to fine-tune the particular results in your pictures.
With the on-screen controls, you possibly can see what the consequences are doing to your picture as they occur. For instance, the primary management is a circle with a dot inside known as a Pin (the cursor seems to be like a pin or tack). Click completely different areas on the picture to create a number of Pins, that are potential blur areas. Click the darkish line contained in the circle and drag it across the circle to extend or lower the blur impact. You can even use the slider bar for this similar perform.
 JD Sartain / IDG
Use the Field Blur to melt the graduated ranges of shade within the blurred background
Field Blur
Use this impact for example a graduated blur impact (much like a gradient, however utilizing solely the colours within the chosen space).
Select the layer within the Layers panel that you simply wish to have an effect on. Choose Filter > Blur Gallery > Field Blur. Click the placement or areas the place you wish to blur the picture. Use your cursor to pick every Blur Pin individually, then drag the spinner contained in the circle to blur the completely different areas.
We selected a picture of a discipline of yellow tulips, deciding to create one completely different from the remaining by altering its shade, then blurring out the remaining. We coloured one of many tulips a brilliant coral-orange. We outlined it with the Lasso software, then inverted the layers: Select > Inverse to make the background the lively layer.
We moved the Pin up into the sky space, then dragged the road contained in the circle till the background was fuzzy however nonetheless recognizable.
NOTE: Press the Delete key to take away particular person pins, or click on the checkbox to toggle verify on and off. Off cancels the present blur impact. The Escape key cancels the Blur Gallery.
 JD Sartain / IDG
The Iris Blur impact blurs out every thing EXCEPT the chosen space
Iris Blur
Use the Iris Blur impact to blur out every thing on the canvas besides the chosen space.
Choose Filter > Blur Gallery > Iris Blur. Position the blur Pin on the part you wish to spotlight so the main focus is obvious and sharp. Use the handles to pull the ellipses round, change its form, enhance or lower its measurement. You can place a number of Pins on the canvas to “stop” the blur in all the chosen areas and simply blur what’s left of the background.
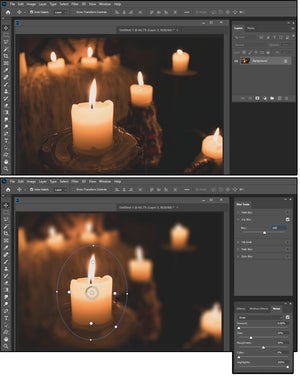
We selected a photograph with seven candles on a desk, then used the Iris Pin selector to create an ellipse across the heart candle. We set the blur impact to 100, which pale and hazed out every thing besides the chosen heart candle. Unlike the Field Blur, which works greatest with a number of Pins or a number of layers, the Iris Blur reacts to every thing not Pinned.
 JD Sartain / IDG
Tilt-Shift Blur alters perspective
Tilt-Shift Blur
Photographers use tilt-shift lenses to {photograph} panoramic views, to change the dimensions of an space so it seems miniature, to right vertical strains that converge, and to blur particular areas of a picture.
In Photoshop, the impact is far the identical. A tilt-shift lens alters perspective. It seems to be prefer it provides an oblong window (or strip) of sharpened focus to a blurred picture. But, in reality, it maintains the sharp focus contained in the window and blurs out the remaining in a graduated fade.
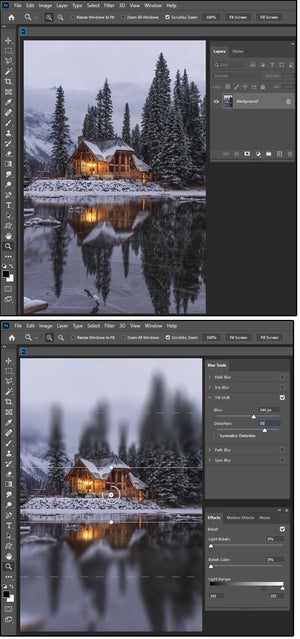
In our instance, we determined to give attention to the cabin and make the timber, mountains, and the sky on prime step by step fade from sharp to hazy; then part out the water and reflections on the underside to simulate an eerie, ghostly feeling.
We divided the picture into 5 sections, maintained the sharp heart, and fuzzed out the remaining. We selected 144 pixels for the Blur and 55 for the Distortion.
Path Blur
The Path Blur does the apparent: It creates a blurred space alongside a particular path that simulates movement. When you choose Filter > Blur Gallery > Path Blur, a line with an arrow and a big pin dot seem on the best, a small pin dot seems within the heart, and one other massive pin dot seems on the left.
 JD Sartain / IDG
Path Blur create a blurred path of movement
If you drag the pin dots in any path, the road that connects them bends and arcs up, down, left, proper, or out and in of spirals, hooks, and loops. If you click on the pin dot first (a smaller dot seems contained in the pin dot), then you possibly can drag a straight line in any path. You can even use the pin tack cursor so as to add extra pin dots to the picture, which creates a number of blur paths.
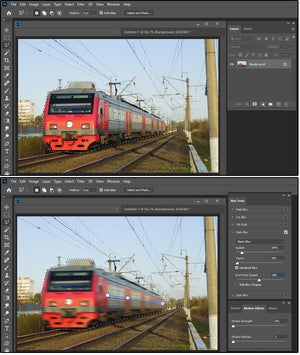
For our instance, we moved the road of pin dots right down to the facet of the practice, then stretched it out from the engine to the caboose, following the road of the tracks to simulate a fast paced practice hovering down the tracks at excessive pace. We set the Basic Blur Speed to 50 p.c, the Taper to 0, checked the Centered Blur field, and selected an End Point Speed of 200 pixels. This supplied an phantasm of a rushing practice, which is the impact we needed.
NOTE: If the Basic “Path” Blur doesn’t present the impact you search, attempt the Rear Sync Flash Blur, which emulates that flash impact that fires on the finish of an publicity.
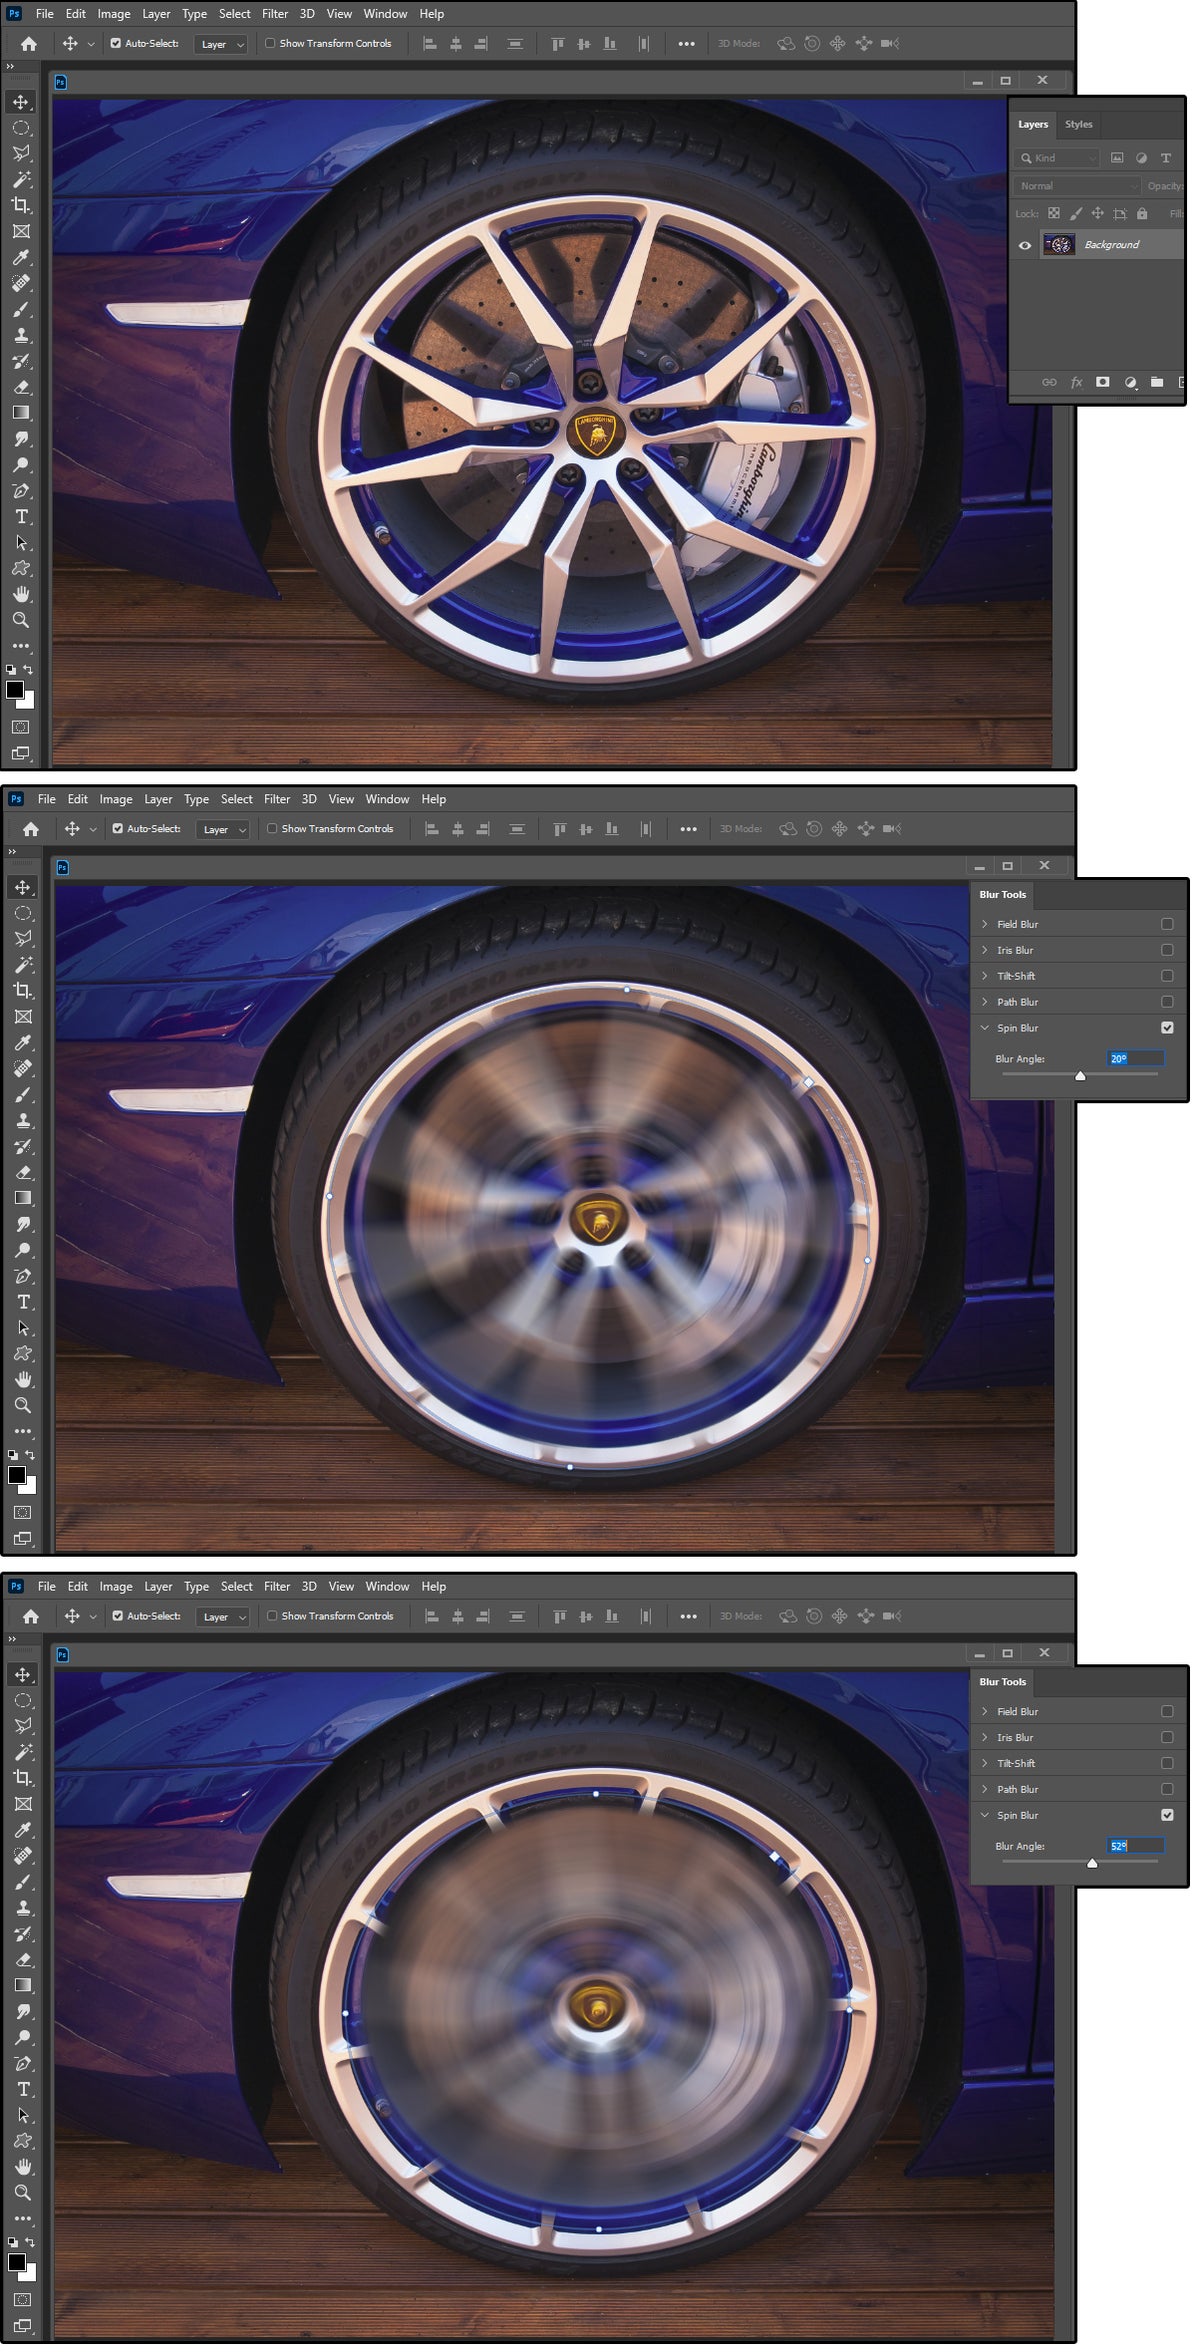
Spin Blur
The Spin Blur is, principally, the identical because the Radial Blur, besides the Blur Angle is measured in levels from 0 to 360. When you select Filter > Blur Gallery > Spin Blur, a circle seems in the course of your picture with tiny dots at north, south, east, and west; and pinpoints seem simply contained in the circle on the similar areas.
 JD Sartain / IDG
Spin Blur is measured in levels
Use the dots to reshape and rotate the outer circle. Use the sq. handles to measurement it, and the pinpoint dots to reshape the within, which is the realm that spins.
We selected to spin a few tires. We chosen a Blur Angle of 20 levels for the primary and a Blur Angle of 55 levels for the second for example the completely different angles and the exact management one has over manipulating the spinning radius.
Gallery Effects Tools
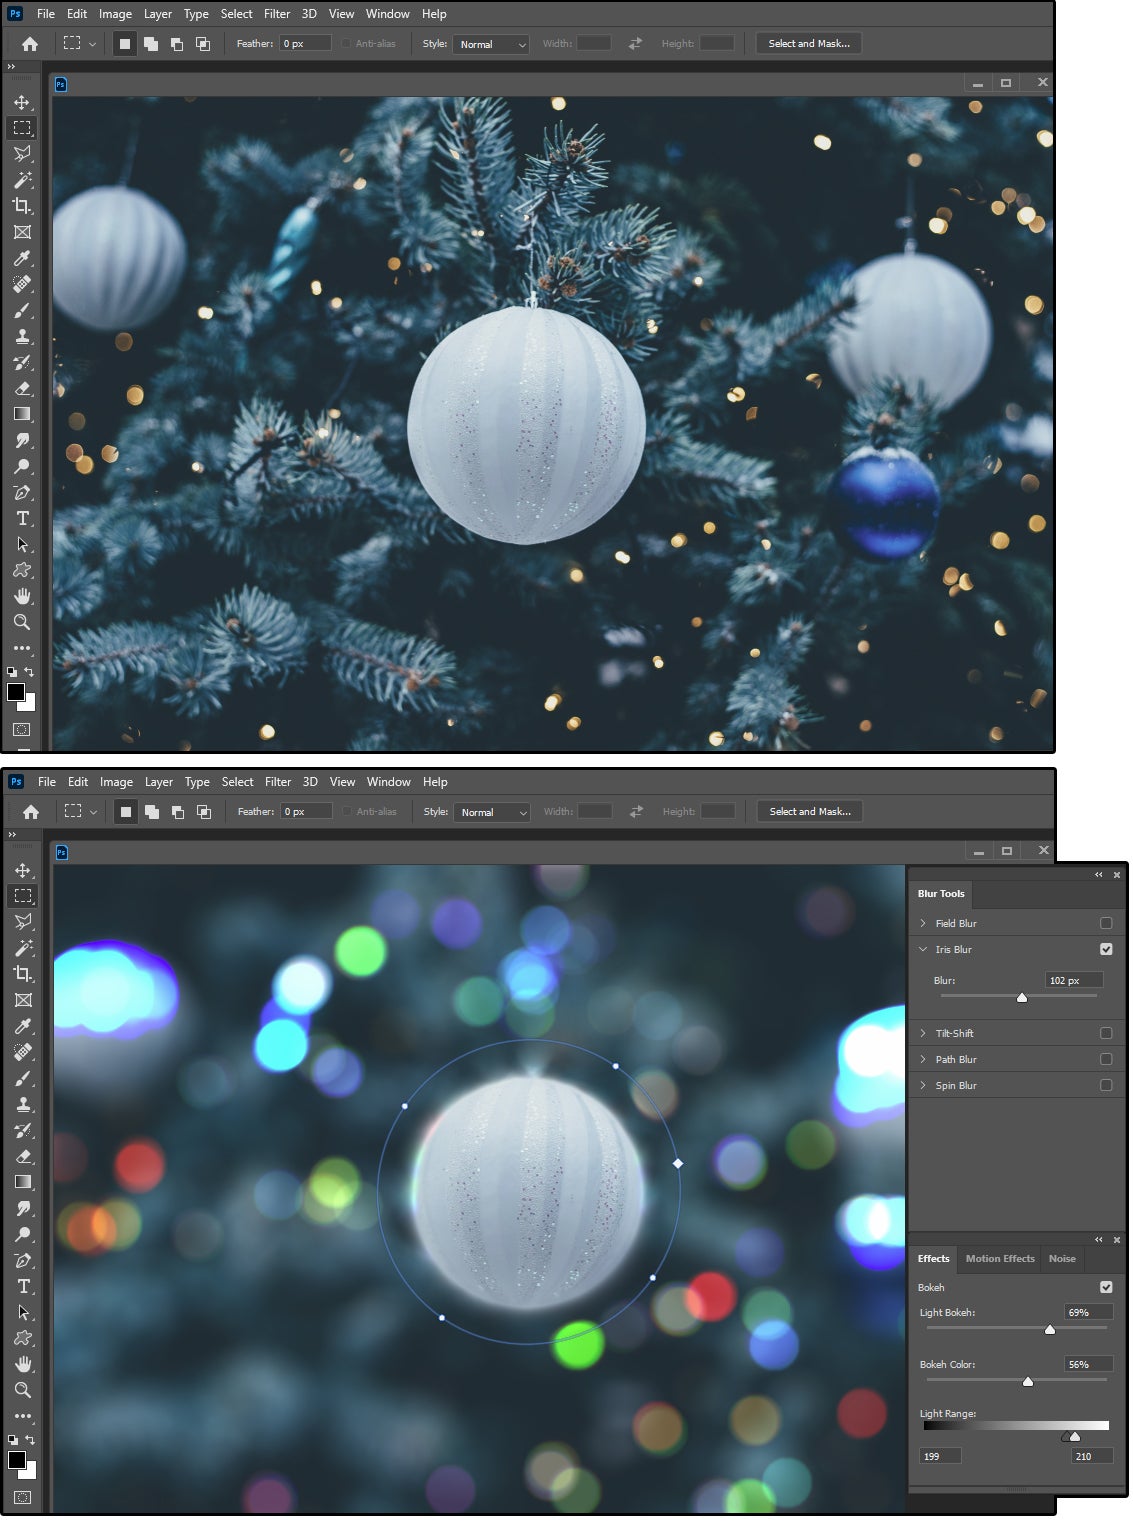
Bokeh Effects
 JD Sartain / IDG
Bokeh impacts the standard of mirrored mild within the shallow depth of discipline
As described within the second paragraph, the Bokeh results in our instance create clean, silky circles of sunshine with mushy, glowing edges.
Notice that the background lights across the decoration in our Christmas picture are gold and white solely, and seem as confetti-like dots on the tree. After we utilized an Iris Blur of 102 pixels, with 69 p.c of Bokeh Light, 56 p.c of Bokeh shade, and a Light Range of 210, the decoration now glows on a background of soppy, colourful lights.
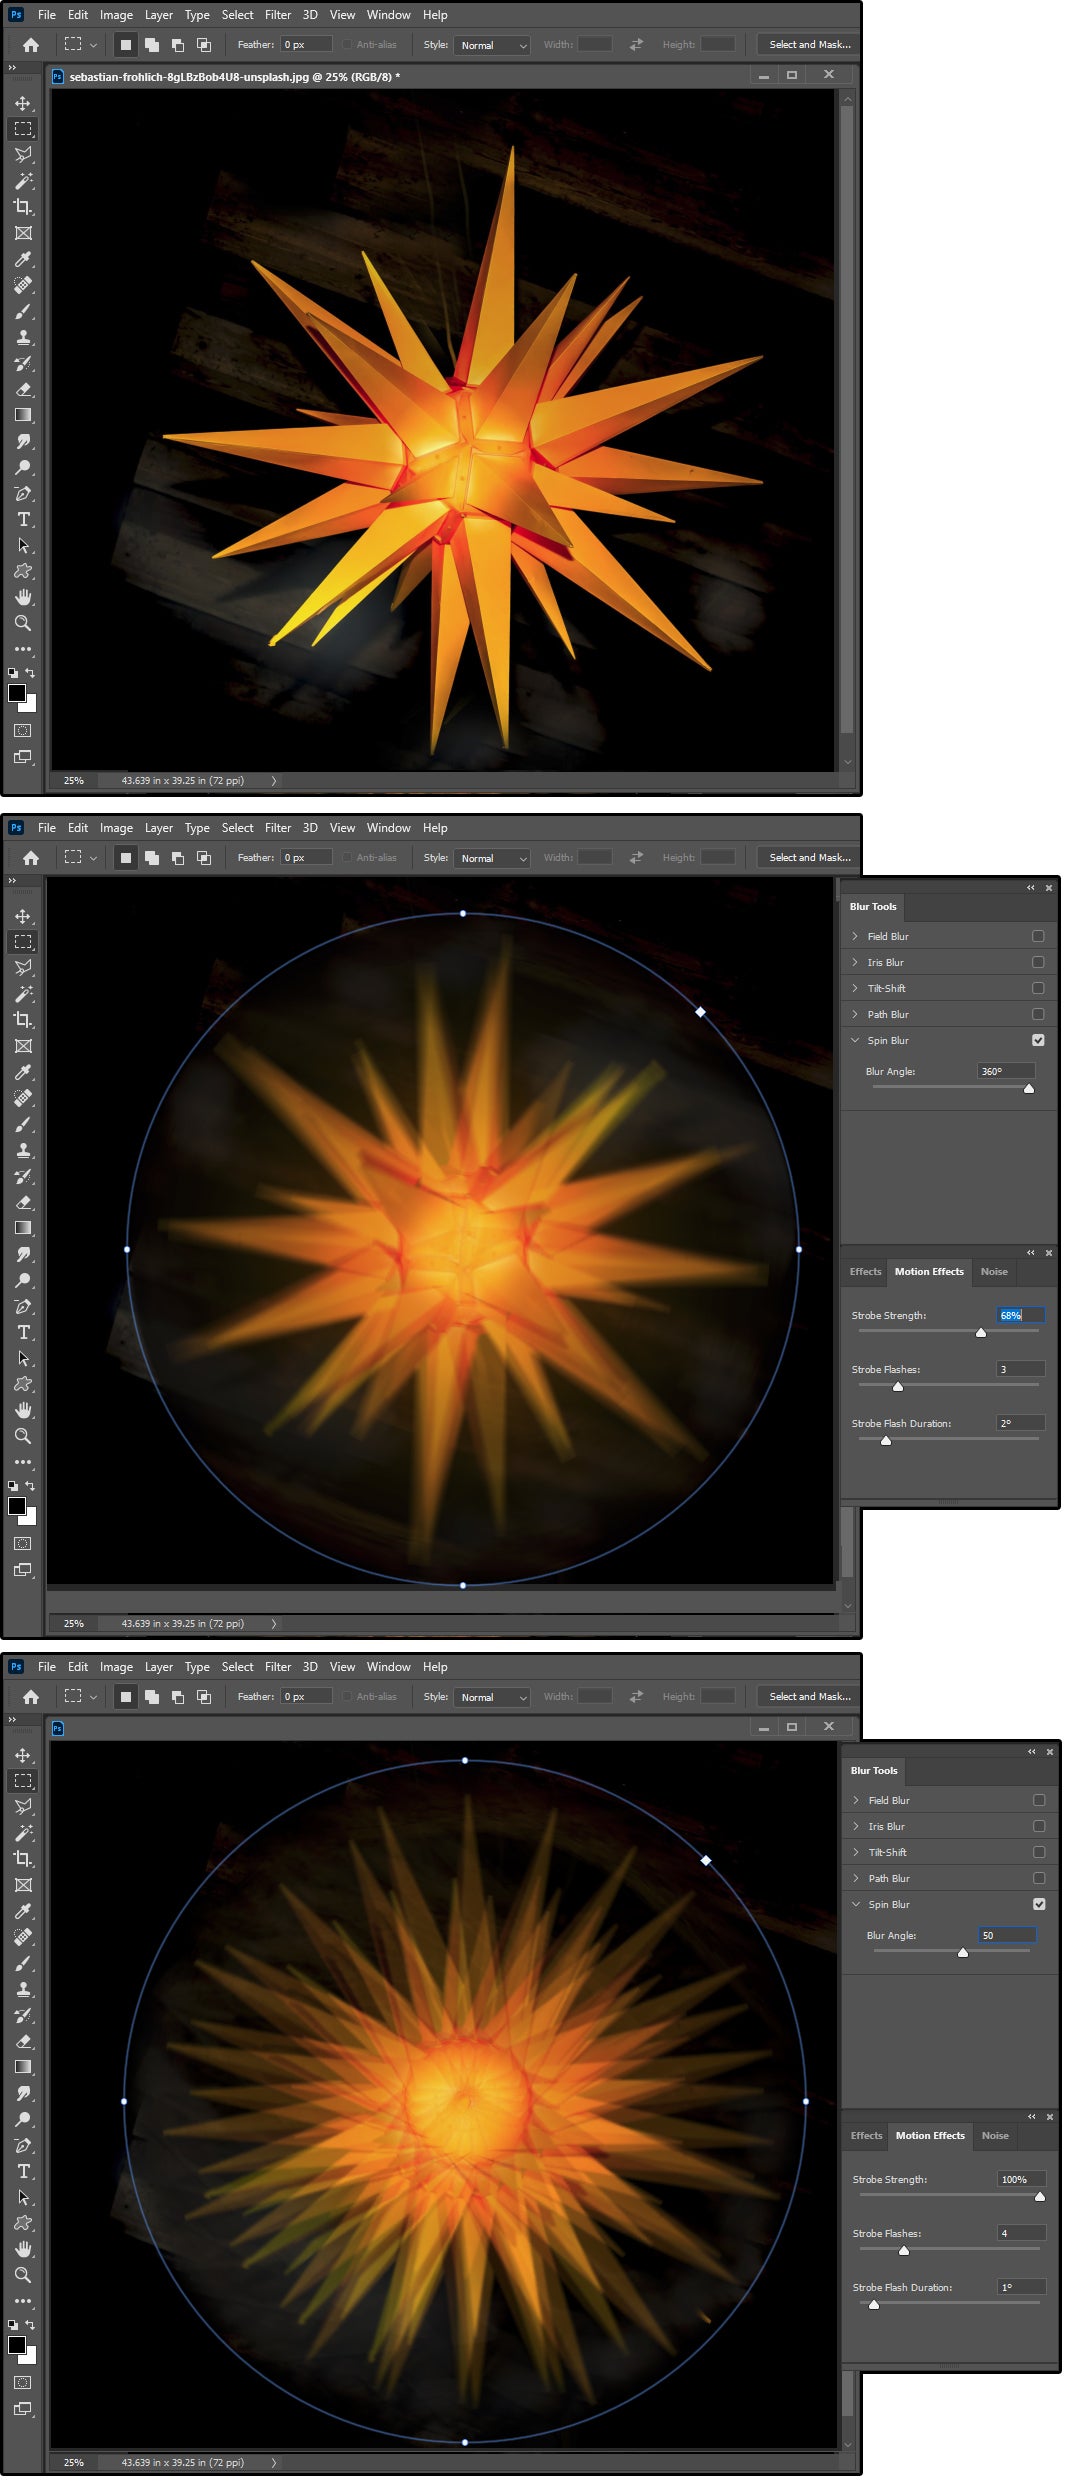
Motion Effects
These results work solely on Spin Blur and Path Blur. There should be a path or radius of movement to get Motion Effects.
 JD Sartain / IDG
Motion Effects
The course of is straightforward. Open a file, select Filter > Blur Gallery > Path Blur or Filter > Blur Gallery > Spin Blur. Use the Pinpoints, the dots, and the handles to measurement and place your path or radius round your object (or throughout the whole picture). Select a Blur Angle, then use the Motion options to create some superb results.
We used a 22-point star to create two very completely different Motion results.
We began with a Spin Blur. The first one has a Blur Angle of 360 levels with 68 p.c Strobe Strength, three Strobe Flashes, and a Strobe Flash period of two levels.
The second picture has a Blur Angle of 50 levels with 100 p.c Strobe Strength, 4 Strobe Flashes, and a Strobe Flash period of 1 diploma.
Both designs look superb, however so completely different. One seems to be like a flaming star, and the opposite seems to be like a sunburst. The Motion Effects fully change from one setting to a different.
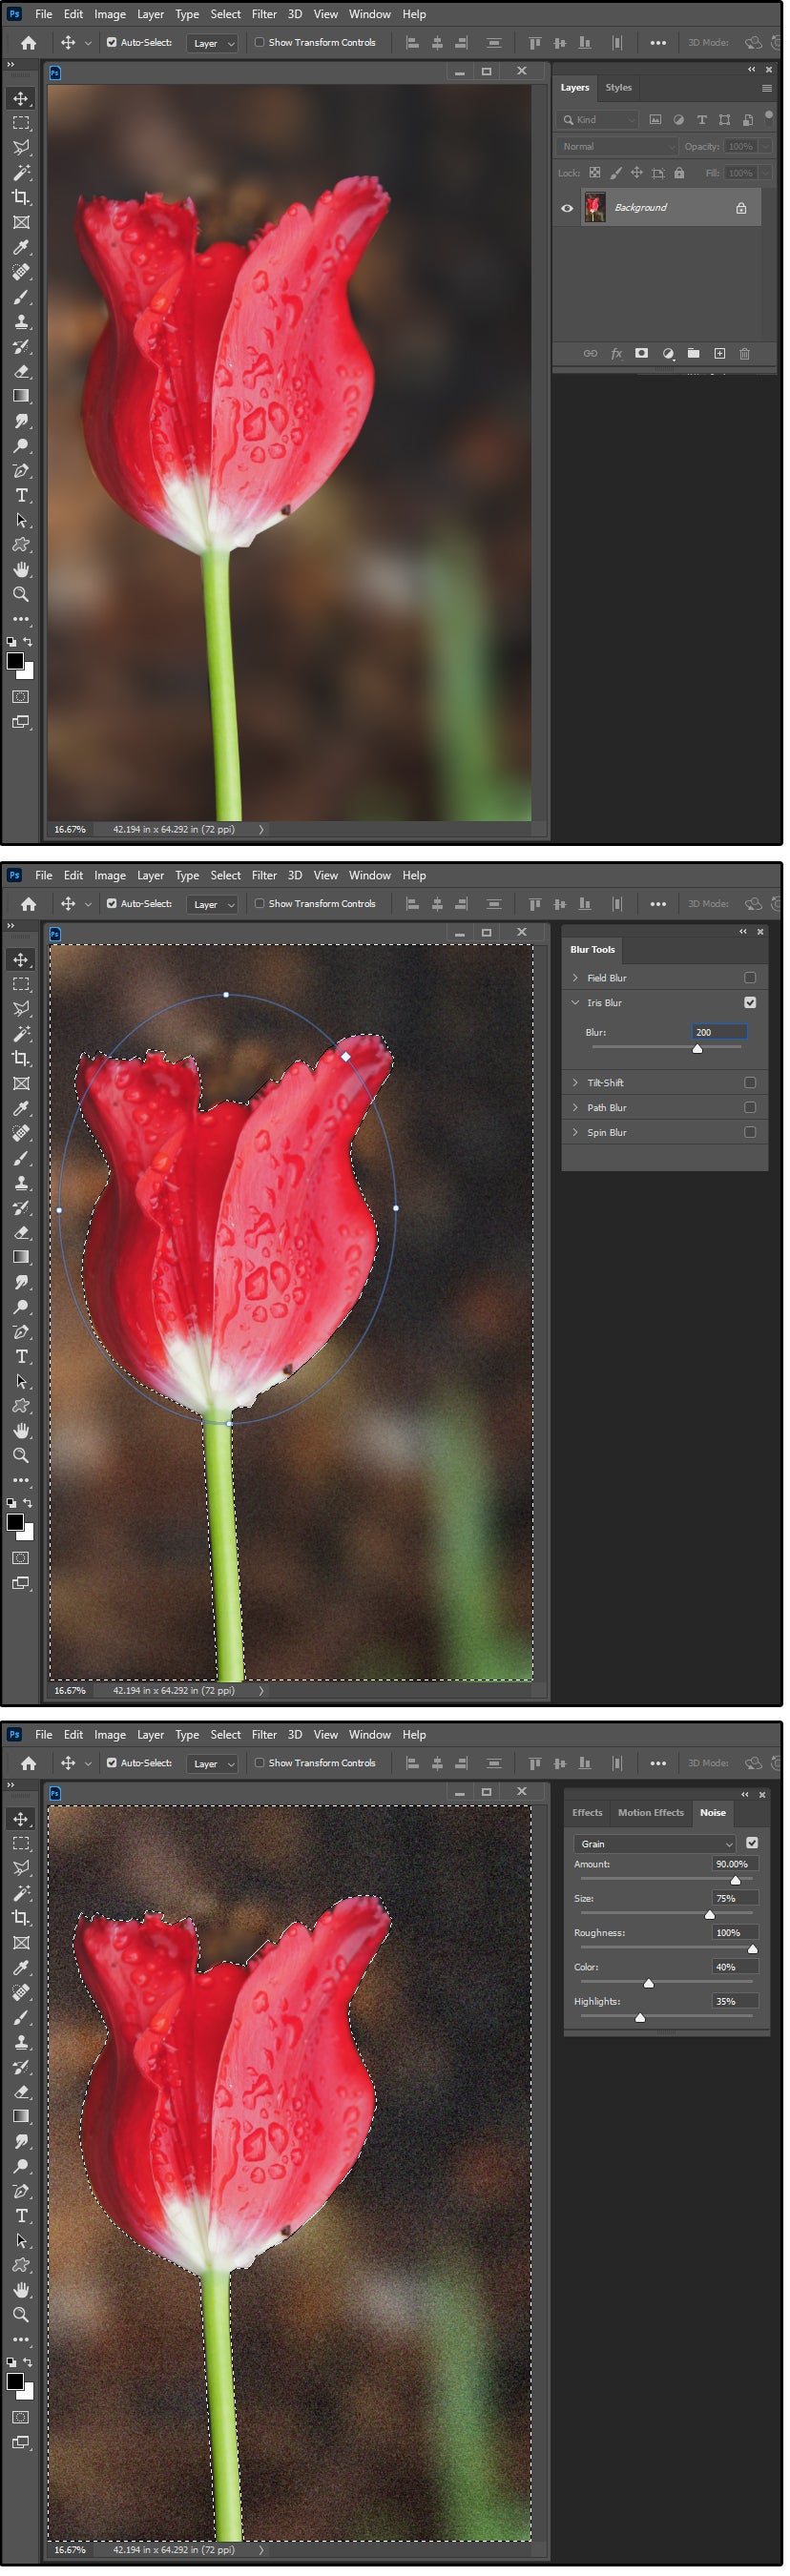
Noise Effects
Noise is one other phrase for grain, or a grainy impact.
 JD Sartain / IDG
Noise Effects
You can add noise anyplace in your images, and there are a number of methods to do it. This impact is used with the Blur Gallery results so you possibly can add again some element or texture to a blurred part.
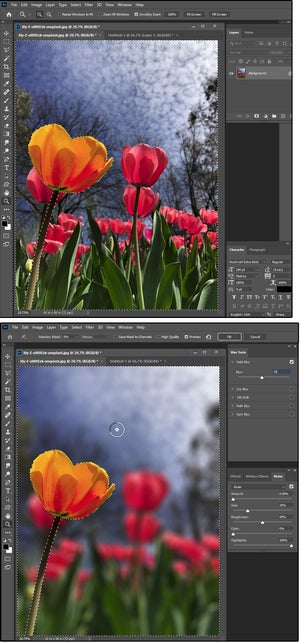
We first used the Iris Blur (set to 200) to mix out the background of a purple tulip. There was nothing basically unsuitable with this consequence, however after a couple of days of taking a look at it, we determined to provide the picture extra depth.
We used the Noise Effect within the Blur Gallery so as to add some wanted texture to the background. We added 90-percent grain at a measurement of 75 p.c with 100-percent roughness, 40-percent shade, and 35-percent highlights. The boring, flat background was reworked to a finely textured end.