
The infamous “Blue Screen of Death” — or BSOD for brief — is the most important catastrophe that may befall a Windows person. The system shuts down with a cryptic error message on a blue background and is just prepared to be used once more after a restart.
Unsaved information is misplaced. After the restart, Windows runs for some time till the error happens once more. In some situations, the BSOD can re-occur instantly and perpetually each time Windows is began. The system is then unusable and repairs are solely doable by way of a second or rescue system.
This article reveals a number of methods to entry a system that now not reveals a desktop.
The causes of the whole crash are different and never at all times straightforward to discern. We describe how the error might be investigated in additional element and what measures can be utilized to restore a faulty Windows system.
1. Why a blue display screen happens
A Windows system crash with a blue display screen is at all times as a result of a driver or the {hardware}.
It may also be a driver that isn’t instantly associated to the {hardware}, similar to a virus scanner element. Drivers run in a privileged mode and have direct entry to important reminiscence areas and {hardware} interfaces.
If a severe, unavoidable drawback happens, the system is stopped with a cease error to forestall injury, for instance to the file system. In such instances, the Windows kernel shows an error message on a blue background with white textual content — often known as a blue display screen. The system is then restarted robotically.
In some instances, the message accommodates the title of the driving force that prompted the crash. While drivers which can be equipped with Windows are hardly ever affected, such errors happen extra steadily with subsequently put in third-party drivers. This can occur instantly after putting in a brand new driver or after an replace.
Changes made by Windows updates can even result in a crash, particularly if vital system capabilities are personalized. An incompatible driver that can’t address these adjustments can then work incorrectly and produce the system to a standstill.
The blue display screen usually solely shows a basic error message that can’t be assigned to a person driver (see level 11). An error code can also be displayed, which may also help to analyse the issue.
See additionally: Deep clean your Windows PC: 10 professional tricks and tools
2. Prevent restart
By default, Windows is configured in order that the blue display screen solely seems very briefly and is barely legible. To hold the message seen for longer, regulate the configuration. You ought to take this safety measure with each Windows system to be ready for issues.
If Windows nonetheless begins and solely crashes after a while, name up the “Settings” (Win-I) and go to “System > About” (in any other case proceed studying in level 3). Click on “Advanced system settings.”
You will discover the hyperlink in Windows 11 behind “Related links” underneath “Device specifications,” in Windows 10 on the right-hand facet of the window underneath “Related settings.” The “System properties” window opens. (A fast strategy to get right here is by way of the “Run” dialogue (Win-R): Type SystemPropertiesAdvanced and ensure with “OK.”
In the “System Properties” window, go to the “Advanced” tab and click on on the “Settings” button underneath “Startup and Recovery.” Remove the tick subsequent to “Perform automatic restart.”
Under “Save debug information,” choose “Small memory image (256KB).” In the occasion of a crash, a file with the extension “.dmp” is now created within the folder “C:WindowsMinidump,” which might be analyzed later (see level 13).
Display errors: Deactivate “Automatic restart.” Otherwise the blue display screen will solely seem briefly and you’ll often not be capable to learn the error message.
Foundry
If Windows crashes repeatedly and shortly after beginning with a blue display screen, you can’t change the setting as described in level 2. However, Windows has arrange a minimal Windows on a separate partition (WinRE, Windows Recovery Environment) throughout set up on the laborious drive, which you need to use for repairs.
If entry to WinRE fails, proceed studying in level 5.
To entry the restore system: Switch on the pc utilizing the ability button, wait briefly till the Windows emblem seems and Windows begins to load. Switch the PC off once more by holding down the ability button a bit of longer.
Repeat the method a number of occasions till Windows begins the automated restore. This is often the case after three false begins. You can acknowledge the mode by the message “Automatic repair is being prepared.”
Windows will try an automated restore and there are two choices as soon as it’s full: The system restarts by itself and you end up in the identical state of affairs as earlier than.
In this case, swap the PC on and off once more repeatedly till the automated restore begins. After a number of makes an attempt, “The PC did not start correctly” seems with the “Advanced options” button. However, additionally it is doable that this button is already seen after the primary auto-repair.
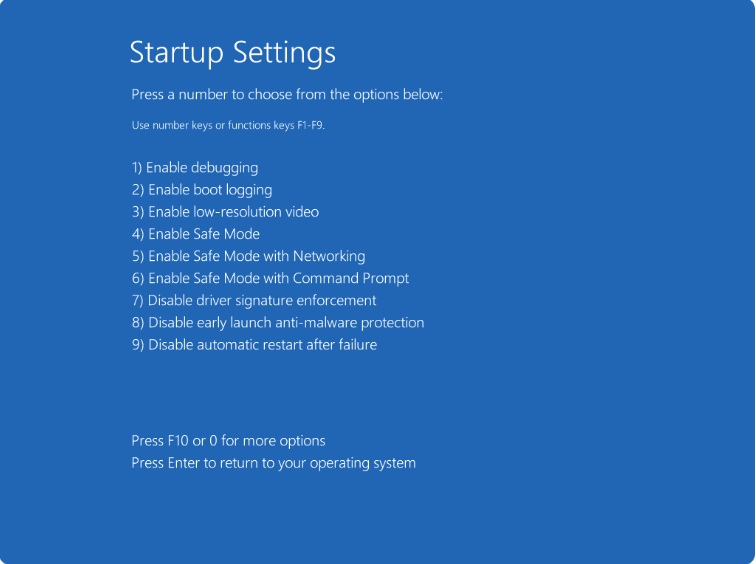
After clicking on “Advanced options,” go to “Troubleshooting > Advanced options > Startup settings” and click on on “Restart.” The “Advanced startup options” menu seems, by which you utilize the arrow keys to pick “Disable automatic restart after failure” and ensure with the Enter key.
Windows will no longer restart robotically within the occasion of a blue display screen and you may learn the messages. You can even use the menu to begin Windows in secure mode, which can be utilized to rectify errors (see level 8).
Important word: If you have got encrypted the system partition with Bitlocker, it’s essential to have the restoration key prepared and enter it when you find yourself requested for it. You saved the important thing if you activated the encryption.
This applies to this tip, but additionally mainly to all accesses to the put in system, which we describe within the following factors. It doesn’t matter whether or not you begin a rescue system from the laborious drive or a USB stick.
Foundry
4. Advanced begin choices
In earlier variations of Windows, you might use the F8 key to name up the superior begin choices or secure mode. This now not works with Windows 10 and 11.
Due to the quick begin mode, Windows begins so shortly, particularly from SSDs, that it’s virtually unimaginable to seek out the correct time to press the F8 key. Microsoft has subsequently determined to now not question the important thing in any respect. However, if you wish to be ready for an emergency, you may change this. The trick is to reactivate the menu of the traditional boot supervisor.
To do that, use the instrument Bootice instrument, which you unzip after which begin the file BOOTICEx64_2016.06.17_v1.3.4.0.exe.
Step 1: Go to the “BCD” tab and click on on “Easy mode.” The possibility “BCD of current system” have to be activated.
Step 2: After clicking on “Add,” create a brand new boot entry with the title “Windows secured.” Customize the choices in order that they correspond to these of the prevailing entry for Windows 10 or 11.
Step 3: Deviating from this, choose the entry “Safe Mode w/ Network” after “SafeBoot:”. Click on “Save current system.”
Step 4: For each boot menu entries, take away the tick in entrance of “Metro Boot Manager (Win8)” and click on on “Save current system.” Under “Global settings,” tick “Display boot menu” and click on on “Save global settings.”
When you restart Windows, the traditional boot menu seems on a black background. Press the F8 key to entry the menu with the superior boot choices: “Repair computer” (WinRE), “Safe mode,” “Disable automatic restart in case of system errors”.
Or you may instantly choose the brand new entry “Windows secured” within the boot menu.
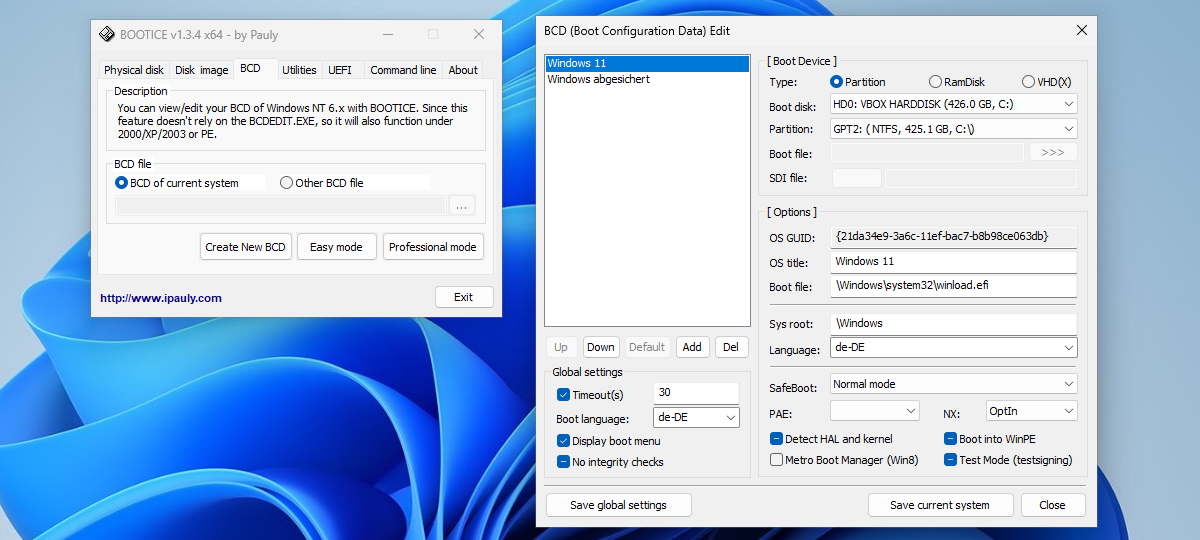
Edit boot menu: Use the Bootice instrument so as to add new entries to the Windows boot menu, for instance for secure mode.
IDG
5. Start restore system
Defects within the file system, an incorrectly configured boot supervisor or dysfunctional drivers can forestall the automated restore from beginning and the “boot settings” from being referred to as up (see level 3). You ought to subsequently at all times have a rescue system prepared for system repairs.
Ideally, you have already got one when you have put in Windows your self from a USB stick. If not, create a USB stick for the Windows set up on one other PC, which additionally accommodates restore instruments.
To do that, use the Microsoft Media Creation Tool for Windows 10 or for Windows 11. Alternatively, obtain the ISO file for Windows 11 instantly (underneath the heading “Download Windows 11 drive image (ISO) for x64 devices”) and create the USB persist with Rufus. The system may also be used to restore Windows 10.
Reading tip: 10 things I’d never, ever do as an IT professional
If you’re utilizing a Windows 10 ISO or Windows 11 previous to model 24H2, proceed as follows:
Step 1: Boot the PC from the set up stick. You might have to alter the boot sequence within the firmware/BIOS setup underneath “Adjust the boot sequence.” When beginning, the message “Press any key to boot from CD or DVD” seems. Press any key to activate the beginning of the USB stick.
Step 2: Click on the “Next” button after which on “Computer repair options.”
Step 3: Go to “Troubleshooting” after which to “Startup help.” Select the goal working system and watch for the startup restore to finish. Click on “Shut down” and swap the PC again on.
Windows ought to now begin once more from the laborious drive, however this measure doesn’t often resolve the reason for the blue display screen. However, the restore system presents additional choices for repairs (see factors 6 and 8).
Windows 11: Since Windows 11 model 24H2, the setup instrument seems barely totally different. It greets you with the “Select language settings” window and also you click on on “Next.” You can then regulate the keyboard settings if required and click on “Next.” Then choose the “Repair my PC” possibility and click on “Next.”
On the following display screen, click on in your most popular language for the keyboard structure. Then proceed with “Troubleshooting” and “Startup help” as described in step 3 above.
Tip: “Computer repair options” or “Repair my PC” solely present a couple of instruments. A self-created Windows rescue system presents considerably extra choices.
It begins from the USB stick and might be operated in virtually the identical means as you’re used to with Windows. You can use the system for repairs, but additionally for information restoration and looking for malware, for instance.
Using the rescue system: The system begins from the set up medium and presents a “Startup help” possibility that can be utilized to resolve some startup issues.
Microsoft
6. Deactivate auto restart
The set up and restore system began from the USB stick (level 5) doesn’t provide the choice of calling up the superior begin choices. Microsoft doesn’t intend to modify off the automated restart from right here when a blue display screen happens. This is just doable if the rescue system was began from the laborious disk.
You can nonetheless forestall the restart utilizing a trick:
Step 1: Start the restore system from the USB stick. When the window with the title “Windows 11 Setup” seems (Windows 10: “Windows Setup”), maintain down the Shift key and press the F10 key.
Step 2: Type regedit and ensure with the Enter key. The registry editor shows the registry of the restore system. To change this, go to the registry department “Hkey_Local_Machine” after which to “File > Load structure” within the menu. Navigate to the “WindowsSystem32config” folder on the system drive, click on on “SYSTEM” after which on “Open.”
The system drive could also be positioned underneath a drive letter aside from “C:”. Under “Key name,” enter the letter Z and ensure with “OK.” This mounts the registry of the put in system underneath “Hkey_Local_MachineZ.”
Step 3: Go to the important thing “Hkey_Local_MachineZControlSet001ControlCrashControl.” After double-clicking on “AutoReboot,” enter 0 underneath “Value” and click on on “OK.”
Step 4: Go to “Hkey_Local_MachineZ” after which to “File > Remove structure” within the menu. Confirm with “Yes.”
Step 5: Exit the registry editor and the command immediate. Close the setup window and ensure the cancellation of the set up with “Yes.”
If Windows restarts now, the blue display screen will stay seen till you turn off the pc.
Note for Bitlocker customers: You can solely achieve entry to the system drive in case you unlock it within the command immediate. To do that, use the command
manage-bde -unlock C: -recoverypassword [recovery key]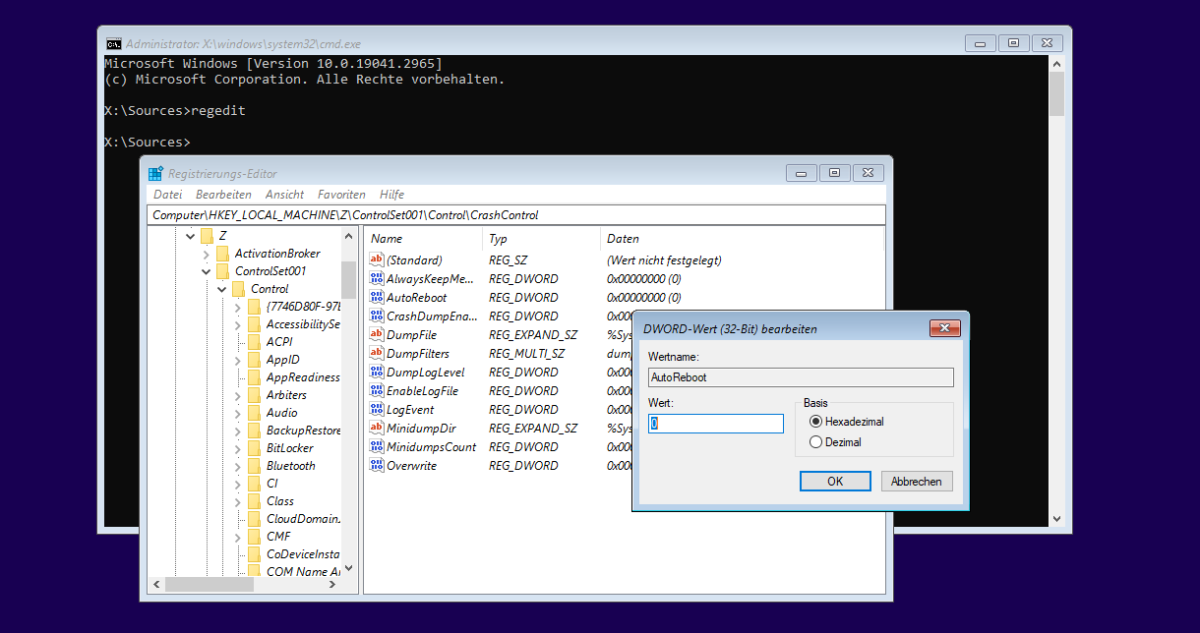
Prevent automated reboot: In the rescue system, you may swap off the reboot by making an entry within the registry. “AutoReboot” is given the worth “0”.
IDG
7. Start restore system instantly
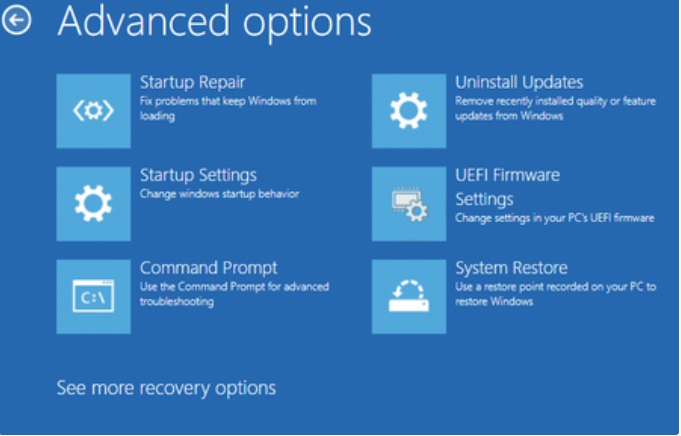
You can entry the restore system from the working Windows as follows: Click on “On/Off” within the Start menu, maintain down the Shift key, and click on on “Restart.” Windows will restart and you will note the “Select option” display screen.
After clicking on “Troubleshoot,” “Advanced options,” “Startup settings,” and “Restart,” you may be taken to “Advanced startup options” and you may choose “Disable automatic restart on system errors” or “Safe mode.”
However, if Windows crashes instantly after beginning, this feature is blocked and it’s essential to use the rescue system as described in level 6. As an extension of level 4, you have got an alternative choice to organize for this example in good time.
If you embody the rescue system (WinRE) instantly within the boot menu, you do not need to take the diversions by way of the “boot settings.” However, this requires that the laborious drive is accessible and that there isn’t any {hardware} defect. Otherwise, the rescue system can’t be began from the laborious drive and it’s best to strive the strategy described in level 5.
Set the Bootice instrument to create a begin menu entry for WinRE:
Step 1: Go to “BCD” in Bootice, go away the choice “BCD of current system,” and click on on “Professional mode.” Under “Application objects” you will note that there’s already an entry labelled “Windows Recovery Environment,” however it’s not displayed within the boot menu. It is named up by way of the Shift-“Restart” mixture.
Step 2: Right-click on “Windows Recovery Environment” and choose “Duplicate this entry” from the context menu.
Step 3: For the brand new entry, double-click on “Description” and enter “WinRE” as the brand new title, for instance. Close the window.
Step 4: Click on “Easy Mode” and verify the settings for the brand new entry “WinRE.” The entry after “Partition” should seek advice from the restoration partition, for instance “GPT3.” Behind “Boot file:” is “RecoveryWindowREWinre.wim” and behind “SDI file” one thing like “(hd0,3)” and “RecoveryWindowsREboot.sdi.” Below “Options” behind “Boot file:” is the entry “windowssystem32winload.efi.” If the configuration in your PC is totally different, appropriate the data.
Step 5 (elective): Remove the tick in entrance of “Metro Boot Manager (win8)” from all boot menu entries. This prompts the traditional boot supervisor on a black background, which shows its menu earlier than the working system begins.
The new Metro Boot Manager first prompts the usual system within the background and shows the system choice in a graphical interface. This signifies that the usual system is prepared to be used shortly, but it surely takes a bit of longer to begin WinRE.
If you restart Windows now, the put in system will likely be loaded robotically after a timeout of 30 seconds. Select the brand new boot menu entry “WinRE” to begin the rescue system instantly.
8. Faulty updates
Irrespective of the error message within the blue display screen and with out understanding the precise trigger, easy measures often assist to get rid of the BSOD drawback.
We assume that Windows was working appropriately instantly after the pc was reinstalled or began up for the primary time and that the error was solely triggered later by a change to the system. Recent Windows or driver updates, the set up of recent software program, or perhaps a software program replace are suspected.
If Windows remains to be beginning: In the “Settings” (Win-I), go to “Apps > Installed apps” (Windows 10: “Apps > Apps and features”). Under “Sort by,” set “Date of installation.” The most just lately put in applications will then seem on the high of the listing.
After a plausibility verify, uninstall essentially the most just lately put in program(s). Programs that begin robotically and use system companies or drivers are doable sources of error.
Proceed in the identical means with Windows updates. Go to “Windows Update” within the “Settings” (Windows 10: “Update & Security > Windows Update”). Set an extended interval behind “Suspend updates,” for instance “Suspend for 4 weeks.” This will forestall a defective replace from being reinstalled instantly.
Windows 10 customers click on on “Advanced options” and set a date sooner or later underneath “Suspend until:”.
Click on “Update history” or, for Windows 10, on “Show update history.” Under headings similar to “Quality updates” and “Driver updates,” you will note chronological lists of put in updates with the corresponding KB numbers.
Clicking on an entry takes you to a Microsoft web page with additional info on an replace. An web seek for the respective KB quantity can present info on whether or not errors or crashes are already identified in reference to this replace.
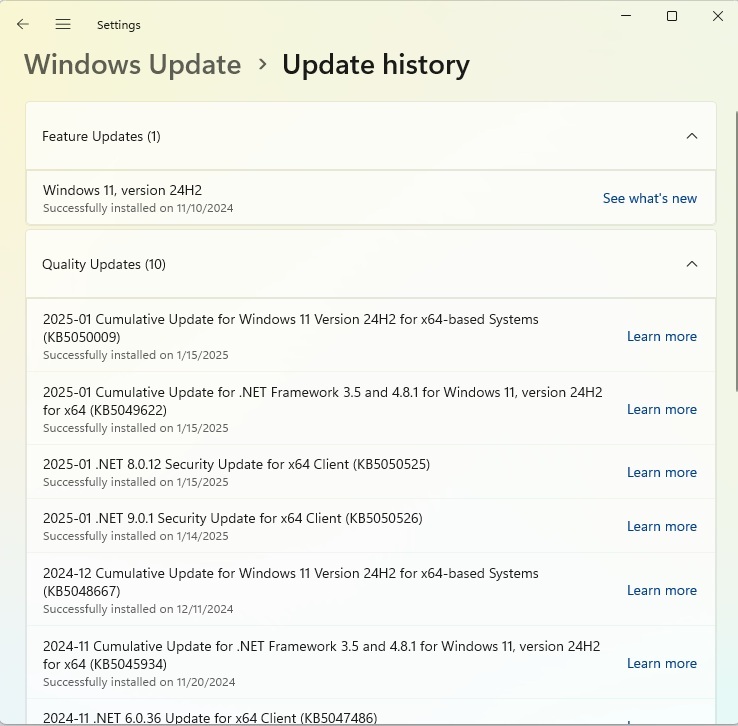
Which updates have simply been put in? The “Update history” reveals the Windows updates in chronological order. The KB quantity can be utilized to seek for info on the web.
Foundry
Click on “Uninstall updates” under “Related settings” (Windows 10: “Uninstall updates” hyperlink on the high of the window) and take away the replace that’s inflicting the blue display screen.
In Windows 10, the hyperlink within the Control Panel results in “Uninstall updates.” However, not all updates might be eliminated as a result of they construct on one another. Windows 11 subsequently solely reveals the most recent updates that you could uninstall. Windows 10 additionally reveals older updates, however the “Uninstall” button solely seems in case you click on on one of many newer entries.
If Microsoft has corrected the error within the Windows replace, the replace might be reinstalled. The set replace delay ought to present ample time for this.
Carry out repairs in secure mode: If Windows doesn’t run secure sufficient in normal mode, strive secure mode. To do that, name up the “Startup settings” as described underneath level 3 or 4 and choose “Enable Safe Mode.” Windows will then solely load essentially the most obligatory drivers, which makes a blue display screen much less doubtless.
Windows updates and applications might be uninstalled in secure mode in the identical means as in normal mode. You can even name up System Restore (see level 9).
Uninstall updates by way of the rescue system: If Windows now not begins and even secure mode doesn’t assist, boot the PC from the set up disc (see level 5) and begin “Repair my PC” (Windows 10: “Computer repair options”). Click on “Troubleshoot” after which on “Uninstall updates” within the “Advanced options” window.
As a rule, choose “Uninstall the latest quality update,” which can take away the most recent Windows replace. Click on “Uninstall the latest feature update” in case you put in it shortly earlier than the blue display screen first appeared.
Under “Advanced options” you may also click on on “Restore system” and choose a beforehand saved restore level (see level 9).
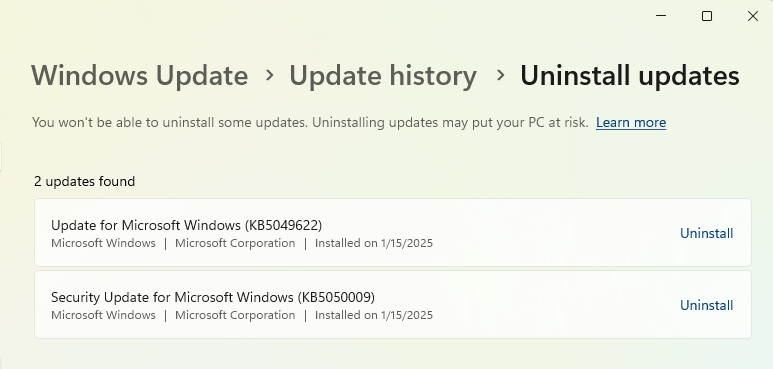
Remove updates: If a latest Windows replace is suspected of inflicting a blue display screen, it may be uninstalled.
Foundry
9. Use restoration
Windows and a few setup applications create a restore level earlier than making main adjustments to the system. The prerequisite for that is that System Restore is activated (see field “Using restore points for a backup”).
In Windows 11 from 24H2, press Win-R, sort rstrui and click on “OK.” In the “System Restore” window, the choice “Recommended restore” is preset, which shows the date of the final restore level.
As a rule, choose this if the date is shortly earlier than the primary incidence of the blue display screen. Otherwise, activate the choice “Select another restore point.” After clicking on “Next,” choose the specified restore level.
In the “Confirm restore point” window, click on on “Search for affected programs.” System Restore will now present you applications, drivers, and Windows updates that have been put in after the restore level was created.
Make a word of the contents of the listing so as to reinstall these applications later. However, this might additionally embody the software program that prompted the issue. Personal paperwork are at all times retained throughout the restore.
Back in the primary System Restore window, click on on “Finish.” Confirm the method with “Yes.” Windows will start the restore course of after which restart.
The course of is comparable for older Windows 11 variations and Windows 10. After clicking “Next” for the primary time, you will note an inventory of restore factors from which you’ll be able to choose the specified entry. Tick “Show more restore points” to see older variations. Then proceed as described for Windows 11.
10. Eliminate driver errors
The measures described underneath factors 8 and 9 can be utilized to take away drivers or undo driver updates. If the error message within the blue display screen refers to a particular driver, this may also be handled particularly. If you have no idea which machine a driver belongs to, search the web for the title of the driving force.
While Windows is working, open the Device Manager, for instance by urgent the Win-X key mixture or right-clicking on the Start menu, which can take you to the menu for administrative instruments.
Go to the affected machine, right-click on the entry, go to “Update driver” after which to “Search for drivers automatically.” If an replace is out there, set up it. Alternatively, you may also go to the {hardware} producer’s web site and verify for updates.
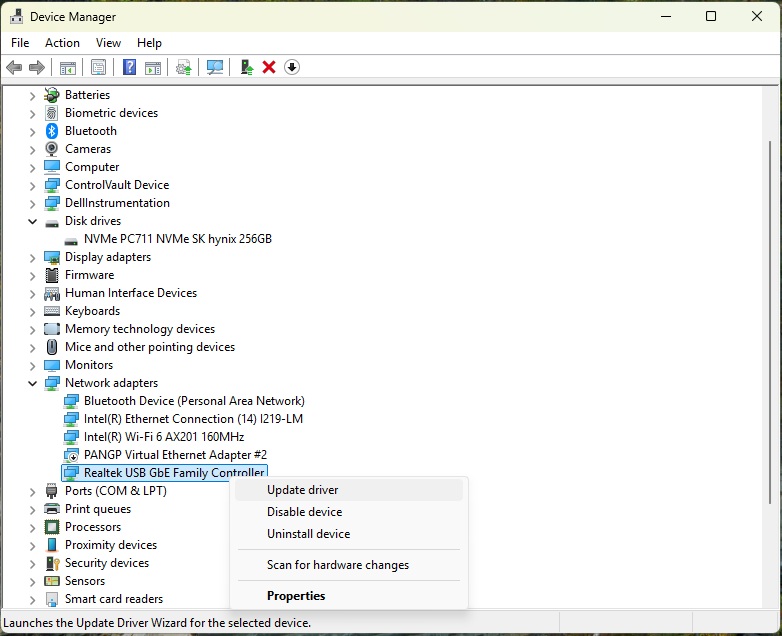
Undoing an replace: If a newly put in driver doesn’t work correctly and causes a blue display screen, restore the earlier model of the driving force by way of the Device Manager.
Foundry
Use older driver: If a driver has develop into unusable as a result of an replace, revert to the earlier model. In the Device Manager, go to “Properties” within the context menu of the affected {hardware} and click on on the “Driver” tab.
Click on “Previous driver” — if accessible — and choose an appropriate possibility underneath “Why do you want to revert to the previous driver?” Click on “Yes” and the driving force will likely be changed.
Use the rescue system: If Windows now not begins, boot the PC from the set up medium (see level 5). As quickly because the window with the title “Windows 11 Setup” seems (Windows 10: “Windows Setup”), maintain down the Shift key and press the F10 key.
A command immediate opens, by which you sort notepad and ensure with the Enter key. Go to “File > Open” and choose “All files” after “File type.” The “Open” dialogue can now be used as a file supervisor.
Go to “WindowsSystem32Drivers” within the system drive and seek for the problematic driver. Use the “Properties” context menu merchandise to show the producer of the driving force on the “Details” tab.
As a rule, you shouldn’t do something with a Microsoft driver except you understand precisely what the results are. If it’s a third-party driver, rename the file, for instance from “Driver.sys” to “Driver.sys.bak.”
Windows will then be unable to load the driving force and the system ought to boot with out errors. However, the related machine will now not work. For a everlasting answer, set up an up to date driver or seek for an answer within the producer’s help boards.
Use restore factors for a backup
To be ready for an emergency, it’s best to verify whether or not System Restore is energetic. You can discover the choices within the Control Panel.
For a fast name, press Win-R, sort SystemPropertiesProtection and ensure with “OK.” Go to the “System Protection” tab. If the worth “On” is proven within the “Protection” column underneath “Protection settings” for the system drive, the backup perform is energetic.
Otherwise, click on on the system drive after which on “Configure.” Activate the “Turn on system protection” possibility. Use the slider underneath “Disk Space Usage” to specify how a lot house the working system ought to reserve for backups.
Select a two-digit gigabyte worth and ensure the change with “OK.” Back within the earlier window, click on “Create” to create a primary backup.
Windows typically creates restore factors robotically, for instance earlier than updates or when putting in new software program. However, you can’t depend on this. You ought to subsequently create restore factors manually earlier than making main adjustments.

Turn on System Protection in Windows earlier than making adjustments to your system, so you may revert to the earlier state if one thing goes awry.
Foundry
11. Unspecific errors
Sometimes the blue display screen shows error messages that don’t particularly seek advice from a driver. An instance of that is “IRQL_NOT_LESS_OR_EQUAL,” which signifies an incompatible or outdated driver.
However, you usually don’t discover out which driver it’s. “UNEXPECTED_KERNEL_MODE_TRAP” can happen when PC elements overheat. You ought to subsequently verify the fan efficiency and clear the followers if obligatory. The blue display screen could show “DATA_BUS_ ERROR” or “PAGE_FAULT_IN_NON_PAGED_ AREA” if the RAM is flawed.
Eliminate a severe boot drawback: The message “INACCESSIBLE_BOOT_DEVICE” (cease error 7B) happens when Windows can not entry the system partition. Faulty updates or drivers in addition to defects within the file system or a broken drive will be the trigger.
In the rescue system (see factors 5 and 10), use Notepad to check whether or not entry to the laborious drive remains to be doable. If not, verify within the BIOS/firmware setup whether or not the laborious drive or SSD has been acknowledged. If this isn’t the case, verify the info cable and energy provide to the drive.
If the drive can’t be put into operation, it’s most likely faulty and you’ll need to interchange it.
To affirm the prognosis, it’s best to use an impartial working system to verify whether or not the drive might be accessed. A Linux dwell system similar to Ubuntu, which you’ll be able to run with Rufus onto a USB stick after which boot. You can even entry Windows drives by way of the Linux file supervisor.
If entry to the laborious drive is feasible, strive the “start help” by way of Windows within the rescue system (see level 5). If this doesn’t assist, verify and restore vital system recordsdata. In the rescue system, run the next on the command immediate
sfc /scannow /offbootdir=C: /offwindir=C:WindowsThe drive letter could differ within the rescue system. Determine it by way of the “Open” dialogue of Notepad. If this doesn’t work both, begin the next two command strains within the rescue system one after the opposite
Dism /Image=C: /Cleanup-Image /ScanHealthDism /Image=C: /Cleanup-Image /CheckHealthIf one of many instructions stories an error, use the next command line
Dism /Image=C: /Cleanup-Image /RestoreWell beingAdjust the drive letters on your system.
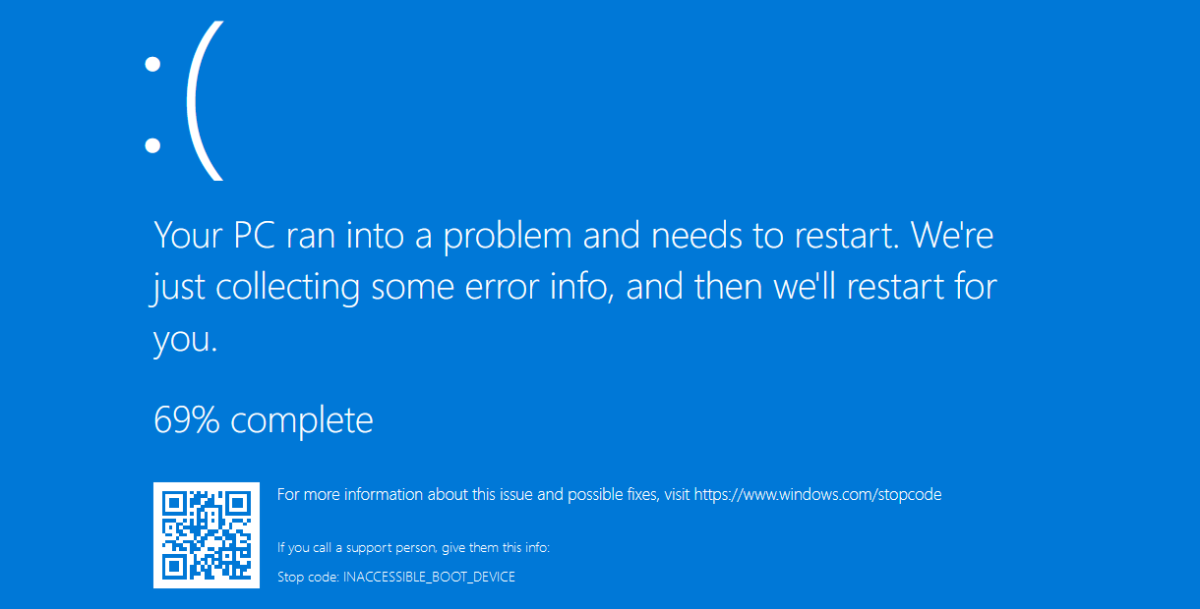
“Blue screen of death”: If Windows reveals the error “INACCESSIBLE_BOOT_DEVICE”, the boot supervisor is incorrectly configured or the system drive is flawed.
IDG
12. Repair Windows startup recordsdata
The “Startup help” makes an attempt to restore the boot atmosphere, however this isn’t at all times profitable. A guide restore is extra doubtless to achieve success. To do that, begin the command immediate within the rescue system. Type in diskpart and ensure with the Enter key.
Use listing disk to show the drives and choose the system drive with sel disk 0, for instance. Use listing vol to show the volumes. The EFI partition is formatted with the “FAT32” file system and is roughly 100MB in measurement.
If the EFI partition is named “Volume 2,” for instance, mount it as drive “B:” with the next two instructions:
sel vol 2assign letter=b:Press Esc to go away Diskpart. Execute the next 4 command strains on the command line
cd /d b:EFIMicrosoftBootbootrec /fixbootren BCD BCD.bakbcdboot C:Windows /l de-de /s b: /f UEFIReplace the drive letter “C:” with the letter beforehand decided for Sfc. Restart the pc. The UEFI boot atmosphere ought to then work once more.
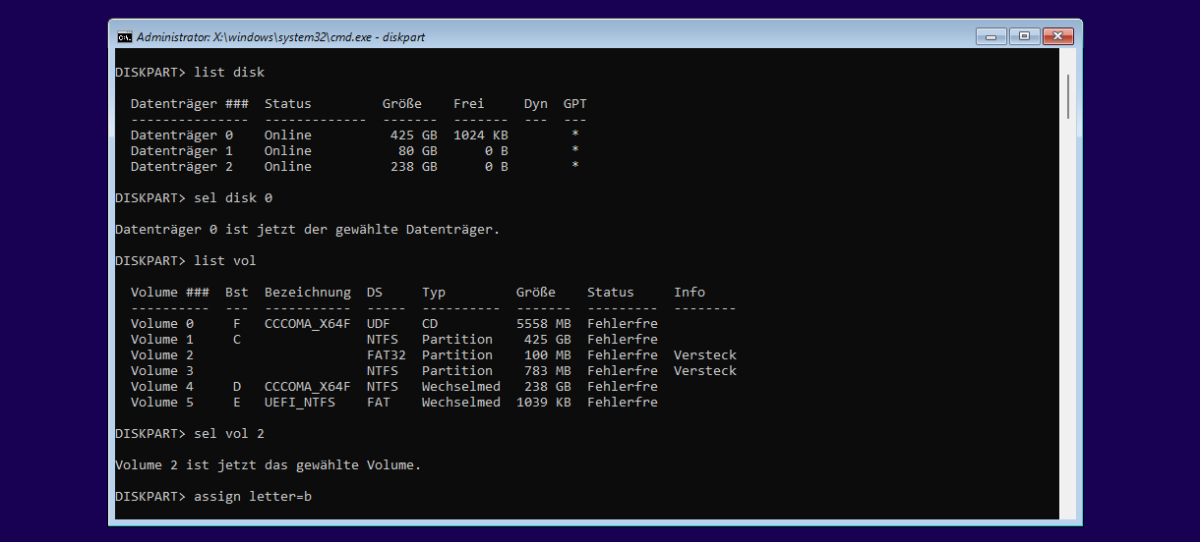
Boot restore: To restore the UEFI boot atmosphere, it’s essential to first assign a drive letter to the EFI partition (FAT32) within the command immediate utilizing Diskpart.
IDG
Restore Windows to manufacturing unit settings
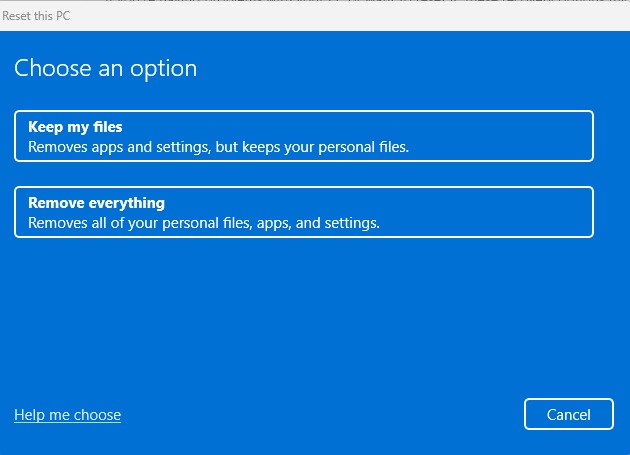
Microsoft presents a number of seemingly easy options for severe Windows issues. In “Settings” (Win-I), go to “System” and click on on “Recovery” (Windows 10: “Update & Security > Restore”).
After clicking on “Reset PC” (Windows 10: “Let’s go”), choose “Keep my files.” Installed applications, drivers and Windows settings will likely be deleted, however private recordsdata will likely be retained. Windows will present you which of them programmes are affected after clicking on “Show apps that will be removed”.
The second possibility – “Remove everything” – corresponds to a brand new Windows set up. The private recordsdata are misplaced and have to be restored later from a beforehand created backup.
Windows 11 additionally presents the choice “Reinstall now” underneath “System -‘ Recovery”, under “Fix problems with Windows Update”. Unlike “Reset PC”, Windows doesn’t use the recordsdata saved on the laborious drive, however downloads the present Windows model.
The benefit: You now not have to put in many updates and the system is updated. However, the obtain takes a while when you have a sluggish web connection.
If Windows now not begins and the “Settings” can subsequently not be referred to as up, reinstalling by way of a Windows set up medium (see level 5) is the ultimate answer. You should again up your individual recordsdata beforehand.
Before resorting to those radical and time-consuming strategies, it’s best to take into account the opposite measures described on this article.
Restore manufacturing unit settings: The reset perform replaces system recordsdata with the unique model. This can rectify many errors, however you’ll have to reinstall all applications.
Foundry
The reason behind a blue display screen, be it a defective driver or an issue with a Windows replace, can not often be rectified instantly. Instead, the issue can usually solely be circumvented. However, there are numerous instruments that may analyze the crash and the generated reminiscence picture in additional element.
Although these instruments are primarily supposed for builders who need to verify their very own drivers, they may also be useful for regular Windows customers. The info offered can be utilized to go looking the web for doable causes and options to the error.
The instrument Who Crashed. After clicking on “Analyze,” it searches for .dmp recordsdata (level 2) and shows descriptions.
The Microsoft instrument Windbg (by way of Microsoft Store app) can open .dmp recordsdata by way of “File > Open Dump File.” In the “Command” space, click on on “!analyze -v”. Windbg then shows intensive info, together with the title of the driving force involved.
Bluescreen View robotically opens all .dmp recordsdata from the folder “C:WindowsMiniDump.” The title of the driving force that prompted the crash seems first within the “File name” column. You can carry out a Google seek for error messages and drivers by way of the “File” menu.
This article initially appeared on our sister publication PC-WELT and was translated and localized from German.