


Microsoft’s Outlook is an irreplaceable device for numerous organizations and a veritable legion of individuals across the globe—but it surely’s not a beloved one by any stretch. Nobody really enjoys sifting by a stuffed inbox or responding to assembly requests all day lengthy; you wish to open your inbox, do what it’s essential to do, and get the heck out as quick as potential.
That’s the place these Outlook organizational ideas are available. Adopting these 5 easy practices will make diving into your inbox much less painful—and far much less time consuming.
1. Use folders to scale back Inbox litter
It appears straightforward to let emails simply pile up in your Inbox, till you attempt to discover one thing and must endure by a guide search. Instead, transfer messages to a customized folder that pertains to the corporate or the message. It’s identical to utilizing a file cupboard.
Custom folders are straightforward to create, handle, and search; and there are not any limits to measurement or depend besides disk house or limitations imposed by your system administrator. But don’t go loopy! Too many folders may also gradual Outlook’s responses. You wouldn’t create a folder in a file cupboard for only a dozen paperwork. If you’re creating one folder for every consumer or every firm, and even by topic/content material (similar to taxes, receipts, journey), it’s alright to consolidate the rare communications right into a Misc folder.
Here’s the way to get began with customized folders.
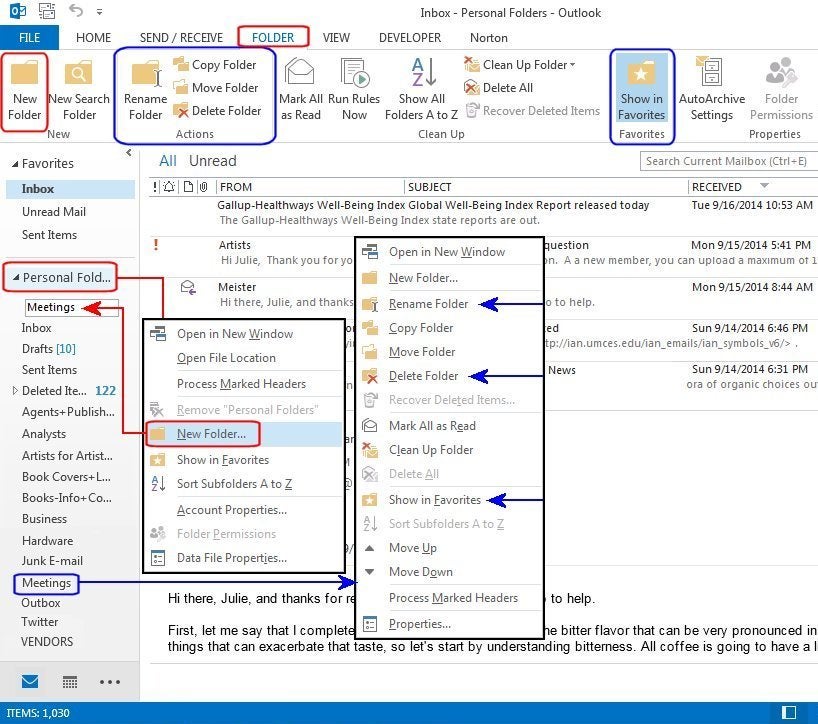
1. Right-click on the Personal Folders possibility in Outlook’s left-hand navigational pane, then select New Folder from the dropdown checklist. (Alternatively open the Folder tab and click on the New Folder button from the “New” group.)
2. In the Field field, kind the folder identify (e.g., Meetings) and press Enter. If you modify your thoughts or discover a typo, right-click the brand new folder and choose Rename Folder or Delete Folder. You may also Move it, Copy it, or add it to the Favorites part by way of the right-click menu. You may also choose any considered one of these buttons from the Actions group.
3. Notice all the opposite Folder choices on the Ribbon menu. You can Search, Sort, Archive, Apply Rules, Mark all Emails as Read, Clean Up, and so forth.—every part it’s essential to handle your folders.
You might let every part pile up in your Inbox, or you could possibly create folders to make emails from particular initiatives or individuals simpler to seek out.
2. Create and assign classes
Categories assist arrange the emails in your energetic Inbox so you possibly can shortly decide the standing of every electronic mail; for instance: Pending, Due, Done, and so forth. You may also kind by classes. So, for instance, in case you solely carry out electronic mail upkeep as soon as every week, you possibly can kind by class, shortly find all of the “Done” emails, after which transfer them to their corresponding folders.
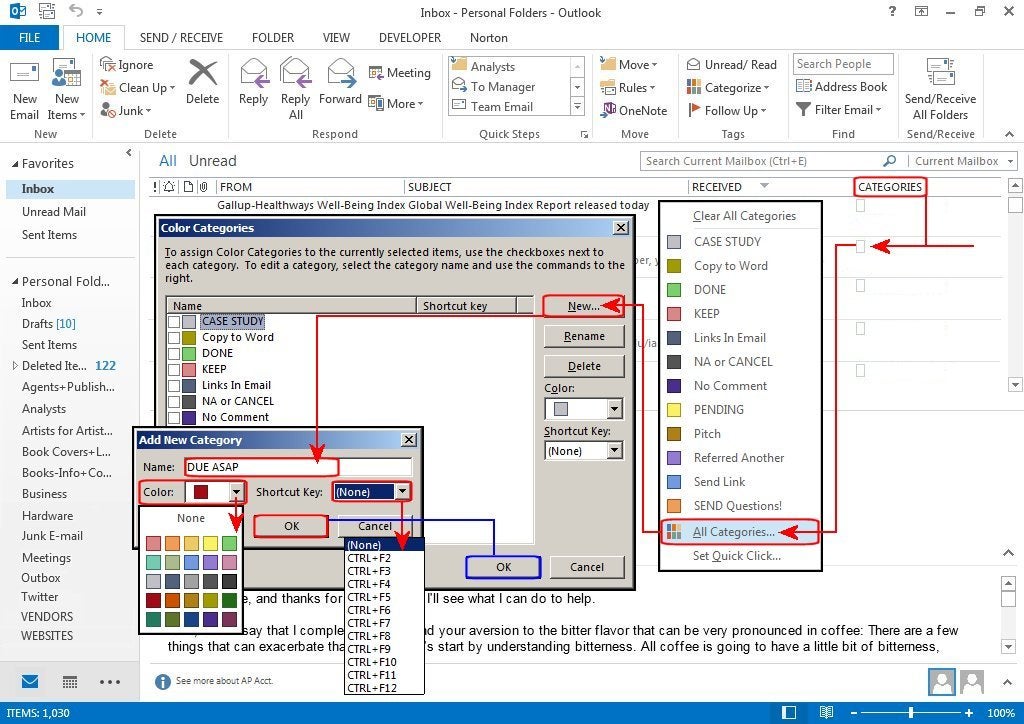
1. To create a brand new class, right-click on the clear sq. field within the Categories column, and choose “All Categories” from the dropdown checklist. In the Color Categories dialog field, click on the New button. Enter a Name on your class within the “Add New Category dialog field.
2. Click the down-arrow beside the Color subject and select a colour for the class. Next, click on the down-arrow beside the Shortcut Key subject and select a shortcut key (CTRL+F2 via CTRL+F12) for the class. These keys should not utilized by different features in Outlook, so they’re accessible for class shortcuts.
3. Click OK on this dialog, then click on OK once more within the Color Categories dialog field and the brand new class is added to your checklist. Note: there are 25 colours, however solely 11 shortcut keys, so select essentially the most often used classes on your shortcut keys.
4. To connect a class to an electronic mail, choose the e-mail, then right-click anyplace within the Categories column, and choose a class from the dropdown checklist. Note: emails can have a couple of class. To take away a class, right-click anyplace within the Categories column on the chosen electronic mail, and click on Clear All Categories from the dropdown checklist. This will solely clear all of the classes connected to the chosen electronic mail. It won’t have an effect on your different emails.
Creating classes for emails is one other technique to make them simpler to seek out later.
3. Quick Steps
Quick Steps is a function that lets you automate a number of duties right into a single step (or click on) similar to Moving emails to a particular folder, deleting, copying, forwarding, and so forth. It’s a beautiful time saver for customers who get a lot of emails from a single sender, be it spam or an in depth pal.
Once you outline a Quick Step to automate a activity, you possibly can then click on any electronic mail, then click on the automated activity from the Quick Steps menu, and Outlook performs all of the steps. You may also assign the duty to an open, unused shortcut key. (Again: Only 9 shortcut keys can be found, so select correctly).
1. To create a brand new Quick Step: From the Home tab, click on the underside down-arrow within the “Quick Step” group, and choose Create New from the checklist; or choose New Quick Step from the primary checklist and Custom from the second checklist. In the Edit Quick Step dialog field, enter a reputation for this activity within the Name subject.
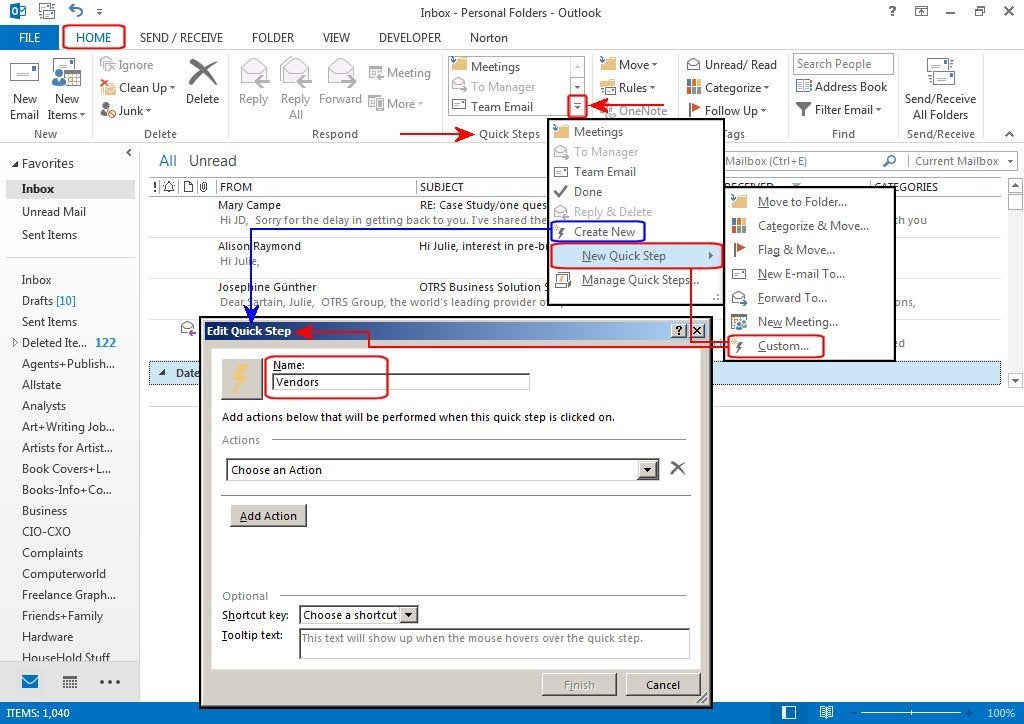
Use Outlook Quick Steps to automate electronic mail duties, like shifting emails from a particular mission right into a folder.
2. Next, click on Choose An Action, click on the down-arrow, and choose one from the “Move to Folder” drop-down checklist. Another subject seems underneath your “Move to Folder” motion—”Choose Folder.” Select a goal folder from the checklist. (Such as “Vendors” within the visible instance beneath.)
3. You can cease right here and simply click on Finish, or click on the Add Action button and Choose Action once more for a second automated activity, similar to “Mark As Read”. In the Optional pane, you possibly can click on the Shortcut Key subject and choose a key from the checklist (CTRL+SHIFT+1 via CRTL+SHIFT+9). Then enter a tooltip within the Tooltip Text field. Click Finish and also you’re executed.
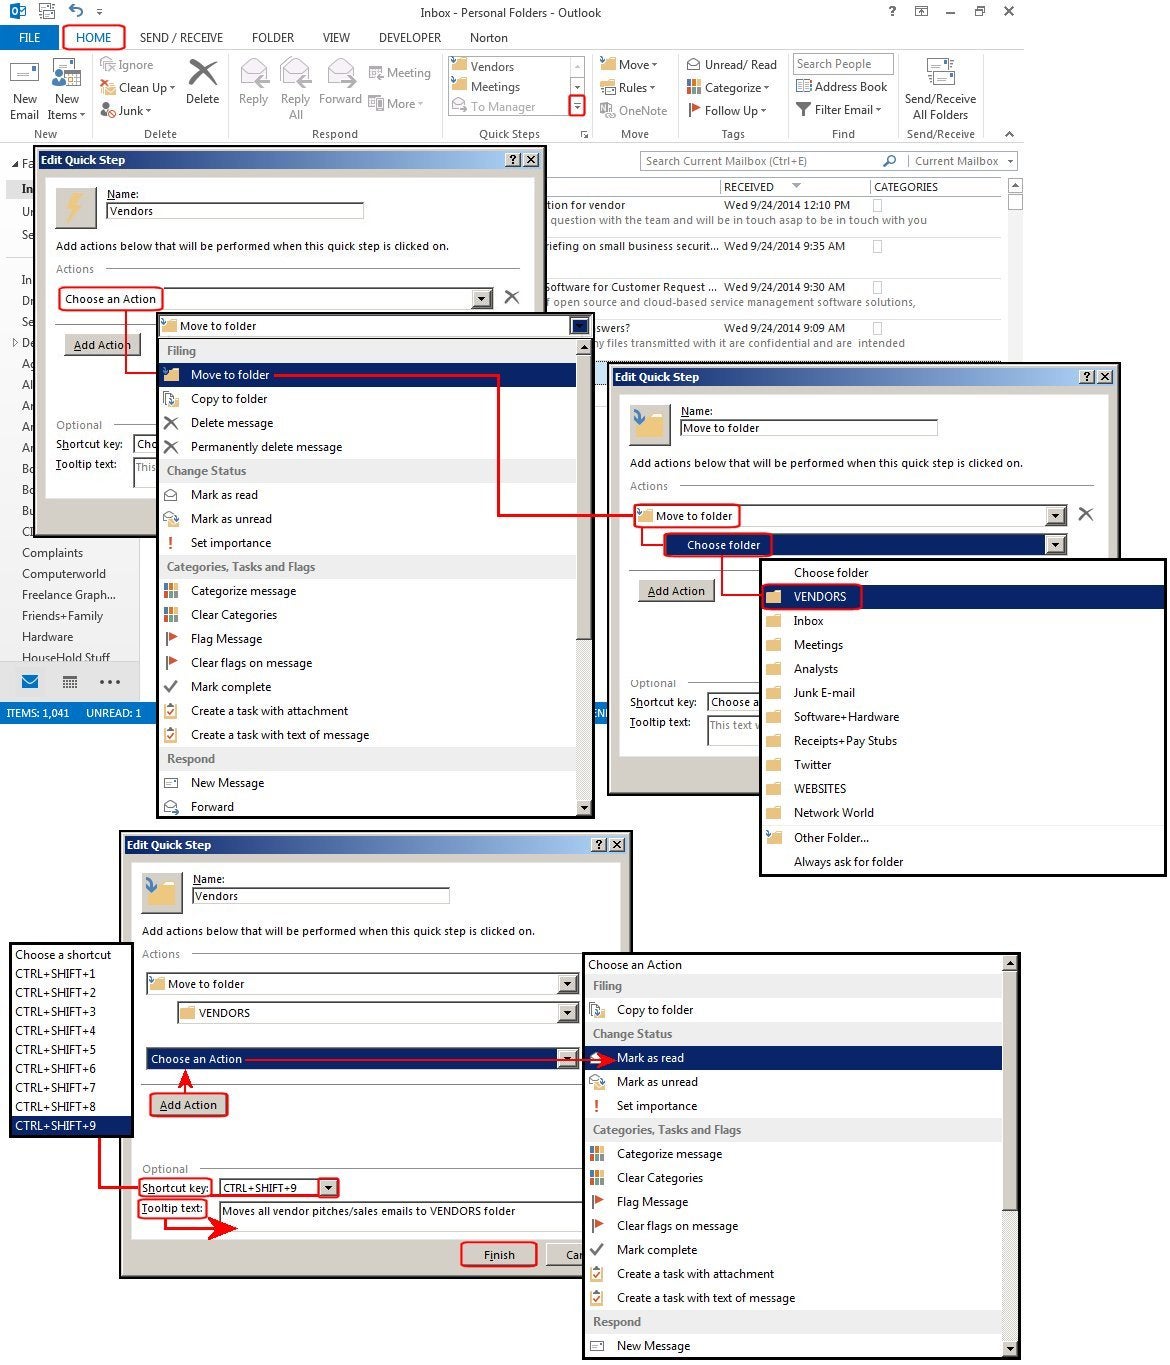
Once you construct a Quick Step, you possibly can click on on an electronic mail, select a Quick Step, and Outlook will do the remaining for you.
4. To use this activity—persevering with with our Vendors instance—click on on an electronic mail despatched by a vendor, after which click on Vendors from the checklist. The electronic mail is marked as learn and moved to your Vendors folder, multi function easy step. Alternatively, you need to use the shortcut key you outlined, however be aware that the keyboard shortcuts solely work on the quantity keys above the letters. It doesn’t acknowledge the numbers on the numeric keypad.
4. Email templates
How usually have you ever despatched the very same electronic mail to dozens (or extra) individuals with nothing modified besides the recipient’s identify and electronic mail tackle? Email templates make this activity a snap.
1. Locate considered one of these type letter-type emails in your Sent folder. Forward it to your self and edit out all of the customized info such because the recipient’s identify, electronic mail tackle, firm, and so forth. Then click on File > Save As, enter a filename, and choose Outlook Template because the file format.
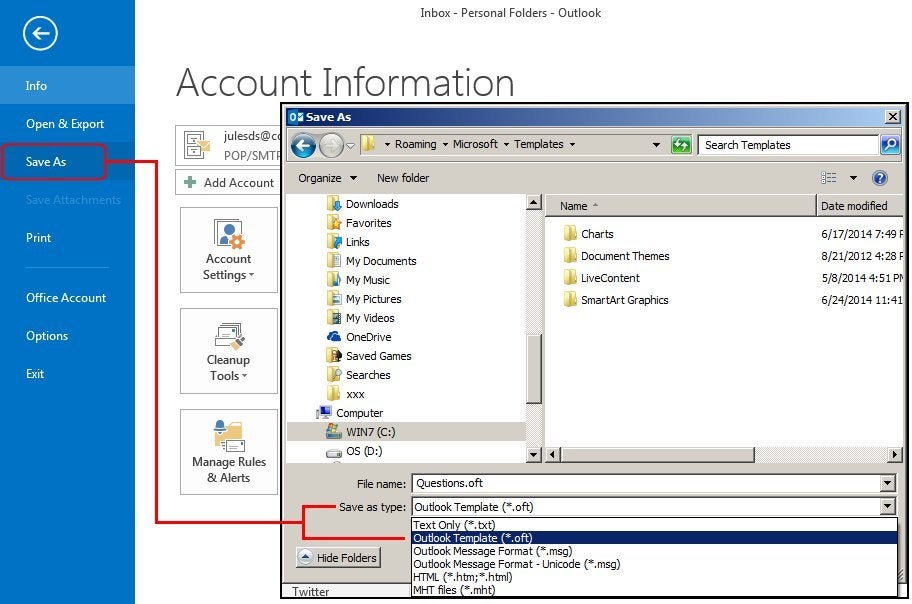
Create an Outlook template for emails you ship repeatedly.
2. To use/open the template: From the File tab’s “New” group, select New Items > More Items > Choose Form, after which click on the down-arrow to view the checklist of types. Select User Templates in file fystem, then select your saved electronic mail template from the checklist and click on Open. Add a customized salutation, insert an electronic mail tackle, and easily click on Send.
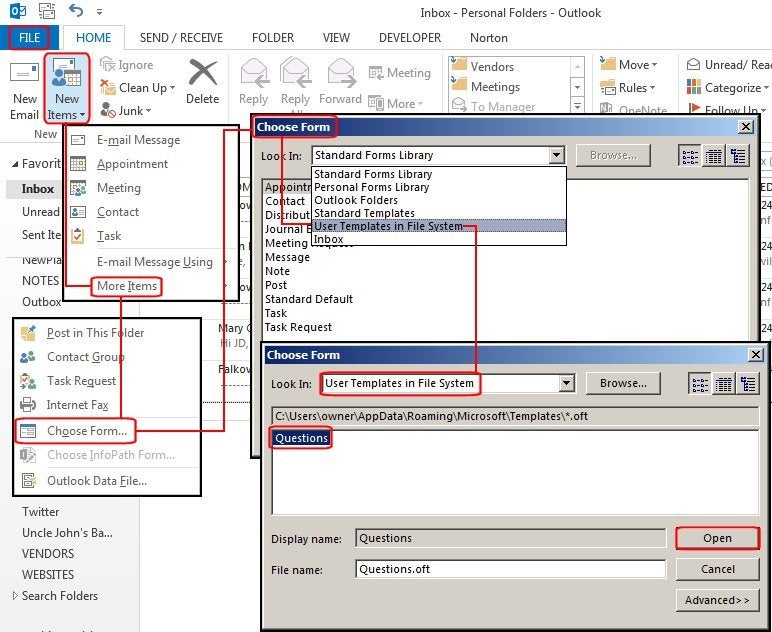
When you employ a template, you possibly can customise addressees and different particulars earlier than you ship it.
5. Conditional formatting guidelines
This helpful function allows you to create guidelines for conditional formatting. Wait, what?
Basically, it is just some personalized attributes that you would be able to routinely add to incoming emails to make them stand out. For instance, you possibly can change the font attributes—underline, daring, italic (daring and italic are font types of particular typefaces)—and the colours primarily based on a rule (or situation) that you simply outline within the “Conditional Formatting” part of Advanced View Settings.

Conditional formatting helps you distinguish particular sorts of emails from the remainder of the pile with particular fonts or colours.
1. From the File tab’s “Current View” group, select View Settings. Click the Conditional Formatting button then, within the Conditional Formatting dialog field, click on the Add button and enter a descriptive identify for what this rule/situation does. I entered “Editor” within the instance proven above as a result of I need the emails from my editor to actually stand out and seize my consideration. (Woohoo!–Ed.)
2. Click the Font button to outline the format for the typeface; i.e., font identify, colour, and attribute similar to Underline or Strikeout (for daring and italic, select a font that provides these attributes as a part of the typeface). Click OK once you’re executed.
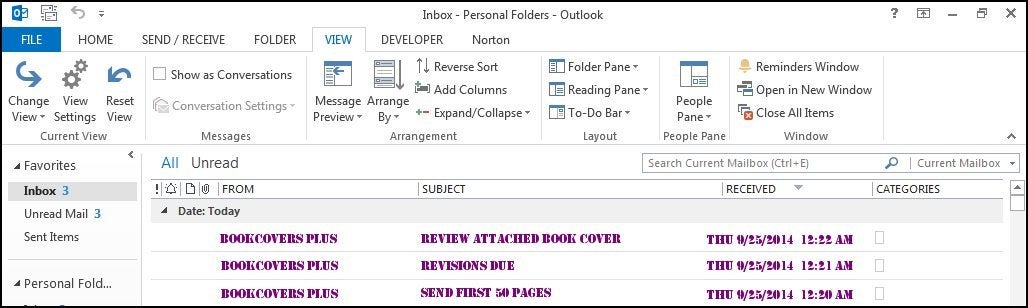
You will not have the ability to miss these emails out of your boss in the event that they present up in vivid purple Stencil font.
3. Next, click on the Condition button and outline a situation; for instance, you possibly can select a particular phrase (or phrases) within the electronic mail or topic line, an electronic mail tackle From or To, the place your electronic mail tackle seems within the electronic mail (To, From, CC, and so forth.), and/or a normal time or date (as we speak, yesterday, final week, final month, and so forth.). Again click on OK once you’re executed.
4. When the dialog field closes, click on but OK once more within the Conditional Formatting dialog field, then click on OK once more within the Advanced View Settings dialog field. Now, every time I obtain an electronic mail from my editor at BookCoversPlus, all these emails will show on my display screen in a purple, STENCIL font, as proven above.