


Photoshop Shapes are vector photographs which you could measurement up or down with out degrading the picture high quality. The smartest thing about utilizing Shapes is that it saves you time. For instance, few folks can draw an ideal circle (particularly with a mouse). If you click on, drag, and draw a vector picture, versus drawing them by hand with one of many pen instruments, you possibly can draw a Custom Shape in mere seconds.
You begin by deciding on the Shapes device. The default is the rectangle form, so search for a sq. on the toolbar, (presently seventh icon from the underside between the Path Selection and the Hand device). You can select from the Rectangle, Rounded Rectangle, Ellipse, Polygon, Line, or Custom Shape instruments.
Photoshop customized shapes
Photoshop supplies a number of libraries of customized shapes. These should not the identical as your private customized shapes, which you’ll be able to create with the Pen device your self. These are additionally, not the identical as the numerous hundreds of customized shapes obtainable to obtain from the Internet. Photoshop Shapes have a .csh extension, so search for recordsdata that finish with this format.
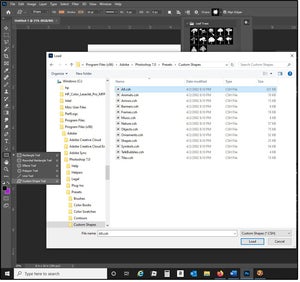
The Custom Shape device has a library of vector shapes to get you began: Leaf Trees, Wild Animals, Boats, and Flowers. If you’ve gotten any earlier variations of Photoshop in your laptop, you possibly can import all of the shapes from these Shape collections and multiply your library. Click the gear icon (prime proper nook of the Shape submenu, then navigate to the Adobe > Photoshop > Presets > Custom Shapes folder.
Select All from the listing of recordsdata and click on the Load button. The All file contains 12 extra classes of shapes: Animals, Arrows, Banners, Frames, Music, Nature, Objects, Ornaments, Shapes, Symbols, Talk Bubbles, and Tiles. If you don’t need or want entry to all of those Shapes, simply import or load the person recordsdata that apply.

Select Shapes to pull draw vector photographs
How to make use of and edit Photoshop Shapes
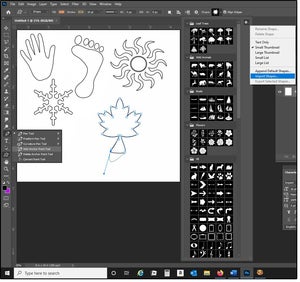
To find and use Photoshop Shapes, select the Shapes device from the principle toolbar, right-click to see the submenu, then cursor right down to the form you wish to use. Notice that the menu throughout the highest adjustments primarily based on which form you select. For instance, if you choose the Polygon, select the variety of sides you need from the Sides area field (prime, far proper). Or, in the event you select the Custom Shape device, the Shapes dropdown (additionally prime, far proper) shows dozens of vector choices.
The prime menu additionally shows the Fill, Stroke, Width, Height, and Shape modifying choices (corresponding to Combine Shapes, Intersect Shapes, and so on.), Alignment choices, Stack Layers choices (corresponding to Bring to Front, Send to Back, and so on.), the Path choices (beneath the Gear icon), and final, the Align Edges characteristic, which aligns vector form edges to the pixel grid. Experiment with these options to alter or improve your Photoshop shapes.
Notice that when a form is chosen, the field handles (referred to as anchor factors) seem in a number of areas round and all through the form. Use these factors to edit or re-draw the form. For instance, click on the anchor level on the appropriate facet of the leaf stem and drag the deal with down and to the appropriate. Repeat the method on the left facet of the leaf stem.
When you click on one of many anchor factors, a line with the dots on every finish (referred to as Direction Points) seems. Click considered one of these factors, then use your cursor to pull and slide the road round till the stem is reshaped to your satisfaction. If it is advisable edit the picture extra, you possibly can simply add extra anchor factors with the Pen device (or delete them).
How to attract edit a vector Shape with Anchor Points
How to create customized Photoshop Shapes
Even in the event you can’t draw, you possibly can hint a picture, proper? That’s how simple it’s to create your individual vector Shapes in Photoshop. First, obtain a free, public area coloring e-book picture from the Internet, corresponding to from Super Coloring. Then do this:
1. Go to web page 3 (web page numbers at backside of every display screen web page), scroll down (or web page down) 4 occasions, then double-click (choose) the Christmas tree.
2. Right-click the picture, then select Save Image As…
3. Navigate to your Pictures folder and save the file (simple-christmas-tree-coloring-page.png seems within the File Name area field).
4. Open the file in Photoshop.
5. Select Image > Image Size (or Alt + Ctrl + i (concurrently).
6. The present measurement is 4.7 inches vast by 6.6 inches tall, with a decision of 72 pixels per inch. Change the pixels per inch to 300. It would possibly blur a bit, however that’s okay. We’re going to re-draw this image utilizing the Pen device and anchor factors, so it turns into a vector picture.
IMPORTANT NOTE: Always use, create, or convert your work to a minimal decision of 300 pixels per inch earlier than you make any edits or modifications. You can all the time cut back the picture measurement or decision with minimal to zero picture high quality. You can’t, nonetheless, enlarge a low-resolution picture with out degrading high quality.
7. Save the file with the brand new picture measurement settings.
8. Use the Magic Wand device and click on anyplace on the background (make certain all the background is chosen).
9. Choose Select > Inverse (or Shift- Ctrl+ i) to re-select the tree, then select Edit > Copy (or Ctrl+ C).
10. Open a brand new Photoshop file: 8x10x 300 ppi and choose Edit > Paste. Now that we have now the vector picture, the unique is not wanted.
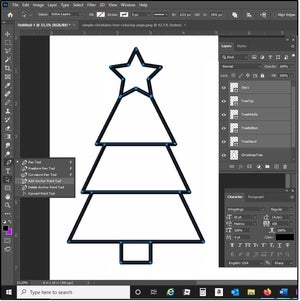
11. Select the Pen device from the Tools palette (close to the underside). For this newbie’s train, it’s a plus that the picture traces are thick.
12. Begin with the star. Click the highest level of the star, and an anchor level seems. Click the following star level, and one other anchor level seems (related to the primary one). Continue across the perimeter of the star, then shut the vector by clicking the primary, unique anchor pint once more.
13. Choose Edit > Define Custom Shape, then kind in a reputation to your form and click on OK.
14. Select the Pen device once more and click on every nook of the primary tree part.
15. Choose Edit > Define Custom Shape once more. Name the form TreeTop and click on OK.
16. Repeat this course of for the center and backside tree sections, after which once more for the tree stand.
NOTE: Each time you create a brand new vector be certain you’ve gotten Layer1 chosen, the complete Christmas Tree layer. Each time a brand new vector is outlined, a brand new layer seems within the Layers panel. Name these layers the identical factor because the Shapes.

How to create customized Photoshop Shapes
How to attract, reshape, and add coloration or patterns to Photoshop Shapes
1. Once all of the shapes are outlined, you should use these vector shapes over and over.
2. Open a brand new Photoshop file measurement 8x10x 300 ppi.
3. Select the Shape device, then the Custom Shape device.
4. Go to the Shape Library area field on the submenu and click on the down arrow on the appropriate.
5. Scroll to the underside of the dropdown menu and choose your vector star.
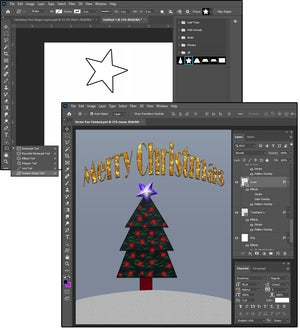
6. Place your cursor within the top-left nook and drag down and over till the star turns into the dimensions and form you want.
7. While the star remains to be chosen—within the Layers panel—right-click your vector picture.
8. Select Blending Options from the submenu.
9. In the Layer Style dialog, click on the phrase Stroke (clicking the field alone won’t be sufficient).
10. On the Stroke panel, select measurement “6” pixels for the stroke width. Position = Outside; Blend Mode = Normal; Opacity = 100%; File Type = Color; Color = Black; and click on OK. Your star now has a top level view. Without this line, the star would seem invisible on the web page.
11. Now, right-click the Star1 layer once more, choose Blending Options > Patterns. Scroll by means of the Patterns library and select one that appears like a star.
12. Repeat steps 1 by means of 11 to pull and draw the remaining layers, plus add a top level view and a sample fill.
13. Add some coloration or a gradient to the background and it’s completed (or form of). The consequence is an easy, child-like image of a Christmas tree with a star on prime. But now you know the way to create your individual customized shapes.
14. Save the file with a reputation (we’ll use Star1) and create one other customized form.

How to attract reshape edit and fill customized Shapes
Convert fonts, wingdings, webdings, and different image bullets into Photoshop Shapes
In the older variations of Photoshop, changing fonts and different symbols was not really easy. In the CS variations, it’s a bit of cake.
1. Open a brand new file and be certain that the Character/Paragraph panel is displayed on the display screen.
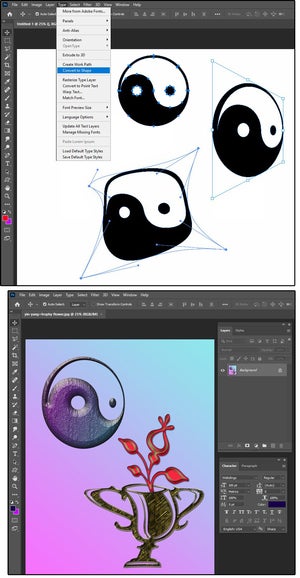
2. Change the font to Wingdings and the dimensions to 300 factors.
3. Select the Text device and drag out a textual content field.
4. Enter the left sq. bracket, and a yin/yang image seems on the display screen.
5. Choose Type > Convert to Shape.
6. Select the Path Selection device (black arrow on toolbar), and a number of other dozen anchor factors seem on and across the yin/yang image.
This image is now a vector picture which you could measurement, distort, rotate, skew, warp; change the angle, the colour; add a great deal of results corresponding to Bevel, Emboss, Contouring, 3D; plus add texture, gradients, patterns, shadows, glow, and a lot extra. The choices are infinite, as a result of there are millions of image bullet fonts obtainable on the Internet.

How to transform bullets and symbols to vector Shapes
Find free Photoshop Shapes and image bullets
Any web site that has fonts (and there are dozens of them) may have image bullets. For instance attempt any of those:
Look for categories called Symbols, Bullets, Decorative, Wingdings, or Ornaments.
To obtain Photoshop Shapes, attempt any of those:
The Ultimate Collection of Custom Photoshop Shapes
Or simply do what I do: Search on-line for “free Photoshop Shapes” or “free fonts.” Then experiment, play, and have enjoyable!