


Photoshop kinds are artworks that may be utilized to textual content, objects, vector shapes, illustrations, or images. Unlike Microsoft kinds, that are principally only a assortment of attributes (similar to daring, italic, underline) and minor results (similar to shadows, reflections, glowing halos), Photoshop makes use of layers to include textual content and pictures, and people layers could be “decorated” with a mode.
Photoshop Styles are accessed by way of the Styles panel, which you’ll add to your Photoshop desktop by way of the Window tab: Select Window > Styles and the panel seems. I mix the Styles panel with the Layers panel and depart each open on a regular basis. Notice that Photoshop offers 20 “free” kinds in 4 classes (Basic, Natural, Fur, and Fabric) to get you began.
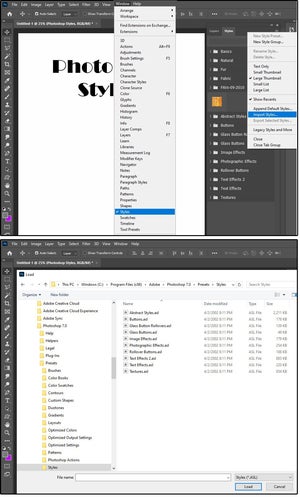
How to import/load extra Photoshop Styles
If you’ve got any older variations of Photoshop in your pc, you’ll be able to import all of the Styles from these different Style collections and construct up your library. Click the menu icon (4 stacked traces) within the top-right nook of the Styles panel, then navigate to the Adobe > Photoshop > Presets > Styles folder.
The extension for Styles is .asl. You can not use Ctrl+ A to pick out all of them from the checklist of information—you must import them one by one. So, choose the primary one and click on the Load button. Follow this identical process to import another kinds you want. You can simply delete Styles and cargo extra at any time.

How to entry import load Photoshop Styles
How to make use of Photoshop Styles
Using Photoshop Styles is a breeze. Once you learn the way the Style Effects work, you’ll be able to improve your textual content and pictures to assist them pop off the web page or display. Editing kinds is a little more difficult, however nonetheless not too tough.
To start, be certain that the mix Layers and Styles panels are displayed on the display.
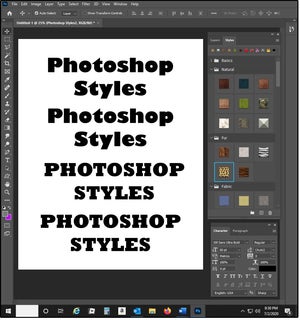
1. Open an 8×10 x 300 ppi Photoshop file.
2. Use the Text software and sort Photoshop Styles throughout the highest. Use a thick font similar to Impact, Gil Sans Ultra Bold, Broadway, Franklin Gothic Heavy, or Rockwell Extra Bold, and measurement it to 60 factors. These fonts got here with Adobe, so it is best to have them in your system.
3. Duplicate 3 times, and make two of them all-caps.
4. Place your cursor on the primary “Photoshop Styles” phrase within the Layers panel, then click on the Styles tab.
5. Browse by way of the assorted fashion icons and select one to strive, or use our examples beneath.

How to make use of Photoshop Styles
How to edit Photoshop Styles
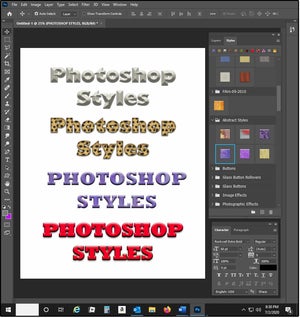
For the primary one, select the Style referred to as “Tile.” Notice how the textual content has a sculptured, three-dimensional look, however the shade is white and so is the background.
1. Let’s change the Color:
a. Click the Layers tab. Right-click the layer referred to as Photoshop Styles (in lowercase) and select Blending Options from the dropdown checklist.
b. In the left panel, click on the phrase Color. In the Color Picker dialog, choose a pleasant, darkish blue, then click on OK.
c. Next, slide the Opacity bar from 31% to 100% and click on OK.
2. Now, let’s change the Drop Shadow:
a. Click the Layers tab once more. Right-click the layer referred to as Photoshop Styles2 (in lowercase) and select Blending Options from the dropdown checklist.
b. In the left panel, click on the phrases Drop Shadow. In the middle of the panel, transfer the Distance slider from 7 to 20 px. Then transfer the Spread from 13 to 23 p.c. And final, transfer the Size from 16 right down to 10.
c. Un-check Use Global Light and alter the Angle to 120 levels, then click on OK.
3. Now, let’s change the Bevel & Emboss:
a. Click the Layers tab once more. Right-click the layer referred to as PHOTOSHOP STYLES (in all caps) and select Blending Options from the dropdown checklist.
b. In the left panel, click on the phrases Bevel & Emboss. In the middle panel, beneath Structure > Style, select Emboss from the dropdown checklist, and click on OK.
4. And final, let’s change the Stroke (or Outline):
a. Click the Layers tab once more. Right-click the layer referred to as PHOTOSHOP STYLES2 (in all caps) and select Blending Options from the drop-down checklist.
b. In the left panel, click on the phrase Stroke. In the middle panel beneath Stroke > Structure, change the Size from 8- to 6-point, and alter the Position from Outside to Inside.
c. Under Stroke > Fill Type, change the Fill Type to Color and alter the colour to black, and click on OK.

How to edit Photoshop Styles
How to save lots of edited Photoshop Styles
Edit an present Style (like we did above), then save the Style with a distinct title. For instance:
1. Right-click the primary layer above referred to as Photoshop Styles (lowercase) and select Blending Options.
2. Click the New Style button within the Layer Style dialog and provides your new fashion a reputation, similar to “Blue Tile.” Click OK, OK (twice).
3. Repeat this course of for the opposite three textual content layers. For Photoshop Styles2 (lowercase) title the Style: Cheetah2. For the PHOTOSHOP STYLES (all caps), title the Style: Brushstrokes2. And for the PHOTOSHOP STYLES2 (all caps) layer, title it Bright Red Bevel2.
How to create customized Photoshop Styles
There are 4 methods to create a brand new fashion, however solely considered one of them permits you to do it from scratch. The different three strategies require you to decide on an present, empty fashion that has no options or results, and edit it (as proven above).
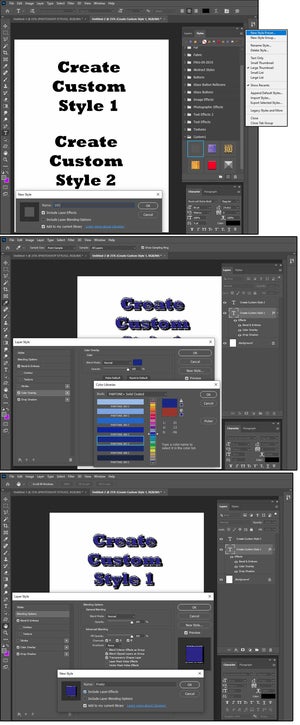
1. Open a brand new 8×10 x 300 ppi file and sort Create Custom Style 1, then duplicate the layer and name it “Create Custom Style 2.” Be certain the Create Custom Style 1 layer is chosen, then swap over to the Styles tab.
2. At the underside, click on the tiny folder icon and within the Group Name dialog, enter a reputation for the folder the place you wish to save your customized Styles, similar to “Custom1.”
3. For starters, transfer (drag and drop) the 4 new kinds you simply edited and saved to your folder.
4. Next, choose Layers > Blending Options > New Style and enter a reputation, similar to Base (to your fundamental, empty Style). Notice that every one the results within the Styles panel on the left are clean, with no checked bins. Click OK, and now you’ve got a base/basis on which to construct new kinds.
5. Select the Base Style within the Styles panel, then any of the next three choices will work now.
a. Choose New Style from the Styles panel menu.
b. Click the Create New Style button on the underside, proper of the Styles panel.
c. Click wherever in an empty space on the Styles panel.
6. Click the Layers tab, right-click one of many Layers, and when the Layer Style dialog seems, begin including results to your new fashion. If you add one thing you don’t like, simply take away it by un-checking the field for that impact.
7. For instance, my new fashion has the next:
a. Bevel & Emboss: Style = Smooth; Technique = Smooth; Depth = 125%; Highlight Mode = Dissolve; Opacity = 75%; Shadow Mode = Dissolve; Opacity = 75%.
b. Color Overlay: Pantone 287c
c. Drop Shadow: Blend Mode = Multiply; Opacity = 100%; Angle = 140 levels; Distance = 30 px; Spread = 30%; Size = 15 px.
d. Click the New Style button once more, title it Frosty, and click on OK, OK (twice). Click the Styles tab and spot your new Style within the Custom1 folder.
e. Follow the directions above to create your individual new fashion.

How to create customized Photoshop Styles
How so as to add patterns to Photoshop Styles
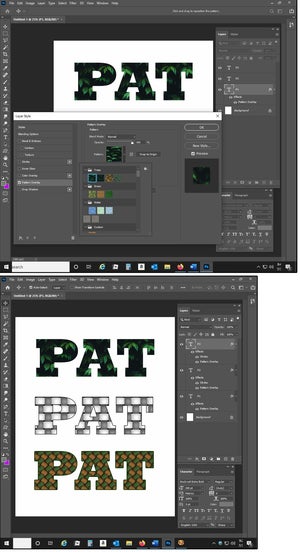
Adding patterns to your Styles is straightforward.
1. Open a brand new Photoshop file and enter the phrase Pat (for Patterns). Use a thick font and measurement it to 200 px. Duplicate the layer twice and title the layers P1, P2, and P3.
2. Select the layer for P1. Right-click, select Blending Options > Pattern Overlay.
3. In the Layer Style dialog, middle panel, click on the down arrow beside the phrase Pattern, and open the Pattern folders.
4. Browse by way of the assorted patterns, choose one you want, and click on OK.
5. Repeat steps above so as to add patterns to the opposite Layers P2 and P3.

How so as to add patterns to my Photoshop Styles
Where to seek out and obtain free Photoshop Styles
Search on-line for “Free Photoshop Styles,” and also you’ll have numerous selections, or check out a few of my favorites: