
Time might not essentially be cash, but it surely nonetheless issues. Every second you spend wading by context menus or clunkily navigating Windows is a second you could possibly be doing one thing you’re keen on as an alternative. And with a lot of contemporary life tied up in expertise, these wasted seconds can add up quick.
Now it’s time to reclaim these misplaced seconds, minutes, and hours. These easy Windows 10 suggestions and methods aren’t glamorous and most aren’t even new to the Start menu-swapping October 2020 Update, to be sincere, however when deployed collectively they’ll critically streamline your workflow.
Once you’ve mastered these strategies, remember to take a look at our guides to 10 helpful Windows 10 tools you might not know about, how to tune Windows 10 for laser-focused productivity, and the best Windows 10 tips, tricks, and tweaks. Optimizing your setup will get awfully addictive, awfully quick.
Adjust your startup applications
Let’s begin the place all of it begins: When your laptop boots up. Seemingly each program you put in worms its means into activating alongside your PC. Some software program, equivalent to your keyboard’s administration app or your antivirus, deserves that lofty standing. Others don’t. (I’m you, recreation launchers.) And each program that leaps to life when Windows does delays your skill to make use of your system, particularly in the event you haven’t upgraded to an SSD but.
Fortunately, it’s simple to grab management over which applications launch with Windows. Simply press Ctrl + Shift + Esc or seek for “Task Manager” to open the Windows 10 Task Manager, then click on on the Startup tab on the high. There, you’ll see all of the applications clamoring for a spot within the startup limelight, full with an estimated affect ranking from Low to High. If you wish to flip any off, merely click on its itemizing and choose Disable. Obviously, doing so means you’ll have to open this system manually to activate it to any extent further.
Customize your activity bar
Now let’s begin organizing issues a bit higher. Launching a program that’s pinned to your Windows 10 taskbar is all the time quicker than searching it down within the Start menu or in your desktop. So you’ll wish to populate yours with the software program and information you employ probably the most.
To pin a program to your taskbar, merely right-click it and choose the Pin to taskbar choice within the context menu that seems. You may do that to a program’s icon when it seems in your taskbar after opening it. You can pin often visited webpages to your taskbar by saving it as a shortcut by way of your browser’s setting menu, then right-clicking that shortcut in your desktop and deciding on Pin to taskbar.
Folders can solely be pinned to the Start menu, alas. You can pin particular information to your taskbar, kinda-sorta, however the course of is barely totally different, and brings us to our subsequent tip…
Embrace leap lists
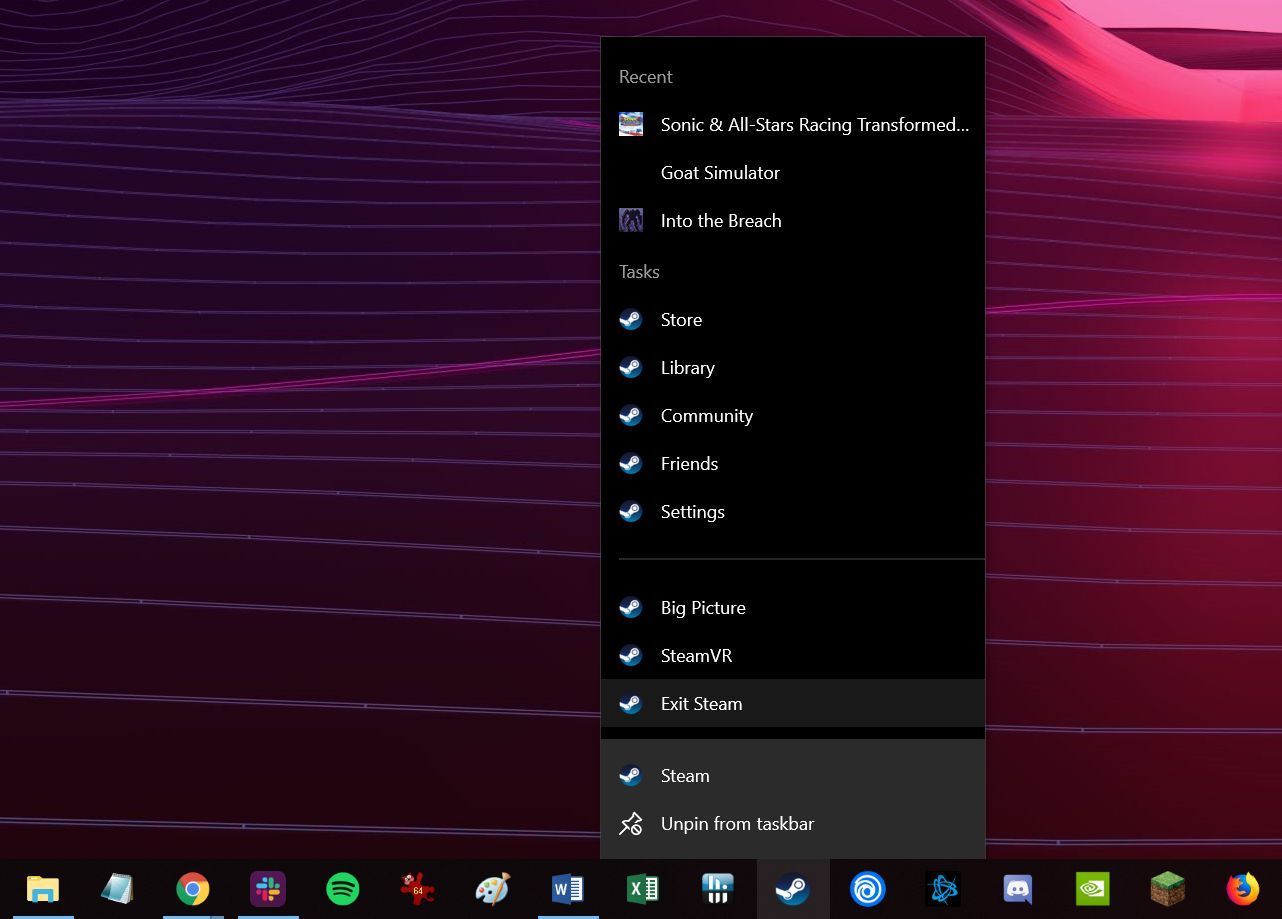
Now that you simply’ve pinned your most-used applications to the taskbar, you’re able to make the most of the awesomeness referred to as leap lists. When you right-click a program icon in your taskbar, most will reveal a pop-up checklist of your most up-to-date open information for that program, or shortcuts to frequent duties. It’s a good way to leap proper again right into a undertaking without having to slog by folder after subfolder within the Windows File Explorer.
 Brad Chacos/IDG
Better but, if you already know you’ll always return to a selected file or shortcut, you possibly can pin it to the highest of the leap checklist by mousing over its entry, then clicking the pin icon that seems all the way in which on the precise. Any information you do it for will seem underneath a brand new “Pinned items” part on the high of the leap checklist. Simply click on the pin icon for an entry once more to take away it.
Launch taskbar shortcuts with keyboard shortcuts
But we’re searching for velocity. Unless you’re summoning a leap checklist to leap again shortly into a selected file, even clicking these icons in your taskbar could be sped up—by not clicking on them. Power customers swear by the velocity of keyboard shortcuts, and you’ll open a program in your taskbar with out having to raise your hand to your mouse.
You used to have the ability to open particular applications pinned to your taskbar by urgent the Windows key concurrently with a quantity related to the place this system is situated to the precise of the Start Menu—urgent Win + 1 to open your first pinned choice, Win + 2 to open the second choice, and so forth. That appears to have disappeared in Windows 10, although it nonetheless works in older variations of the working system.
If you wish to use your keyboard to open applications pinned to your taskbar in Windows 10, press Win + T. You’ll see a field seem across the first pinned merchandise to the precise of the Start Menu. Press Enter to open it, or hold urgent T to cycle by all of your pinned applications from left to proper.
Keyboard shortcuts!
 Adam Patrick Murray/IDG
Continuing with that theme, keyboard shortcuts are great for performing duties a lot faster than you possibly can by clicking round menus with a mouse. If you’re a keyboard shortcut novice, right here’s a sampling of a number of the extra helpful ones:
- Crtl + C: Copy
- Ctrl + X: Cut
- Crtl + V: Paste
- Crtl + Z: Undo final motion (these Crtl suggestions work with most software program)
- Alt + Tab: Cycle by open applications
- Win + Tab: See all open program on a per-monitor foundation, summon Windows Timeline
- Windows key: Open search
- Windows + E: Open File Explorer
- Windows + Print Screen: Takes a screenshot and saves it to your Pictures folder
- Windows + I: Open Windows Settings
- Crtl + Shift + Esc: Open Task Manager
- F5: Refresh the energetic window
If you wish to see a full checklist of all Windows 10 keyboard shortcuts, take a look at this cheat sheet on Microsoft’s help website. Most—however not all—of them ought to work with older variations of Windows, too.
DIY keyboard shortcuts
You don’t should cease with Windows 10’s native keyboard shortcuts. You can create customized keyboard shortcuts to open applications shortly, too.
 Brad Chacos/IDG
To accomplish that, right-click the app and choose Create shortcut. You’ll see a brand new icon seem with the identical title as this system, however with “shortcut” on the finish. Right-click the shortcut for this system and choose Properties. In the pop-up menu that seems, choose the Shortcut tab, click on the Shortcut Key subject, and press the alphanumerical key you’d prefer to affiliate with this system. Click OK to save lots of the change. Windows will assign Crtl + Alt + <key of your alternative> because the keyboard shortcut to open that program.
This trick could be critically helpful for wrangling applications that you simply use usually, however not usually sufficient to pin to your taskbar. I like utilizing it for the myriad recreation launchers put in on my PC, associating the keyboard shortcut’s letter with the primary letter of the sport launcher’s title.
Shut all of it down
If you’re opening applications and information willy-nilly, chances are you’ll end up drowning in open home windows. Fear not: Windows supplies a number of methods to clear the deck near-instantly, returning your focus to the duty at hand.
My favourite? Click and maintain the title bar on the high of this system you’re working in, then give it a vigorous shake. All different home windows might be minimized to the taskbar. Pressing Windows + Home accomplishes the identical factor. Alternatively, if you wish to reduce all the things and reveal your desktop, merely press Windows + D in your keyboard, or click on the barely-visible sliver all the way in which to the very proper of your taskbar, past the system tray and notification heart. Poof.
Supercharge the Send To menu
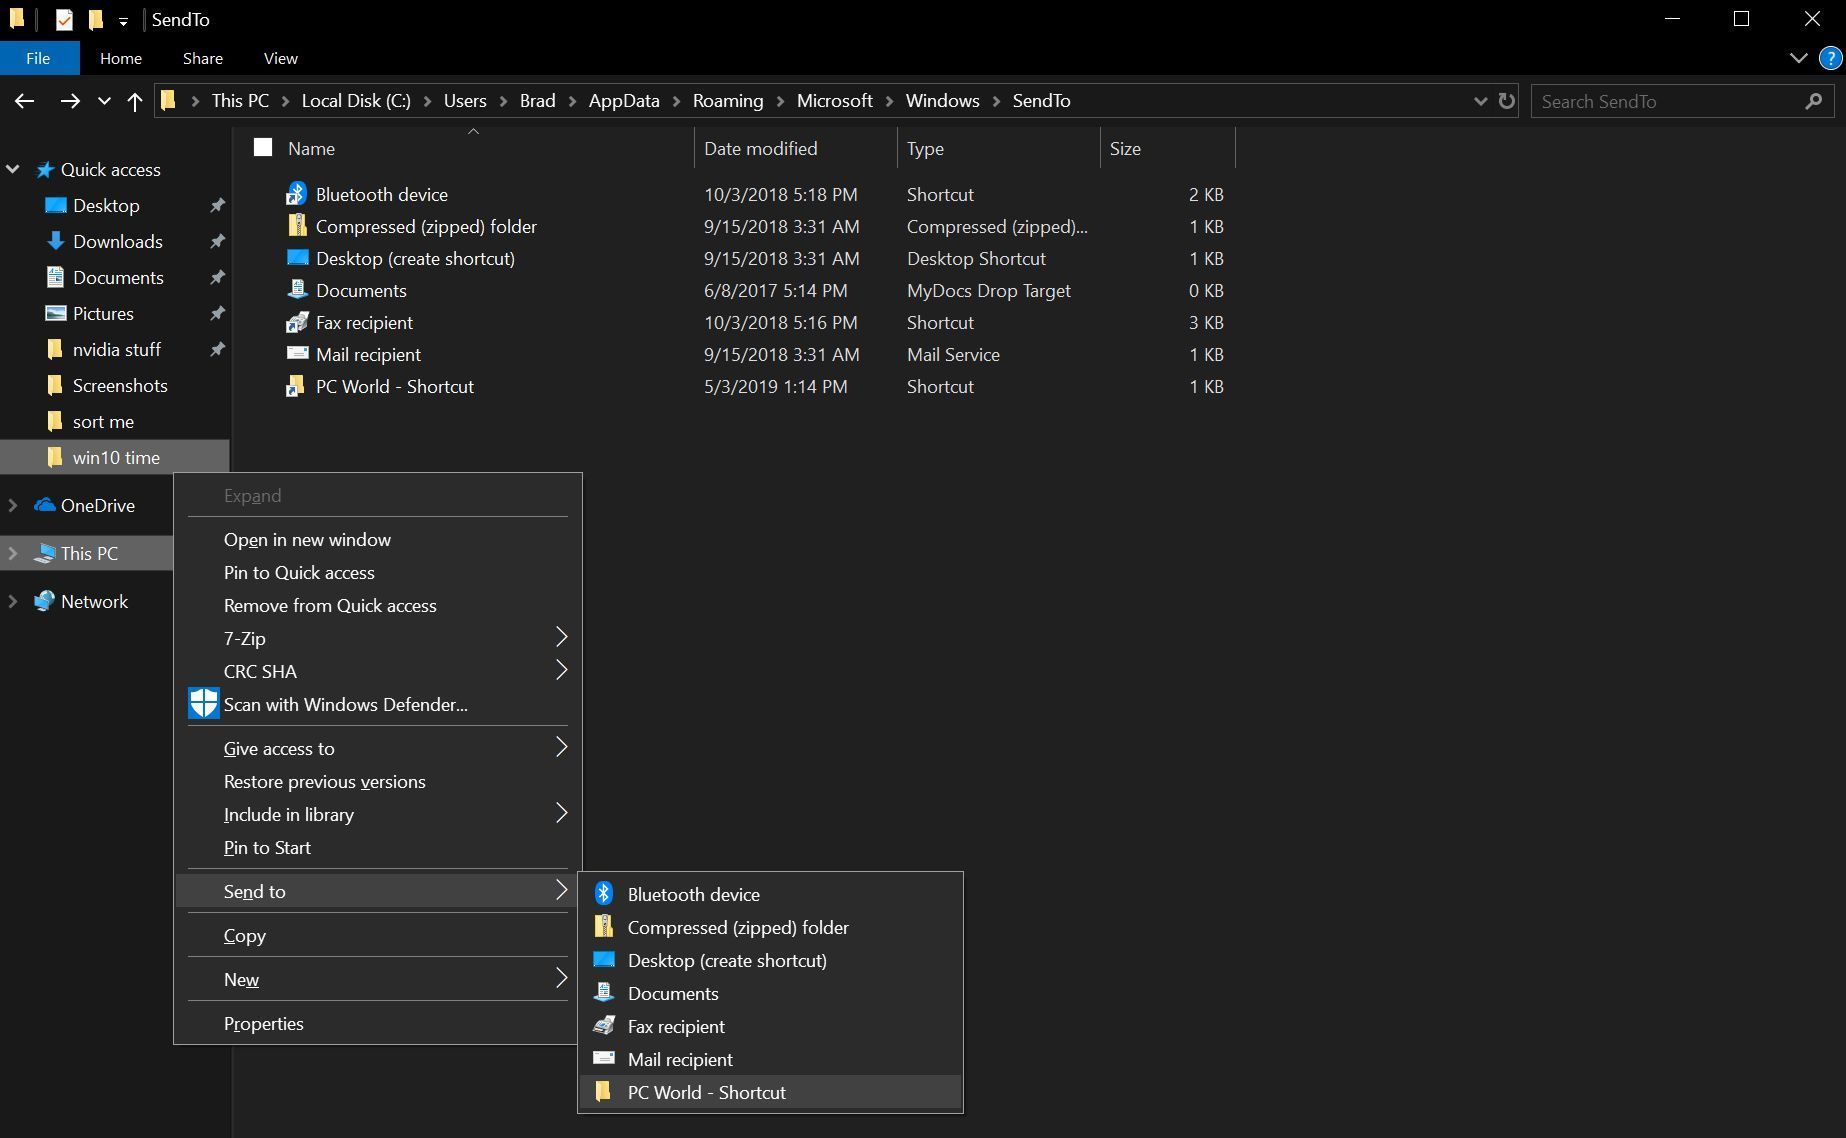
Staying organized is vital to working effectively. You can use the right-click context menu’s Send To choice to hold your digital home clear, although doing so would require altering the menu to suit your specific wants. Doing so is quick, and effectively well worth the hassle.
 Brad Chacos/IDG
Start by creating shortcuts to your most-used folders. (I like making a shortcut for my PCWorld work folder, as an illustration.) Once that’s completed, open File Explorer and kind shell:sendto into the situation bar on the high. File Explorer will reveal a listing of the choices that seem within the Send To menu. Simply drag your beforehand created shortcuts into this folder. Next time you right-click an merchandise and summon the Send To menu, these folders might be listed as choices. Happy sorting!
Quick Access or This PC?
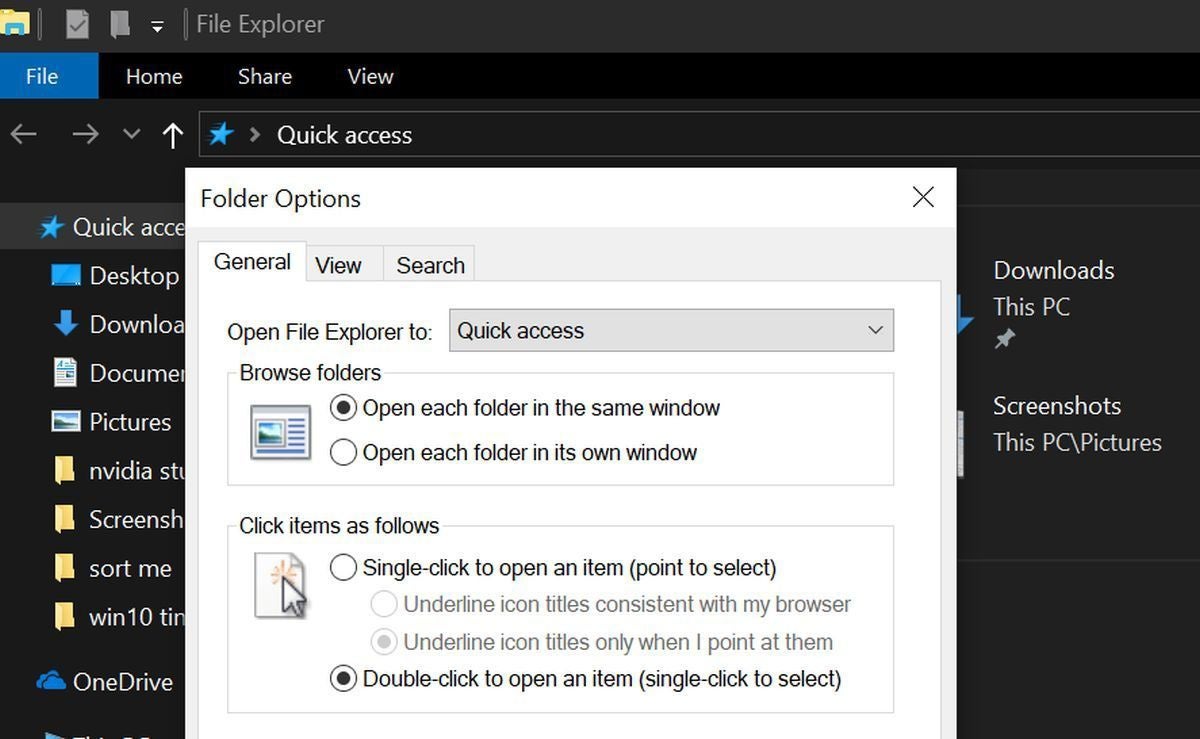
While you’re in File Explorer, you may wish to change the situation it opens to. Windows 10 modified issues up by having File Explorer default to Quick Access, a view of your most just lately used information and often used folders. Sounds useful, proper? Not a lot in the event you’re already benefiting from leap lists in your taskbar. If you’ve arrange your system as outlined on this information, you’re more likely to wade into File Explorer to search out occasionally used gadgets—the alternative of what Quick Access supplies.
 Brad Chacos/IDG
Fortunately, you possibly can change how File Explorer behaves and have it open to the “This PC” interface as an alternative, the place you can begin drilling down into the subfolders in your onerous drives. To accomplish that, open File Explorer, click on on the View tab, after which click on Options. A single choice, Change folders and search choices, will seem; choose it. In the pop-up it summons, open the General tab, click on the “Open File Explorer to” drop-down on the high, and choose both Quick Access or This PC.
Power up
Finally, when you’ve mastered these easy but secret methods, you could possibly discover much more time financial savings by delving into the unique world of Windows energy instruments. Secretive enthusiast-class instruments like Timeline, Nearby Sharing, Cloud Clipboard, Storage Sense, and God Mode will help you streamline your workflow much more. Head over to our information to 10 truly helpful Windows 10 tools you might not know about to fall even deeper down this rabbit gap, or our tutorial on how to fine-tune Windows 10 for laser-focused productivity if you wish to reduce interruptions.
Editor’s word: This article is up to date periodically with new info. It was most just lately up to date to say the Windows 10 October 2020 Update.