
There are varied methods to work collectively in a community based mostly on Windows 11. The easiest is to arrange a shared workgroup, a sort of staff of computer systems with equal rights. The workgroup in Windows 11 connects the collaborating gadgets in order that the computer systems inside the community can see one another. This relies on file and printer sharing, which permits the PCs within the workgroup to alternate Office paperwork, pictures, music, movies and so forth at file stage. To make the essential settings and arrange a workgroup in Windows 11, comply with these directions. Once the workgroup community is about up, use community shares to share particular person paperwork or whole folders on the laborious drive with the opposite computer systems within the community.
Adding Windows 11 to the community
A Windows 11 community based mostly on a workgroup requires that every one desktop PCs and notebooks are related to one another. To do that, it’s enough to attach the computer systems to a WLAN router such because the Fritzbox, both by way of an Ethernet cable or wirelessly by way of WLAN. The router bodily connects the computer systems and printers related to it in order that they will talk with one another. To do that, the DHCP server within the router, which is lively by default, assigns a singular IP handle to the person gadgets. The information packets are then transported between the computer systems with out you having to fret about addressing and routing.
Modern WLAN routers robotically deal with every thing essential by default. So be sure that your laptop and each different laptop meant for the community is related to the router. Then perform the next steps in Windows 11.
Check community profile
For a personal workgroup community, the “Private” community profile sort should be chosen in Windows 11. This ensures that your PC may also be seen by different computer systems. To examine and, if essential, change the profile sort, click on on “Network & Internet” and your community connection — both “Ethernet” or “WLAN” and “Properties” within the Settings app. Make certain that the “Private” possibility is chosen beneath “Network profile type” and shut the window.
Activate community features
Choose “File and Printer Sharing for Microsoft Networks” inside the “Properties” display on your community connection.
Foundry
The subsequent step is to activate “File and printer sharing for Microsoft networks” in your PC or pocket book. To do that, open the Settings app and click on on “Network and Internet” on the left. Click on “Advanced network settings” after which on “Change adapter options.”. Windows 11 opens a brand new window with an icon on your community connection. It is labelled “Ethernet” or comparable for a wired community connection — or “Wi-Fi” for a wi-fi community connection. Right-click on the icon and click on on “Properties” within the context menu. Windows 11 now shows a window with quite a few settings. Make certain that the “File and printer sharing for Microsoft networks” possibility is ticked. Confirm with “OK” and shut the connection window.
The various method to swap on “File and printer sharing for Microsoft networks” is by way of the search perform: Click on the Windows button and sort in “control panel”. Click on the Control Panel app. Click on “Network and Internet > View network status and tasks > Change adapter settings.” Windows 11 will now show the icon on your community connection. You can then right-click on it and use the “Properties” command to make sure that “File and printer sharing for Microsoft networks” is ticked.
Customize the pc identify
Windows 11 makes use of the pc identify to uniquely establish a pc within the community. We suggest utilizing a pc identify that’s as significant as doable as a way to simply acknowledge and assign the system in query. The Settings app in Windows 11 shows the present laptop identify on the high of the beginning web page. If you need to change the identify, click on on “Rename.”
Windows 11 will then open a brand new window. Enter your required identify within the empty enter area. It could solely comprise letters, numbers, and hyphens. Confirm with “Next” and restart your laptop.
First support if the computer systems can’t discover one another on the community
If the Explorer in Windows 11 doesn’t present any computer systems within the community aside from your personal, the next guidelines will assist you to to troubleshoot and resolve the issue.
- Network profile: In the Settings app beneath “Network & internet,” examine whether or not your PC is utilizing the “Public (recommended)” community profile. If so, swap to the non-public community profile.
- Router setting: In the working menu of your Wi-Fi router, seek for a safety setting that might block communication between the gadgets. On the Fritzbox, the choice “The active WLAN devices shown below may communicate with each other” should be switched on beneath “WLAN > Security,” in any other case it won’t work.
- No visitor entry: Make certain that your laptop shouldn’t be logged on to the router by way of the Wi-Fi entry for company. Access to different computer systems within the community shouldn’t be permitted by way of the visitor Wi-Fi for safety causes.
- Different workgroups: Only if the workgroup set in Windows 11 matches on all computer systems within the native community will Explorer show the related computer systems beneath “Network.”
- Firewall blocks community entry: The “Private” community profile units up particular rights within the Windows firewall that enable entry to the PC from exterior. If you might be utilizing different safety software program that features a firewall, it’s essential to arrange a corresponding exception there.
- Check superior sharing settings: In the Control Panel, go to “Network and internet > View network status and tasks > Change advanced sharing settings.” Make certain that the “Enable file and printer sharing” possibility is switched on beneath “Private.”
Set workgroup
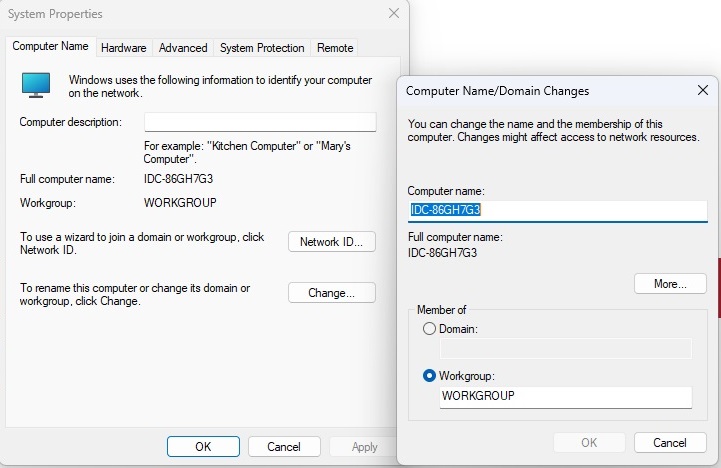
By default your workgroup will probably be named WORKGROUP, however you’ll be able to change it.
Foundry
Checking and altering the workgroup identify in Windows 11 shouldn’t be as handy as altering the pc identify. Type “Workgroup” into the search area on the high left of the Settings app after which click on on “Change workgroup name”. Windows 11 opens a brand new window during which the identify of your workgroup seems after “Workgroup” – it’s “WORKGROUP” by default. If you wish to specify your personal identify, click on on the “Change” button.
Under “Member of”, choose the choice “Workgroup” and enter the identify you need on your workgroup. Windows robotically capitalises the identify. Click on “OK”.
Tip: It shouldn’t be essential to customize the default workgroup “WORKGROUP”. The community in Windows 11 works simply as nicely with the default identify.
Switch on community detection
Windows 11 makes use of community discovery to entry your laptop from different PCs within the dwelling community. The perform gives details about your laptop that different techniques can retrieve. In public networks, community discovery ought to at all times be disabled for safety causes, however it’s required in a personal workgroup community.
Windows 11 usually prompts community discovery robotically while you swap to the “Private” community profile. It is due to this fact typically advisable to set the non-public community profile as a substitute of the general public profile on all Windows computer systems within the dwelling community.
You can discover out whether or not the community detection perform is switched on within the Windows 11 Control Panel. Click on the Windows button, enter “control panel” and click on on the Control Panel app. Click on “Network and internet > View network status and tasks > Change advanced sharing settings.” Windows 11 now shows the settings for the community profiles “Private” and “Guest or Public.” Make certain that the “Switch on network discovery” possibility is chosen beneath “Private.” If essential, click on on “Save changes” and shut the Control Panel.
Check this setting later for all different Windows PCs in your house community and alter their community profile to “Private” if essential. Then examine whether or not the community discovery perform can be activated.
Further studying: 10 Windows 11 tips and tricks we use to customize our PCs
Log in with a Microsoft account
In addition to “File and printer sharing for Microsoft networks,” the suitable community profile and community detection, the consumer rights should even be appropriate for sharing recordsdata and folders in Windows 11. For community entry to a Windows 11 PC, it’s essential to go browsing to the respective laptop with a consumer identify and the corresponding password.
There are two strategies for this: Either you arrange the consumer accounts of the opposite PCs on every PC. Or you should use a central consumer account for all community entry. So that you may entry the information of the opposite PCs as conveniently as doable from any laptop within the community, log in all over the place together with your Microsoft account in Windows 11. Advantage: You don’t must take care of entry rights within the community and might entry your private information anyplace and at any time.
If you might be already logged in to Windows 11 with a Microsoft account, no change is important. If you utilize a neighborhood consumer account, open https://account.microsoft.com/account in your browser and create a brand new account. Then change the account sort within the Windows 11 Settings app beneath “Accounts > Your info.” Click on “Sign in with a Microsoft account instead” and enter your new account particulars.
Show community
After you will have added a minimum of two computer systems to the workgroup as described, Windows 11 shows the 2 techniques within the community surroundings. Open the Explorer by clicking on the file icon within the taskbar or utilizing the Win-E keyboard shortcut. Click on “Network” within the left-hand column. Wait a second till Windows has recognized the techniques within the community, then the related computer systems will seem.
Good to know: After clicking on the “Network” entry on the right-hand aspect, the Explorer in Windows 11 additionally exhibits different gadgets which can be at the moment lively on the community along with your PCs. Depending on the Wi-Fi router and the gadget settings, routers, Wi-Fi repeaters, good dwelling elements, community laborious drives, and media servers additionally seem right here.
The icons make it simple to acknowledge whether or not it’s a pc or one other community gadget. Windows 11 at all times identifies computer systems in Explorer with a monitor image. But watch out: Other gadgets within the community may also fake to be computer systems and are then displayed by Windows 11 with a monitor icon. If it’s not a PC, chances are you’ll obtain an error message while you click on on the icon.
Integrate one other PC with Windows 11 into the community
Additional desktop PCs and notebooks with Windows 11 or earlier variations of the Microsoft working system will be built-in into your Windows 11 community at any time.
If the specified laptop is related to the web by way of the Wi-Fi router, it’s typically prepared for integration into the native community. To entry the community, it’s essential to swap on “File and printer sharing for Microsoft networks” as soon as on the PC on which entry is to happen as described and modify the pc identify and workgroup. The following applies to the pc identify: It could solely happen as soon as in your complete community and should not comprise umlauts or particular characters. The identify of your workgroup should be equivalent to the identify on the pc on which you arrange the community for the primary time.
If the opposite community PCs are usually not displayed in Explorer on the brand new laptop, the troubleshooting software in Windows 11 can assist. It checks the community configuration and gives info on the supply of the issue. You begin it within the Settings app by clicking on “System” and “Troubleshooting.”
Click on “Other troubleshooting” and click on on “Execute” for the “Network adapter” entry within the checklist that seems. Follow the directions of the wizard. Then return to the checklist of troubleshooters and perform the “Internet connections” examine.
This article was translated from German to English and initially appeared on pcwelt.de.